Love this? Save it for later!
Share the inspiration with your friends
This was supposed to be focaccia. I had it all planned out — the good olive oil, the flaky salt, the whole romantic idea of pulling apart a perfect, airy loaf with friends at a dinner party. But somewhere between answering the door for a neighbor who needed a cup of sugar and realizing my yeast was three months past its prime, the plan fell apart. The dough didn’t rise. It sat there like a sad, dense pancake, and I was already running late. I remember staring at that lump of dough, a butter dish melting on the counter, and a head of garlic that I had already started roasting out of habit. I thought, well, this isn’t what I wanted, but maybe I can still save dinner. I grabbed the butter, smashed in the roasted garlic, threw in every herb I could find in the drawer, and just spread it all over that flat dough like I didn’t care. I baked it anyway, honestly expecting a brick. What came out of the oven was nothing like the plan — and better. It was golden, buttery, and so fragrant that my neighbor came back to ask what I was hiding. That was the day I stopped panicking when things went wrong in the kitchen. Maybe you’ve been there — the moment you realize the recipe you had in your head just isn’t happening, and you have to pivot. This cheesy garlic herb pull-apart bread is that pivot. It is forgiving, it is fast, and honestly, it tastes like you spent hours on it. I keep making it because it reminds me that sometimes the best things in life — and in the kitchen — come from a happy little disaster.
Why You’ll Love This Recipe
Let me tell you, after that first accidental batch, I started making this bread on purpose. And it has become my secret weapon for every gathering. This isn’t just another bread recipe — it is the one that disappears before the main course even hits the table.
- Quick & Easy: Comes together in under 40 minutes from start to finish. No kneading, no rising time, no fuss. Perfect for those moments when guests are on their way and you need something impressive fast.
- Simple Ingredients: You probably already have everything in your kitchen. Canned biscuits, butter, garlic, cheese, and herbs. No fancy grocery trips needed — I mean it.
- Perfect for Hosting: This bread was made for dinner parties, potlucks, and festive get-togethers. It sits right in the middle of the table, and everyone just reaches in and grabs a piece. It breaks the ice before anyone even says hello.
- Crowd-Pleaser: I have served this to kids, grandparents, and picky eaters. It gets rave reviews every single time. There is something about the combination of warm, melted cheese and garlic butter that nobody can resist.
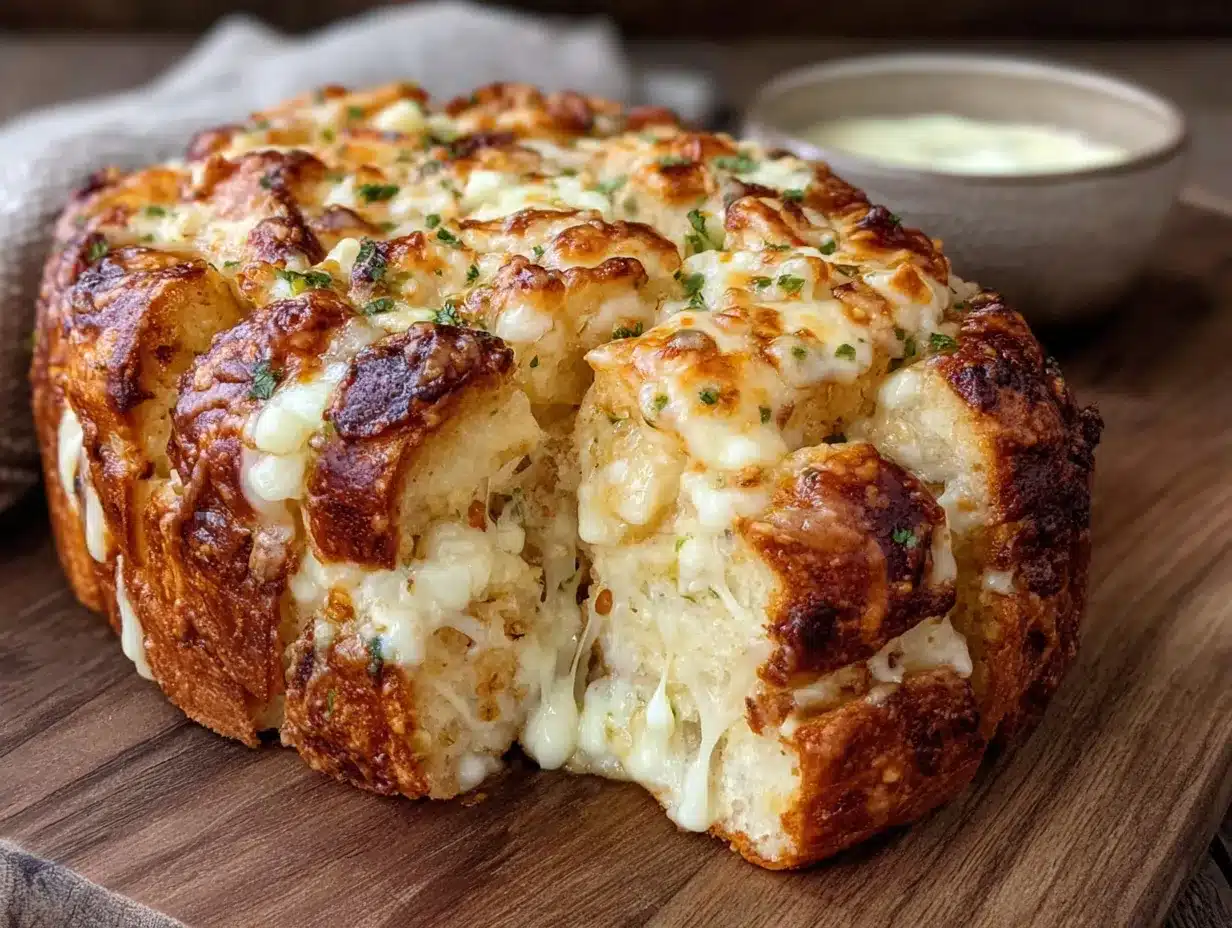
- Unbelievably Delicious: The texture is soft and pillowy on the inside, with these crispy, golden edges where the cheese caramelizes against the pan. It is next-level comfort food that feels indulgent without being complicated.
What makes this recipe different from the rest is the technique. Instead of using homemade dough that requires patience and planning, we use refrigerated biscuit dough as our shortcut. But here is the trick — you season the butter generously, you use freshly grated cheese (please, do yourself a favor and skip the pre-shredded stuff), and you layer everything so that every piece gets a little bit of everything. It isn’t just another version of pull-apart bread. It is the best version because it focuses on flavor and texture, not on proving that you can make dough from scratch.
This recipe is the kind that makes you close your eyes after the first bite. It is comfort food reimagined — faster, easier, but with the same soul-soothing satisfaction. Perfect for impressing guests without stress, or turning a simple dinner into something memorable.
What Ingredients You Will Need
This recipe uses simple, wholesome ingredients to deliver bold flavor and satisfying texture without the fuss. Most of these are pantry staples, which makes this bread perfect for last-minute hosting.
- For the Bread Base:
- 2 cans (16.3 oz each) refrigerated buttermilk biscuits — I recommend Pillsbury Grands! for the best texture. They are fluffy and hold up well to the butter and cheese. Do not use the flaky layers variety; the homestyle or buttermilk style works best here.
- For the Garlic Herb Butter:
- 1/2 cup (1 stick) unsalted butter, melted — Use good quality butter here. It is the foundation of the flavor. Salted butter works too, just reduce the added salt slightly.
- 4 cloves garlic, minced — Fresh garlic is non-negotiable. The pre-minced stuff in a jar has a different flavor and won’t give you that same aromatic punch.
- 1 tablespoon fresh parsley, chopped — Flat-leaf or curly both work. Adds a pop of color and freshness.
- 1 tablespoon fresh chives, chopped — Optional, but I love the mild onion flavor they bring.
- 1 teaspoon dried oregano — Or use 1 tablespoon fresh oregano if you have it.
- 1/2 teaspoon dried thyme — Adds earthiness.
- 1/2 teaspoon salt — Fine sea salt or kosher salt.
- 1/4 teaspoon black pepper — Freshly ground is best.
- For the Cheesy Layer:
- 2 cups (8 oz) shredded mozzarella cheese — Freshly shredded from a block. Pre-shredded cheese has anti-caking agents that prevent it from melting smoothly.
- 1/2 cup (2 oz) grated Parmesan cheese — The real stuff, not the green can. It adds a salty, nutty depth.
- Optional for Garnish:
- Extra fresh parsley or chives — For that final touch before serving.
- Flaky sea salt — A sprinkle on top right out of the oven adds a lovely crunch.
Ingredient Tips: If you want to go the homemade dough route, you absolutely can. But for the purpose of this recipe — quick and easy hosting — the canned biscuits are a lifesaver. I personally prefer the texture of the buttermilk variety. For a gluten-free option, use your favorite gluten-free biscuit dough. I have tried it with a few brands, and it works surprisingly well. Just keep an eye on the baking time, as gluten-free doughs can brown faster.
Equipment Needed
You don’t need much for this recipe, which is part of its beauty. Here is what you will need:
- 9-inch round cake pan or cast-iron skillet — I prefer a cast-iron skillet because it gives you those incredible crispy edges. A regular cake pan works perfectly too. Just make sure it is at least 2 inches deep.
- Mixing bowls — One medium bowl for the garlic herb butter and one small bowl for the cheese mixture.
- Cheese grater — Please, for the love of all things cheesy, grate your own cheese. It takes two minutes and makes a world of difference.
- Garlic press or knife — I use a garlic press because I am lazy, but mincing by hand works just as well.
- Pastry brush — For brushing the butter mixture onto the biscuit pieces. A silicone brush makes cleanup easy.
- Knife or kitchen shears — To cut the biscuits into quarters. Shears are faster and less messy.
Budget-Friendly Tip: If you don’t have a pastry brush, just use a spoon to drizzle the butter. It won’t be as even, but it will still taste amazing. And if you don’t have a cast-iron skillet, a regular 9-inch cake pan is perfectly fine. I have made this bread in disposable aluminum pans for potlucks, and it works great.
Preparation Method
This comes together fast, so I recommend reading through all the steps first. Trust me, you don’t want to be grating cheese while your butter is burning.
- Preheat your oven to 375°F (190°C). Place your oven rack in the middle position. While the oven is heating, grease your 9-inch cake pan or cast-iron skillet generously with butter or non-stick spray. Don’t skimp here — you want that golden crust.
- Prepare the garlic herb butter. In a medium microwave-safe bowl, melt the 1/2 cup of unsalted butter. Add the minced garlic, chopped parsley, chives, dried oregano, dried thyme, salt, and black pepper. Stir everything together. Let it sit for a minute so the garlic infuses the butter. The smell at this point is intoxicating — I always stop and take a deep breath.
- Prepare the cheese mixture. In a small bowl, combine the shredded mozzarella and grated Parmesan. Toss them together with your fingers so they are evenly distributed. Set aside.
- Cut the biscuits. Open both cans of refrigerated biscuits. Separate each biscuit and cut it into quarters. You should have about 32 pieces total. I use kitchen shears for this — it is faster and less messy than a knife. The dough is sticky, so keep your hands lightly floured if needed.
- Layer the bread. Take about one-third of the biscuit pieces and drop them into the prepared pan. They should be in a single layer, slightly overlapping. Using a pastry brush, generously brush the garlic herb butter over the biscuit pieces. Make sure every piece gets some butter — this is where the flavor lives. Sprinkle about one-third of the cheese mixture over the top.
- Repeat the layers. Add another third of the biscuit pieces on top. Brush with more garlic herb butter and sprinkle with another third of the cheese. Repeat one more time with the remaining biscuit pieces, butter, and cheese. You should end with a layer of cheese on top. Don’t worry if it looks messy — that is part of the charm.
- Let it rest (optional but recommended). Let the assembled bread sit on the counter for 10 minutes while the oven finishes preheating. This allows the dough to soften slightly and absorb some of the butter. I have skipped this step when I was in a hurry, and it still turned out great, but the rest helps the flavors meld.
- Bake. Place the pan in the preheated oven and bake for 20-25 minutes, or until the top is golden brown and the cheese is bubbly and starting to brown in spots. The internal temperature should reach about 200°F (93°C) if you want to be precise. I usually start checking at 20 minutes. Every oven is different, so trust your eyes and nose more than the timer.
- Cool slightly and serve. Remove the pan from the oven and let it cool in the pan for 5 minutes. This is important — the cheese needs a moment to set, or it will all slide off when you try to pull the bread apart. After 5 minutes, invert the bread onto a serving plate or serve it directly from the pan. Sprinkle with extra fresh parsley and a pinch of flaky sea salt if you are feeling fancy.
Sensory Cue: You will know it is done when the kitchen smells like a garlic bread factory and the top is a deep golden brown with little pools of bubbly cheese. The edges should be crispy and caramelized. If you tap the top, it should sound hollow-ish.
Cooking Tips & Techniques
I have made this bread more times than I can count, and I have learned a few things the hard way. Let me save you some trouble.
Don’t overmix the butter. When you add the garlic and herbs, just stir until combined. If you beat it too much, the butter can become greasy and separate. You want it emulsified, not broken.
Grate your own cheese. I know I said this already, but I am saying it again. Pre-shredded cheese is coated in cellulose and starch to prevent clumping, which also prevents it from melting into that gooey, stretchy goodness we all want. Take the extra two minutes. Your taste buds will thank you.
Watch the garlic. Fresh garlic can burn easily in the oven. If you mince it too fine, it will turn bitter. I like to chop it into small, but not tiny, pieces. If you are nervous about burned garlic, you can sauté the garlic in the butter for 30 seconds on the stove before adding the herbs. Just don’t let it brown.
One mistake I made early on: I used too much butter. I thought, more butter equals more flavor, right? Wrong. The bread became soggy and greasy. Stick to the 1/2 cup. It is the perfect amount to coat the biscuit pieces without drowning them. Trust me on this one.
Timing strategy for hosting: Assemble the bread up to the point of baking, cover it with plastic wrap, and refrigerate it for up to 2 hours. When your guests arrive, just pop it in the oven. It will take a few extra minutes to bake since it is cold, but you get that fresh-from-the-oven magic without the stress of doing everything at the last minute.
For consistent results: Use a kitchen scale to weigh your cheese if you have one. 2 cups of shredded mozzarella can vary wildly depending on how finely you grate it. 8 ounces is 8 ounces, and it gives you consistent results every time.
Variations & Adaptations
This recipe is incredibly versatile. I have played around with it more times than I can count, and here are some of my favorite variations.
Spicy Jalapeño Popper Version: Add 1/4 cup of diced pickled jalapeños and 4 oz of cream cheese, cut into small cubes, between the layers. The cream cheese melts into these little pockets of tangy goodness, and the jalapeños cut through the richness. I made this for a Super Bowl party, and it was gone in ten minutes.
Herb and Sun-Dried Tomato: Swap the fresh parsley and chives for 1/4 cup of chopped sun-dried tomatoes (drained of oil) and 1 tablespoon of fresh rosemary. The sun-dried tomatoes add a sweet, tangy chewiness that pairs beautifully with the garlic. This version feels a little more sophisticated, perfect for a dinner party.
Gluten-Free Adaptation: Use your favorite gluten-free refrigerated biscuit dough. I have tried this with a few brands, and it works well. The texture is slightly denser, but the flavor is still incredible. Just check the baking time at 18 minutes, as gluten-free doughs can brown faster.
Dairy-Free Version: Use a high-quality vegan butter stick (not the spreadable kind) and dairy-free mozzarella and Parmesan shreds. I have had good results with Miyoko’s vegan butter and Violife cheeses. The texture is a little less stretchy, but the flavor is still rich and satisfying.
Breakfast Pull-Apart Bread: Omit the garlic and herbs, and add 1/2 cup of cooked, crumbled breakfast sausage and 1/4 cup of chopped green onions. Use cheddar cheese instead of mozzarella and Parmesan. This version is a hit at brunch. I served it alongside scrambled eggs, and everyone went back for seconds.
Serving & Storage Suggestions
This bread is best served warm, straight from the oven. The cheese is stretchy, the butter is melted, and the edges are crispy. That is the peak experience. But I understand that you might have leftovers — or you might want to make it ahead.
Serving Temperature: Serve it hot, or at least warm. If it cools down completely, the cheese firms up and the bread loses some of its magic. If you need to keep it warm for a party, place it in a 200°F (93°C) oven for up to 30 minutes. Cover it loosely with foil if the top starts to brown too much.
Presentation Tips: Serve it in the cast-iron skillet or cake pan for a rustic, family-style look. Place it on a wooden board or a trivet in the center of the table. Let everyone pull off their own piece. It is interactive and fun, and it gets people talking. I like to put a small bowl of marinara sauce or garlic aioli on the side for dipping.
What to Serve Alongside: This bread pairs beautifully with a simple green salad dressed with a lemon vinaigrette to cut through the richness. It is also perfect alongside a bowl of tomato soup, a hearty pasta dish, or a roasted chicken. For a party, serve it as an appetizer with a cheese board and some olives.
Storage Instructions: Store leftovers in an airtight container at room temperature for up to 2 days. You can also refrigerate it for up to 4 days. The texture will soften, but the flavor remains.
Reheating Methods: The best way to reheat is in a 350°F (175°C) oven for 5-8 minutes, or until the cheese is bubbly again. You can also use an air fryer at 325°F (160°C) for 3-4 minutes. The microwave works in a pinch, but the bread will be soft and the cheese will be chewy, not stretchy. I don’t recommend it unless you are really in a hurry.
How Flavors Develop: Honestly, this bread is at its peak right out of the oven. The flavors don’t improve with time the way a stew or a curry might. But if you have leftovers, they make an incredible breakfast — just reheat and enjoy with a cup of coffee.
Nutritional Information & Benefits
Let’s be real — this is indulgent food. It is butter, cheese, and biscuits. But that doesn’t mean it can’t fit into a balanced lifestyle. Here is the estimated nutritional breakdown per serving (based on 8 servings):
- Calories: Approximately 420-480 per serving
- Fat: 28-32g (with about 15-18g saturated fat)
- Carbohydrates: 34-38g
- Protein: 12-15g
- Fiber: 1-2g
- Sodium: 800-950mg
Health Benefits of Key Ingredients: Garlic is known for its immune-boosting properties and anti-inflammatory benefits. Fresh herbs like parsley and chives are rich in vitamins A, C, and K. Mozzarella cheese provides calcium and protein. So while this isn’t a health food, it does have some redeeming qualities.
Dietary Considerations: This recipe is vegetarian. It can be made gluten-free and dairy-free with the substitutions mentioned in the variations section. It is not suitable for vegan diets without significant modifications. It contains wheat, dairy, and potentially soy (depending on the biscuit brand).
Personal Perspective: I believe in balance. I serve this bread alongside a big salad or a vegetable-heavy main dish. That way, everyone gets their greens, and then they can indulge in a piece (or three) of this cheesy, buttery goodness. Food is about joy, not guilt.
Conclusion
This cheesy garlic herb pull-apart bread is the recipe I turn to again and again. It started as a mistake, but it has become a staple in my hosting rotation. It is forgiving, it is fast, and it never fails to impress. The combination of warm, melted cheese, fragrant garlic butter, and soft, pillowy bread is simply irresistible.
I encourage you to make this recipe your own. Play with the herbs. Try different cheeses. Add some heat or some sweetness. The base is so simple that it invites creativity. And when you pull that pan out of the oven and see the golden, bubbly top, you will feel that little thrill of accomplishment. You made that. You turned a few simple ingredients into something that brings people together.
I would love to hear how it turns out for you. Did you try a variation? Did your guests fight over the last piece? Leave a comment below and share your experience. And if you loved it, please share this recipe with a friend who loves to host. Happy cooking, friend. You’ve got this.
Frequently Asked Questions
Can I use homemade dough instead of canned biscuits?
Absolutely. If you have a favorite pizza dough or bread dough recipe, you can use it here. Roll it out to about 1/2-inch thickness, cut it into 2-inch squares, and proceed with the layering. The baking time may increase by 5-10 minutes, depending on the dough.
Can I make this bread ahead of time and bake it later?
Yes. Assemble the bread completely in the pan, cover it tightly with plastic wrap, and refrigerate for up to 2 hours. When you are ready to bake, remove the plastic wrap and add 5-8 minutes to the baking time since the dough is cold. Do not refrigerate it longer than 2 hours, or the biscuits can become soggy.
Why did my bread turn out soggy?
Sogginess usually comes from too much butter or overcrowding the pan. Stick to the 1/2 cup of butter and make sure your biscuit pieces are in a single layer (with slight overlapping) rather than piled high. Also, make sure your oven is fully preheated before baking.
Can I freeze this pull-apart bread?
Yes, but with a caveat. Baked bread freezes well for up to 1 month. Wrap it tightly in foil and then place it in a freezer bag. To reheat, thaw in the refrigerator overnight and then warm in a 350°F (175°C) oven for 10-12 minutes. The texture will be slightly softer than fresh, but it is still delicious. I do not recommend freezing the unbaked assembled bread, as the biscuits can become mushy when thawed.
What other cheeses can I use?
This recipe is very flexible. Try a mix of provolone and fontina for a creamier texture. Use sharp cheddar for a bolder flavor. Add some smoked gouda for a smoky twist. Just avoid very hard cheeses like aged Parmesan (a little is fine) or very wet cheeses like fresh mozzarella, as they can make the bread watery.
Pin This Recipe!
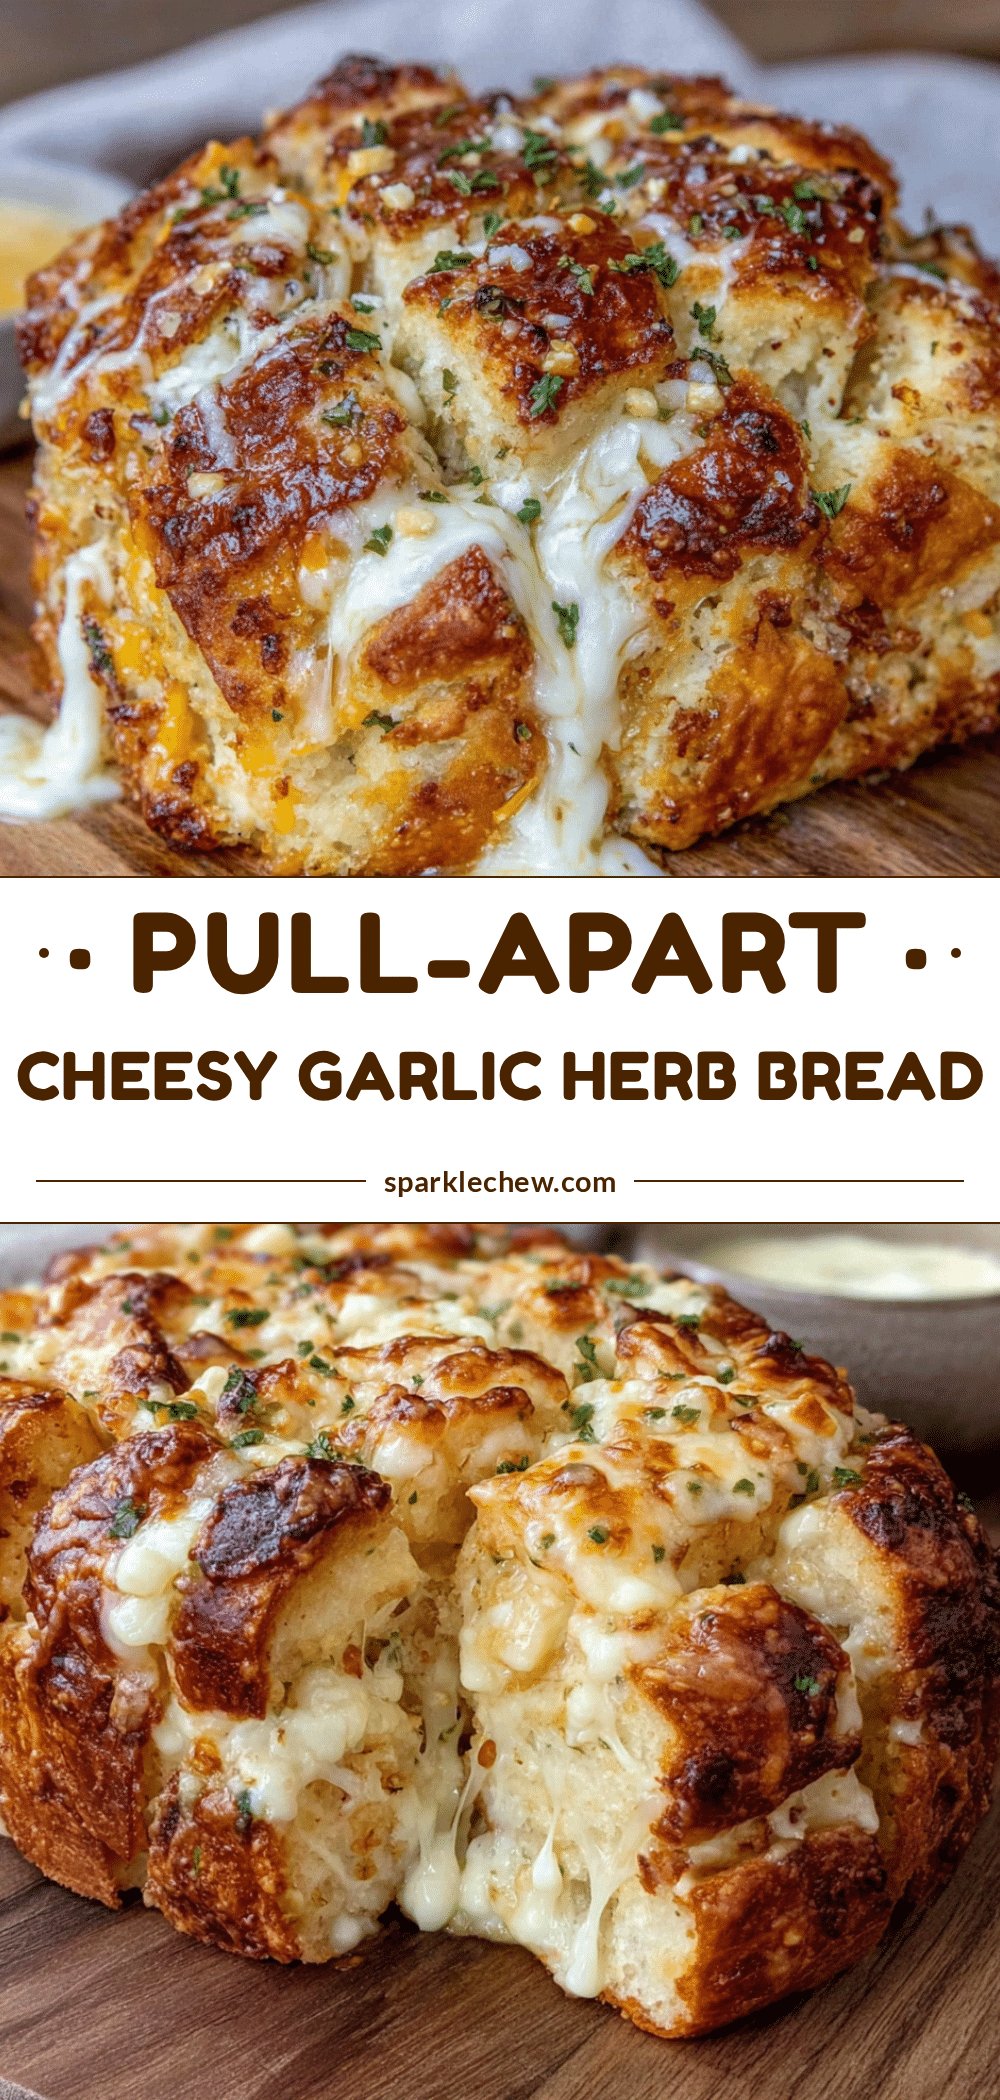
Cheesy Garlic Herb Pull-Apart Bread
This cheesy garlic herb pull-apart bread is a quick and easy recipe that comes together in under 40 minutes. Made with refrigerated biscuit dough, garlic herb butter, and a blend of mozzarella and Parmesan cheeses, it’s the perfect crowd-pleasing appetizer or side dish for any gathering.
- Prep Time: 15 minutes
- Cook Time: 25 minutes
- Total Time: 40 minutes
- Yield: 8 servings 1x
- Category: Appetizer
- Cuisine: American
Ingredients
- 2 cans (16.3 oz each) refrigerated buttermilk biscuits (recommended: Pillsbury Grands!)
- 1/2 cup (1 stick) unsalted butter, melted
- 4 cloves garlic, minced
- 1 tablespoon fresh parsley, chopped
- 1 tablespoon fresh chives, chopped (optional)
- 1 teaspoon dried oregano
- 1/2 teaspoon dried thyme
- 1/2 teaspoon salt
- 1/4 teaspoon black pepper
- 2 cups (8 oz) shredded mozzarella cheese
- 1/2 cup (2 oz) grated Parmesan cheese
- Extra fresh parsley or chives for garnish (optional)
- Flaky sea salt for garnish (optional)
Instructions
- Preheat your oven to 375°F (190°C). Grease a 9-inch round cake pan or cast-iron skillet generously with butter or non-stick spray.
- In a medium microwave-safe bowl, melt the 1/2 cup of unsalted butter. Add the minced garlic, chopped parsley, chives, dried oregano, dried thyme, salt, and black pepper. Stir to combine and let sit for a minute.
- In a small bowl, combine the shredded mozzarella and grated Parmesan. Toss together and set aside.
- Open both cans of refrigerated biscuits. Separate each biscuit and cut into quarters (about 32 pieces total).
- Layer one-third of the biscuit pieces in the prepared pan. Brush generously with the garlic herb butter. Sprinkle one-third of the cheese mixture over the top.
- Repeat with another third of the biscuit pieces, more butter, and another third of the cheese. Repeat one more time with the remaining biscuit pieces, butter, and cheese, ending with a layer of cheese on top.
- Let the assembled bread rest on the counter for 10 minutes (optional but recommended).
- Bake for 20-25 minutes, or until the top is golden brown and the cheese is bubbly and starting to brown in spots. The internal temperature should reach about 200°F (93°C).
- Remove from the oven and let cool in the pan for 5 minutes. Serve warm, directly from the pan or inverted onto a serving plate. Garnish with extra fresh parsley and flaky sea salt if desired.
Notes
For best results, use freshly grated cheese and avoid pre-shredded cheese which contains anti-caking agents. If the bread becomes soggy, it may be due to too much butter or overcrowding the pan. The bread can be assembled up to 2 hours ahead and refrigerated before baking; add 5-8 minutes to the baking time if baking from cold.
Nutrition
- Serving Size: 1 serving (approxima
- Calories: 450
- Sugar: 4
- Sodium: 875
- Fat: 30
- Saturated Fat: 16
- Carbohydrates: 36
- Fiber: 1
- Protein: 13
Keywords: pull-apart bread, cheesy garlic bread, easy appetizer, party bread, biscuit bread, garlic herb bread