Love this? Save it for later!
Share the inspiration with your friends
My friend Jen asked me why I couldn’t just use a regular knife to slice the oranges for my cocktail garnish. I started explaining—with way too much confidence, honestly—that you needed a mandoline for even slices. Otherwise they’d cook unevenly and look terrible. She shrugged and said she’d just use her sharpest chef’s knife. I let out this little sigh, the kind that says “fine, but don’t come crying to me when they’re ruined.”
Well. Let me tell you. Her slices were perfect. More perfect than mine, if I’m being honest. And I had to stand there in her kitchen, eating humble pie with my perfectly imperfect mandoline-sliced oranges. It was a Tuesday afternoon, and I remember staring at her cutting board thinking, “How did I get this far in life being this stubborn about something so small?” The answer is simple—I’d never actually tried it her way.
That day changed how I approach these sun-kissed oven-dried orange slices for cocktails. I stopped being a snob about the tools and started paying attention to what actually worked. And you know what? The best oven-dried orange slices come from paying attention, not from having fancy equipment. Maybe you’ve been there too—clinging to a method someone taught you, convinced it’s the only way. I’m here to tell you there’s another path, and it starts with letting go of a little kitchen perfectionism.
These orange slices have become my signature party trick. They sit in a jar on my counter, catching the afternoon light, waiting for someone to drop one into a glass of something bubbly. And every time I see them, I think about that afternoon with Jen and how being wrong turned out to be the best thing that could have happened to my cocktail game.
Why You’ll Love This Recipe
These oven-dried orange slices are the kind of thing that makes people think you spent way more effort than you actually did. They look like something from a fancy cocktail bar, but honestly? They’re almost embarrassingly easy to make.
- Simple Ingredients: Just oranges and time. That’s it. No sugar syrups, no special preservatives, nothing weird.
- Set It and Forget It: The oven does all the work. You slice, arrange, and walk away for a few hours.
- Lasts Forever: Stored properly, these beauties keep for months. Make a big batch and you’re set for every cocktail hour.
- Instant Party Upgrade: Drop one in a glass of gin and tonic or champagne, and suddenly your drink looks like it costs fifteen dollars.
- Zero Waste: Use the leftover orange flesh for juice, and the peels for cleaning or baking. Nothing goes to waste.
What makes these different from every other dried orange slice recipe out there? It’s the low-and-slow method. Most recipes rush the process at higher temperatures, which can burn the edges or leave the centers chewy. My approach uses a gentle 170°F, which gives you that perfect, translucent, candy-like finish every single time. I learned this after ruining three batches in a row—two burned, one came out leathery and gross. The fourth batch? Pure magic.
This recipe isn’t just good—it’s the kind that makes you close your eyes after the first sip of your cocktail. It’s a small touch that makes a big difference. And honestly, in a world where we’re all trying to make ordinary moments feel special, these little orange suns do exactly that.
What Ingredients You Will Need
This recipe uses the simplest ingredients to deliver the most beautiful results. The magic is in the technique, not the grocery list. Here’s what you’ll need:
- Oranges (3-4 large): Navel oranges are my go-to for their sweetness and seedless interior. Look for firm, heavy oranges with bright, unblemished skin. Organic is worth it here since you’re eating the peel. Blood oranges make stunning deep-red slices, and cara cara oranges give a lovely pinkish hue.
- Paper towels: For blotting the slices before they go in the oven. This step is non-negotiable—excess moisture leads to steaming instead of drying.
- Parchment paper: Line your baking sheets to prevent sticking. Trust me on this one. I tried using silicone mats once and the slices stuck like glue.
Optional but lovely additions:
- Granulated sugar (1-2 tablespoons): A light dusting before baking gives a subtle sweetness and a slight sparkle. Skip if you want a more natural look.
- Cinnamon sticks or star anise: Place on the baking sheet alongside the oranges for a subtle aromatic infusion. The scent while they bake is incredible.
- Vanilla extract (1 teaspoon): Brush lightly onto slices before baking for a warm, sweet aroma. I tried this on a whim and now I never skip it.
For the best texture, I recommend using oranges that are at room temperature. Cold oranges from the fridge are harder to slice evenly, and the juice is more likely to squirt everywhere. Let them sit on the counter for an hour before you start.
If you’re feeling adventurous, try this with lemons or grapefruits too. The process is identical, and you’ll end up with a gorgeous rainbow of dried citrus. I keep a jar of mixed citrus slices on my bar cart and they’re always the first thing guests notice.
Equipment Needed
You don’t need much for this recipe, which is part of its charm. Here’s what you’ll need:
- Sharp knife or mandoline slicer: A sharp chef’s knife works beautifully—Jen proved that to me. A mandoline gives you perfectly even slices if you have one, but it’s not essential. Just be careful either way. I have the scars to prove mandolines are dangerous.
- Cutting board: Any stable cutting board will do. I prefer a large wooden one because it doesn’t slip around.
- Baking sheets (2-3): You’ll need enough surface area to arrange the slices in a single layer without overlapping. Crowding them leads to uneven drying.
- Parchment paper: Non-negotiable for easy cleanup and preventing stuck slices.
- Paper towels: For blotting the slices before baking. This step makes a huge difference in the final texture.
- Airtight container: For storing the finished slices. A mason jar works perfectly and looks beautiful on the counter.
If you don’t have a mandoline, don’t run out and buy one. A sharp knife and a steady hand will give you beautiful results. I actually prefer knife-cut slices now because they have a more organic, handmade look. The mandoline slices are too perfect—they look machine-made.
Preparation Method
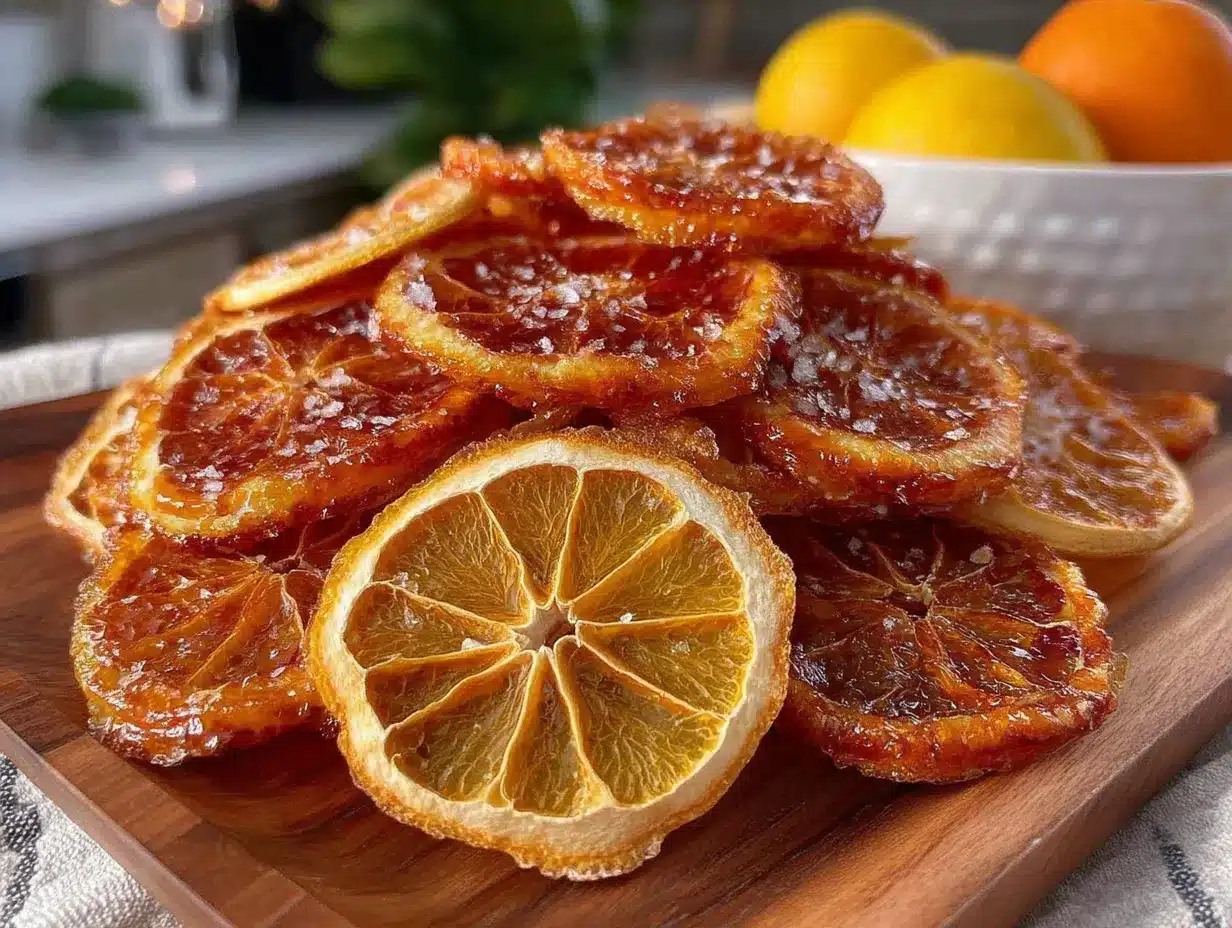
Here’s how to make these sun-kissed beauties. Follow these steps, and you’ll have perfect oven-dried orange slices every single time.
- Preheat your oven to 170°F (77°C). Yes, this is very low. That’s the point. If your oven doesn’t go this low, set it to the lowest temperature available and prop the door open slightly with a wooden spoon. I’ve had to do this in every apartment I’ve ever lived in—ovens are never as accurate as we want them to be.
- Wash and dry the oranges thoroughly. Scrub the skins gently to remove any wax or residue. Pat them completely dry. Wet oranges are slippery oranges, and slippery oranges lead to sliced fingers.
- Slice the oranges into even rounds, about ¼-inch (6mm) thick. This is the most important step. Too thin and they’ll burn. Too thick and they won’t dry properly. Use your knife or mandoline with a steady, even pressure. You should get about 8-10 slices per orange, depending on size.
- Blot the slices gently with paper towels. Lay them out on a clean kitchen towel or paper towels and press another layer on top to absorb excess juice. This step removes surface moisture, which helps the slices dry evenly instead of steaming. Don’t squeeze—just blot gently.
- Arrange the slices on parchment-lined baking sheets. Make sure they’re in a single layer with no overlapping. Leave a little space between each slice for air circulation. If they’re touching, they’ll stick together and dry unevenly.
- Optional: Dust with sugar. If you’re using sugar, sprinkle a light, even layer over the tops of the slices. A fine-mesh strainer works beautifully for this. Go easy—you can always add more, but you can’t take it away.
- Bake for 3-4 hours, flipping halfway through. The exact time depends on your oven, the humidity in your kitchen, and the thickness of your slices. Start checking at the 3-hour mark. You’re looking for slices that are dry to the touch but still slightly pliable. They should not be crispy or brittle.
- Let them cool completely on the baking sheets. They’ll continue to dry as they cool. Don’t skip this step—moving them while they’re warm can cause them to stick or break.
- Store in an airtight container. Once completely cool, transfer your sun-kissed oven-dried orange slices to a jar or container. They’ll keep for months at room temperature, though I doubt they’ll last that long.
Sensory cues to watch for: At the 2-hour mark, your kitchen will smell like a citrus orchard. The edges of the slices will start to look translucent. When they’re done, the slices should feel leathery, not sticky. If they feel tacky, give them another 30 minutes and check again.
One thing I learned the hard way—don’t walk away and forget about them. I did that once, got distracted by a phone call, and came back to slices that were more like orange-colored crackers. Still pretty, but they shattered when I tried to put them in a glass. Learn from my mistakes, friends.
Cooking Tips & Techniques
After making about a zillion batches of these (okay, maybe a dozen), I’ve collected some hard-won wisdom. Here’s what I wish someone had told me the first time.
Uniform thickness is everything. I cannot stress this enough. Slices that vary in thickness will dry at different rates. The thin ones will burn while the thick ones are still wet. Take your time with this step. If you’re using a knife, use a smooth, single motion rather than sawing back and forth. Sawing creates uneven edges that dry funny.
Don’t crowd the pan. I know it’s tempting to cram as many slices as possible onto each baking sheet. Resist the urge. Airflow is crucial for even drying. If you have to do two batches, do two batches. Your patience will be rewarded.
Rotate your pans. Ovens have hot spots. Halfway through baking, swap the top and bottom racks and rotate the pans front to back. This ensures every slice gets the same treatment. I learned this after one batch came out with perfectly dried slices on one side and slightly underdone ones on the other.
Check for doneness by feel, not sight. Dried orange slices can look done when they’re still moist in the center. Gently touch one—it should feel dry and leathery, like soft fruit leather. If it feels sticky or tacky, it needs more time.
Let them cool completely before storing. This is the step everyone wants to rush, but it’s crucial. Warm slices release moisture into the container, which can cause mold to develop. Give them at least an hour on the counter before you move them to a jar.
One more thing—don’t throw away the orange scraps. The leftover fruit (after you’ve taken the center slices) makes amazing juice, and the peels can be candied or used to make cleaning vinegar. I keep a bag in the freezer for this purpose. Zero waste, maximum flavor.
Variations & Adaptations
Once you’ve mastered the basic sun-kissed oven-dried orange slices, the possibilities are endless. Here are some of my favorite variations:
Spiced Orange Slices: Before baking, mix a teaspoon of cinnamon, half a teaspoon of nutmeg, and a pinch of cloves with your sugar. Sprinkle this over the slices for a holiday-inspired version. These are incredible in mulled wine or hot toddies. I made these for a Christmas party last year and they were gone within an hour.
Herb-Infused Slices: Lay fresh rosemary or thyme sprigs on the baking sheet next to the oranges. The herbs release their oils as they warm, infusing the slices with a subtle savory note. These are perfect for gin-based cocktails or even as a garnish for roasted chicken dishes. Trust me on this one—it sounds weird but it works.
Honey-Glazed Slices: Mix a tablespoon of honey with a teaspoon of warm water and brush it lightly over the slices before baking. This gives them a gorgeous glossy finish and a subtle sweetness. Be careful not to use too much, or they’ll take forever to dry.
Dietary Adaptations: This recipe is naturally gluten-free, vegan, and dairy-free. If you’re watching your sugar intake, skip the optional sugar dusting entirely—the natural sweetness of the oranges is plenty. For a low-histamine diet, use fresh oranges rather than pre-sliced ones from a store, as older citrus can have higher histamine levels.
Other Citrus: Try this with lemons, limes, grapefruits, or even kumquats. Each citrus variety will have a slightly different drying time—thinner-skinned fruits like limes will dry faster, while thicker-skinned grapefruits will take longer. Keep an eye on them and adjust accordingly.
Serving & Storage Suggestions
These sun-kissed oven-dried orange slices are incredibly versatile. Here’s how to use and store them:
Serving Ideas: Drop a slice into a glass of champagne, prosecco, or sparkling water for an instant upgrade. They’re stunning in gin and tonics, old fashioneds, or any cocktail that benefits from a citrus garnish. You can also use them as a decorative element on cakes, cheeseboards, or even as a stirrer for hot tea. I once used them to garnish a batch of cupcakes and people lost their minds.
Presentation Tip: For cocktails, cut a small slit in the slice and perch it on the rim of the glass. Or float it directly in the drink—it’ll slowly rehydrate and release its flavor. For a dramatic look, thread several slices onto a skewer and use it as a garnish for a pitcher of sangria.
Storage: Keep your dried orange slices in an airtight container at room temperature. A glass jar with a tight-fitting lid works perfectly. They’ll stay beautiful for up to 6 months if stored properly. Avoid storing them in the refrigerator—the humidity will cause them to soften and potentially mold.
Rehydrating: If your slices have been sitting for a while and seem too brittle, you can soften them by placing them in a sealed container with a slice of fresh bread for a few hours. The bread releases moisture that the slices will absorb. This trick has saved many a batch for me.
Flavor Development: Interestingly, the flavor of these slices deepens over time. After about a week in the jar, the citrus oils have mellowed and the sweetness becomes more pronounced. They’re good right away, but they’re spectacular after a week or two. If you can wait that long, you’ll be rewarded.
Nutritional Information & Benefits
While these sun-kissed oven-dried orange slices are primarily used as a garnish, they do offer some nutritional benefits worth noting:
One dried orange slice (approximately 5g) contains roughly 10-15 calories, 2-3g of carbohydrates, and 1g of sugar. The drying process concentrates the natural sugars, so the flavor is more intense than fresh orange slices.
Health Highlights:
- Vitamin C: Oranges are famous for their vitamin C content, and while some is lost during the drying process, a good amount remains. One slice provides about 5% of your daily vitamin C needs.
- Fiber: The peel contains pectin, a type of soluble fiber that supports digestive health. Eating the whole slice (peel and all) gives you this benefit.
- Antioxidants: Oranges are rich in flavonoids, particularly hesperidin, which has anti-inflammatory properties. These compounds are concentrated in the peel, so you’re getting a good dose with each slice.
- Low Calorie: At just 10-15 calories per slice, they’re a guilt-free way to add flavor and visual appeal to your drinks.
Dietary Considerations: This recipe is naturally gluten-free, vegan, dairy-free, nut-free, and soy-free. The only potential allergen is the orange itself for anyone with citrus allergies. If you’re on a low-sugar diet, skip the optional sugar dusting and enjoy the natural sweetness of the fruit.
I personally love that these slices let me enjoy the nutritional benefits of the peel, which I’d normally throw away. It feels good to use the whole fruit and get all those extra nutrients in the process.
Frequently Asked Questions
Can I use a dehydrator instead of an oven?
Absolutely! A dehydrator works beautifully for this recipe. Set it to 135°F (57°C) and dry for 6-8 hours, or until the slices feel leathery. The lower temperature takes longer but gives you even more control over the final texture. I actually prefer my dehydrator for large batches because I can run it overnight without worrying about the oven being on.
Why are my dried orange slices turning brown?
Some browning is normal, especially around the edges. But if your slices are turning dark brown or black, your oven temperature is too high. Remember—low and slow is the key. Also, make sure you’re blotting the slices thoroughly before baking. Excess moisture can cause uneven drying and lead to browning. If your slices are browning too quickly, try reducing the temperature by 10-15 degrees.
How do I know when the orange slices are fully dried?
The slices should feel dry to the touch and be slightly pliable, like soft fruit leather. They should not be crispy or brittle. When you bend one gently, it should flex without cracking. If it snaps, it’s over-dried. If it feels sticky or tacky, it needs more time. Trust your senses—touch is more reliable than sight for this recipe.
Can I dry other fruits using this same method?
Yes! This method works beautifully for lemons, limes, grapefruits, and even apples or pears. Each fruit will have a slightly different drying time, so keep an eye on them. Thinner slices dry faster, and fruits with higher water content (like grapefruits) take longer. I’ve done mixed batches of oranges and lemons together, and they turn out beautifully as long as they’re sliced to the same thickness.
How long do these dried orange slices last?
Stored properly in an airtight container at room temperature, they’ll last 6 months or more. Keep them away from direct sunlight and moisture. If you live in a humid climate, you might want to add a silica gel packet to the container to absorb excess moisture. I’ve had jars last well over a year, though the color does fade slightly over time. The flavor remains beautiful, just more subtle.
Conclusion
These sun-kissed oven-dried orange slices have become a staple in my kitchen, and I have a feeling they’ll become one in yours too. They’re proof that the simplest things often bring the most joy—a slice of dried fruit floating in a glass, catching the light, turning an ordinary drink into something special.
What I love most about this recipe is how forgiving it is. Even if your slices aren’t perfectly uniform, even if you forget to flip them at the halfway point, they’ll still be beautiful and delicious. They’ll still impress your friends and make your cocktails feel like a celebration. And honestly? That’s what cooking should be about—not perfection, but connection. Connection to the food, to the moment, to the people you’re sharing it with.
I’d love to hear how these turn out for you. Drop a comment below and tell me what cocktail you garnished with them, or tag me in your photos if you share them online. And if you come up with a brilliant variation I haven’t tried, please share it—I’m always learning, always adapting, and always grateful for the wisdom of this community.
Now go slice some oranges. Your cocktails are waiting.
PrintSun-Kissed Oven-Dried Orange Slices – Perfect Cocktail Garnish

These oven-dried orange slices are the perfect cocktail garnish, made with just oranges and time. They look like something from a fancy cocktail bar but are almost embarrassingly easy to make.
- Prep Time: 15 minutes
- Cook Time: 3-4 hours
- Total Time: 3 hours 15 minutes to 4 hours 15 minutes
- Yield: 24-40 slices 1x
- Category: Garnish
- Cuisine: American
Ingredients
- 3–4 large oranges (navel, blood, or cara cara)
- Paper towels (for blotting)
- Parchment paper
- 1–2 tablespoons granulated sugar (optional)
- Cinnamon sticks or star anise (optional)
- 1 teaspoon vanilla extract (optional)
Instructions
- Preheat your oven to 170°F (77°C). If your oven doesn’t go this low, set it to the lowest temperature available and prop the door open slightly with a wooden spoon.
- Wash and dry the oranges thoroughly. Scrub the skins gently to remove any wax or residue. Pat them completely dry.
- Slice the oranges into even rounds, about ¼-inch (6mm) thick. You should get about 8-10 slices per orange, depending on size.
- Blot the slices gently with paper towels to remove surface moisture. Don’t squeeze—just blot gently.
- Arrange the slices on parchment-lined baking sheets in a single layer with no overlapping. Leave a little space between each slice for air circulation.
- Optional: Dust with sugar using a fine-mesh strainer for a light, even layer.
- Bake for 3-4 hours, flipping halfway through. Start checking at the 3-hour mark. The slices should be dry to the touch but still slightly pliable.
- Let them cool completely on the baking sheets. They’ll continue to dry as they cool.
- Store in an airtight container at room temperature. They’ll keep for months.
Notes
Uniform thickness is crucial for even drying. Don’t crowd the pan—airflow is important. Rotate pans halfway through baking. Check for doneness by feel: slices should be dry and leathery, not sticky or brittle. Let cool completely before storing to prevent mold. For a dehydrator, set to 135°F (57°C) and dry for 6-8 hours.
Nutrition
- Serving Size: 1 slice
- Calories: 1015
- Sugar: 1
- Carbohydrates: 23
- Fiber: 0.5
Keywords: dried orange slices, oven-dried oranges, cocktail garnish, citrus garnish, homemade garnish, orange garnish