Love this? Save it for later!
Share the inspiration with your friends
My friend Dave asked why I couldn’t just skip the separate dough chilling step and pop the baking sheet straight into the freezer for ten minutes instead. I started to explain why that wouldn’t work — something about texture, about the butter needing to firm up slowly. Then I stopped. Honestly, I had no good reason. I’d just always done it that way because that’s how my grandmother’s recipe card said to. So I shrugged, told him to give it a shot, and watched him scoop the dough, roll it, and slide the tray into the freezer. Ten minutes later, those little rounds of dough were perfect — firm, not sticky, ready for their thumbprint indents. The cookies baked up just as tender and buttery as my grandma’s ever did, maybe even a little better because the centers stayed softer.
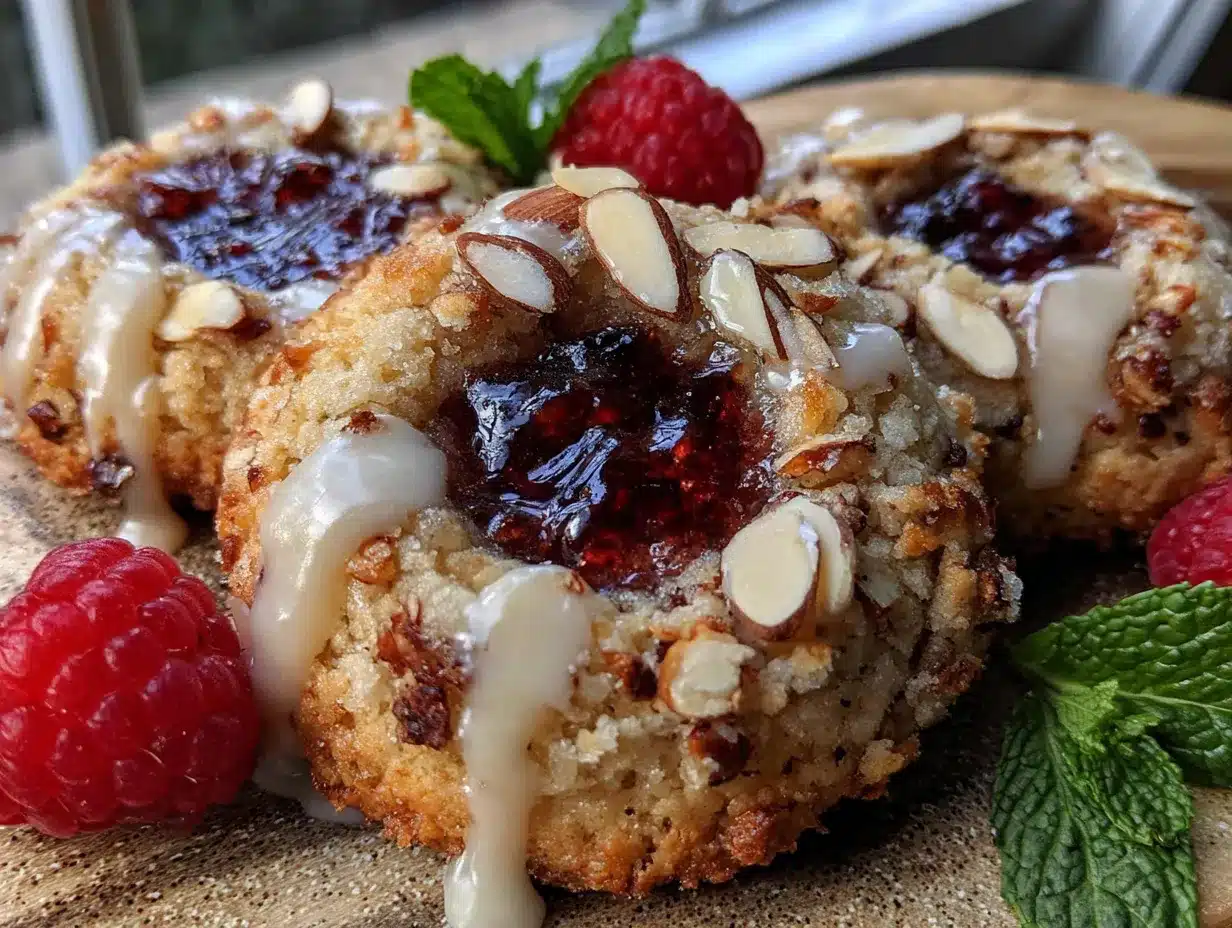
That moment stuck with me. It made me think about all the times I’ve followed a recipe like it was carved in stone, never questioning if there was a smarter, faster way. And these cookies — these cozy raspberry almond thumbprint cookies with vanilla glaze — they’re the result of that lesson. They’re the cookie I make when I need something that feels like a hug, when the air gets crisp and the days feel shorter. The raspberry jam bubbles up in the center, the almond adds this warm, nutty undertone, and the vanilla glaze on top? It’s the kind of sweet finish that makes you close your eyes after the first bite. Maybe you’ve been there — standing in your kitchen, flour on your counter, and you just need a recipe that works without a million fussy steps. That’s this one.
I keep coming back to these cookies because they remind me that sometimes the best cooking advice comes from the person who doesn’t know any better. Dave didn’t know you were “supposed” to chill the dough in the fridge for an hour. He just knew what made sense in the moment. And honestly, that’s the kind of cooking I want to share — practical, forgiving, and absolutely delicious.
Why You’ll Love This Recipe
Let me tell you why these cookies have earned a permanent spot in my holiday rotation and my regular Tuesday afternoon baking sessions. They’re not just another thumbprint cookie — they’re the one that gets requested every single time.
- Quick & Easy: From start to finish, these come together in about 45 minutes. The freezer trick cuts the chilling time down to just 10 minutes, so you’re not waiting around forever.
- Simple Ingredients: Butter, sugar, flour, almond extract, raspberry jam, and a little vanilla for the glaze. You probably have most of this in your pantry right now.
- Perfect for Cozy Evenings: These cookies were made for cold weather, slow afternoons, and those nights when you just want to curl up with something sweet and a hot cup of tea.
- Crowd-Pleaser: I’ve brought these to cookie swaps, potlucks, and family dinners. They disappear fast. Kids love the jam center, and adults appreciate the sophisticated almond flavor.
- Unbelievably Delicious: The texture is what gets me every time — a tender, buttery shortbread-like base with a soft, jammy center and a glossy vanilla finish. It’s comfort food in cookie form.
What makes this recipe different from the rest? It’s the almond extract. Most thumbprint cookies rely on vanilla alone, but that little splash of almond changes everything. It adds this warm, almost marzipan-like depth that pairs perfectly with the raspberry. I’ve tested this recipe more times than I can count, tweaking the flour ratio, the baking time, the amount of jam. This version? It’s the one that finally made me stop tweaking. It’s the best version.
These cookies aren’t just good — they’re the kind that makes you close your eyes after the first bite. They’re comfort food reimagined: faster, easier, but with the same soul-soothing satisfaction. Perfect for impressing guests without stress, or turning a simple evening into something memorable.
What Ingredients You Will Need
This recipe uses simple, wholesome ingredients to deliver that cozy, nostalgic flavor. Most of these are pantry staples, which is exactly what you want when a cookie craving hits on a rainy afternoon.
For the Cookie Dough
- 1 cup (226g) unsalted butter, softened to room temperature (I prefer using Kerrygold for its rich flavor, but any good unsalted butter works)
- 2/3 cup (133g) granulated sugar
- 1 large egg yolk, room temperature (save the white for another use, or brush it on something else)
- 1 teaspoon almond extract (this is the star — use a good quality one like Nielsen-Massey for the best flavor)
- 1/2 teaspoon vanilla extract
- 2 cups (250g) all-purpose flour, spooned and leveled
- 1/4 teaspoon salt
For the Filling & Glaze
- 1/2 cup (160g) raspberry jam or preserves (seedless works best for a smooth finish, but I actually love the little seeds — they feel rustic)
- 1 cup (120g) powdered sugar, sifted
- 2-3 tablespoons whole milk or heavy cream (cream makes the glaze richer)
- 1/2 teaspoon vanilla extract
- Optional: 1/4 cup sliced almonds, for garnish (toasted, if you want extra crunch)
When it comes to the jam, I recommend Bonne Maman raspberry preserves — they have a nice balance of sweetness and tartness that doesn’t get lost during baking. If you’re using a cheaper jam, just know it might be sweeter and thinner. You can also use seedless jam if you prefer a smoother texture, but honestly, I think the seeds add a nice little pop.
For the almond extract, don’t skip it. I know some people are nervous about almond extract because it can be strong, but trust me — it mellows out in the oven and leaves behind this warm, cozy aroma that fills your whole kitchen. If you’re really unsure, start with 3/4 teaspoon instead of a full one.
And the butter? Make sure it’s truly softened — not melted, not rock hard. Leave it out on the counter for about an hour before you start. If you’re in a hurry, cut it into small cubes and let it sit for 20 minutes. That’s a trick I learned from a pastry chef friend, and it works every time.
Equipment Needed
You don’t need a fancy kitchen to pull these off. Here’s what you’ll need:
- Electric mixer (handheld or stand mixer — either works. I use my KitchenAid stand mixer because it frees up my hands, but a hand mixer does the job just fine)
- Large mixing bowl
- Baking sheets (I use two half-sheet pans so I can bake all the cookies at once)
- Parchment paper or silicone baking mats (parchment is cheaper and works great)
- Measuring cups and spoons
- Small cookie scoop (about 1 tablespoon size — makes the dough balls uniform)
- Thumb or the back of a 1/2 teaspoon measuring spoon (for making the indentations)
- Small saucepan or microwave-safe bowl (for warming the jam)
- Wire cooling rack
- Small whisk or fork (for the glaze)
If you don’t have a cookie scoop, just use a regular tablespoon and roll the dough into balls with your hands. It’s a little messier, but it works. And if you don’t have a wire rack, you can cool the cookies on the baking sheet — just give them a few extra minutes to set up.
One thing I’ve learned the hard way: use a light-colored baking sheet. Dark sheets absorb more heat and can brown the bottoms of your cookies too quickly. If all you have is dark sheets, reduce the oven temperature by 25°F.
Preparation Method
Let’s get to the fun part. I’ve broken this down step by step so you can follow along without any hiccups.
- Preheat the oven to 350°F (175°C). Line two baking sheets with parchment paper. This ensures easy cleanup and prevents sticking.
- Cream the butter and sugar. In a large mixing bowl, beat the softened butter and granulated sugar together on medium speed until light and fluffy — about 2-3 minutes. You’re looking for a pale yellow color and a texture that looks like soft, spreadable frosting. Scrape down the sides of the bowl with a spatula halfway through.
- Add the wet ingredients. Beat in the egg yolk, almond extract, and vanilla extract until combined. The mixture might look slightly curdled at this point — don’t panic. That’s normal. It’ll come together when you add the flour.
- Mix the dry ingredients. In a separate small bowl, whisk together the flour and salt. Gradually add this to the wet mixture, mixing on low speed until just combined. You should see no more streaks of flour, but don’t overmix. Overmixing develops gluten and makes the cookies tough.
- Shape the dough. Using a small cookie scoop or a tablespoon, scoop out rounded balls of dough (about 1.5 tablespoons each). Roll them between your palms into smooth balls. Place them on the prepared baking sheets, spacing them about 2 inches apart — they spread a little.
- The freezer trick (thanks, Dave). Place the baking sheet with the dough balls into the freezer for exactly 10 minutes. This firms up the butter so the cookies hold their shape better and don’t spread too much. While they’re chilling, warm up your jam.
- Make the indentations. Remove the dough from the freezer. Use your thumb or the back of a 1/2 teaspoon measuring spoon to press a deep well into the center of each dough ball. Don’t press all the way through — leave about 1/4 inch of dough at the bottom. If the dough cracks a little around the edges, just gently pinch it back together.
- Fill with jam. Warm the raspberry jam in a small saucepan over low heat or in the microwave for 15-20 seconds until it’s loose and stirrable. Spoon about 1/2 teaspoon of jam into each indentation. Don’t overfill — it will bubble up and spread as it bakes.
- Bake. Bake one sheet at a time on the center rack for 12-14 minutes, or until the edges are lightly golden and the bottoms are just starting to brown. The centers will look a little puffy and soft — that’s fine. They’ll set as they cool. Let them cool on the baking sheet for 5 minutes, then transfer to a wire rack to cool completely.
- Make the glaze. While the cookies are cooling, whisk together the sifted powdered sugar, 2 tablespoons of milk or cream, and the vanilla extract. You’re looking for a thick but pourable consistency — it should drizzle off the whisk in a ribbon. If it’s too thick, add another teaspoon of milk. If it’s too thin, add a little more powdered sugar.
- Glaze the cookies. Once the cookies are completely cool, drizzle the glaze over the tops using a spoon or a small piping bag (or a zip-top bag with the corner snipped off). If you’re using sliced almonds, sprinkle them on top while the glaze is still wet so they stick.
- Let the glaze set. Let the cookies sit at room temperature for about 20-30 minutes until the glaze is firm and set. Then serve, or store in an airtight container.
Cooking Tips & Techniques
I’ve made these cookies more times than I can count, and I’ve definitely made my share of mistakes along the way. Here’s what I’ve learned so you don’t have to repeat my errors.
Don’t skip the freezer step. I know it’s tempting to just bake them right away, but trust me on this. The cold dough holds its shape better, so the cookies stay thick and tender rather than spreading into flat, sad discs. I once skipped it because I was in a hurry, and I ended up with cookies that looked more like pancakes. They still tasted good, but they weren’t as pretty.
Watch the baking time carefully. These cookies go from perfectly golden to overbaked very quickly. Start checking at the 12-minute mark. You want the edges to be just barely golden — the centers will look soft and slightly underdone. That’s exactly what you want. They’ll continue to set as they cool on the baking sheet.
Use a light hand with the jam. It’s easy to get carried away and fill those thumbprints to the brim, but less is more. The jam bubbles up and spreads during baking, so a little goes a long way. Too much jam and it’ll overflow, creating a sticky mess on your baking sheet. Trust me, I’ve cleaned enough burnt jam off parchment to know.
Room temperature ingredients matter. The butter needs to be properly softened, and the egg yolk should be at room temperature. Cold ingredients don’t cream together as well, which can result in a denser, less tender cookie. If you forget to take the egg out ahead of time, place it in a bowl of warm water for 5 minutes.
Toast your almonds if using them. I know it’s an extra step, but toasting sliced almonds in a dry skillet over medium heat for 2-3 minutes brings out their nutty flavor and adds a lovely crunch. Just watch them closely — they burn fast.
Multitasking tip: While the dough is chilling in the freezer, warm your jam and get your glaze ingredients measured out. This saves time and keeps your workflow smooth.
Variations & Adaptations
One of the best things about this recipe is how flexible it is. Here are some ways to make it your own.
Flavor Variations: Swap the raspberry jam for any other flavor you love. Apricot, strawberry, blackberry, or even a tangy lemon curd all work beautifully. I once made a batch with fig jam and added a little crumbled goat cheese on top — it was unexpectedly amazing. For the almond extract, you can substitute it with an equal amount of vanilla extract for a more classic thumbprint cookie, or use orange zest for a citrusy twist.
Dietary Adaptations: To make these gluten-free, substitute the all-purpose flour with a 1:1 gluten-free baking flour blend. I’ve tested this with Bob’s Red Mill Gluten-Free 1-to-1 Baking Flour, and the texture was surprisingly close to the original. For a dairy-free version, use a high-quality vegan butter like Earth Balance, and swap the heavy cream in the glaze with oat milk or almond milk. The cookies will be slightly less tender, but still delicious.
Seasonal Twists: In the summer, use fresh raspberry jam made from farmers’ market berries. In the fall, try apple butter or spiced pumpkin butter. Around the holidays, a dollop of cranberry sauce or peppermint jam adds a festive touch. I made a batch last December with homemade cranberry-orange jam, and they were gone before I could even photograph them.
Different Fillings: If you’re not a jam person, try filling the thumbprints with a small piece of dark chocolate before baking. The chocolate melts into a gooey center that’s pure heaven. Or use a dollop of Nutella — just be aware it can get a little messy. For a savory-sweet option, a tiny pinch of flaky sea salt on top of the glaze balances the sweetness beautifully.
My personal favorite variation: I once made a batch with half raspberry jam and half lemon curd, swirling them together in the thumbprint. The tart lemon cuts through the sweetness of the cookie and the jam, and the combination is just incredible. It’s become my go-to for spring gatherings.
Serving & Storage Suggestions
These cookies are best served at room temperature, when the glaze is set and the cookie is tender. I like to arrange them on a pretty plate or a tiered stand for holiday gatherings — they look so rustic and inviting with the jam peeking through the glaze.
What to serve with them: A cup of hot coffee or a mug of chai tea is the perfect companion. The warmth of the drink balances the sweetness of the cookie. For a dessert spread, pair them with dark chocolate truffles, fresh berries, and a cheese board with sharp cheddar and brie. They also make a lovely addition to a brunch table alongside scones and fresh fruit.
Storage Instructions: Store the cookies in an airtight container at room temperature for up to 5 days. Layer them between sheets of parchment paper to prevent the glaze from sticking. If you live in a humid climate, the glaze might get a little sticky — that’s okay, they’ll still taste great.
Freezing Instructions: These cookies freeze beautifully. You can freeze the baked, unglazed cookies for up to 3 months. Place them in a single layer on a baking sheet and freeze until solid, then transfer to a freezer-safe container or zip-top bag. When you’re ready to serve, thaw them at room temperature, then make the glaze and drizzle it on fresh. You can also freeze the unbaked dough balls (without the jam indentation) for up to 3 months. Just scoop and roll them, freeze on a baking sheet, then transfer to a bag. When you’re ready to bake, let them thaw in the fridge overnight, then proceed with the indentation and filling steps.
Reheating: These cookies are best at room temperature, but if you want a warm cookie, pop one in the microwave for 10 seconds. The jam gets all warm and gooey again — it’s dangerous.
Flavor development: Honestly, these cookies taste even better the next day. The flavors meld together, and the texture softens slightly. So don’t be afraid to make them a day ahead.
Nutritional Information & Benefits
Let’s be real — these are cookies, not health food. But I do think there’s something to be said for the simple pleasure of a homemade treat made with real ingredients.
Estimated nutritional values per cookie (based on 24 cookies):
- Calories: 165
- Total Fat: 8g
- Saturated Fat: 5g
- Cholesterol: 30mg
- Sodium: 40mg
- Total Carbohydrates: 22g
- Sugar: 14g
- Protein: 2g
Health benefits of key ingredients: Almond extract contains trace amounts of vitamin E and healthy fats from almonds (though the amount in extract is minimal). Raspberries are packed with antioxidants and fiber, which is a nice little bonus in the jam. And while butter gets a bad rap, it does contain fat-soluble vitamins like A, D, E, and K. Plus, there’s something to be said for the mental health benefits of baking — the process itself can be meditative and stress-relieving.
Dietary considerations: This recipe contains gluten, dairy, and eggs. For gluten-free and dairy-free adaptations, see the Variations section above. The cookies are nut-free if you skip the almond extract and the sliced almond garnish, though the almond extract is a key flavor component.
My personal perspective: I believe in balance. These cookies are a treat, and they should be enjoyed as such. I’d rather have one really good, homemade cookie made with real butter and sugar than a whole box of processed ones. So go ahead, have two. Life is short.
Conclusion
These cozy raspberry almond thumbprint cookies with vanilla glaze are everything I want in a cookie — buttery, tender, filled with sweet-tart jam, and finished with a glossy vanilla drizzle. They’re the kind of cookie that makes you slow down, pour yourself a cup of tea, and actually enjoy the moment. They’re forgiving enough for a beginner baker and impressive enough for a holiday cookie swap.
I hope you make these your own. Swap the jam, change the extract, pile on the almonds or leave them off. Baking should be fun, not stressful. And honestly, the best cookies are the ones made with a little experimentation and a lot of love.
When you make them — and I hope you do — come back and let me know how they turned out. Did you try a different jam? Did your kids help with the thumbprints? Did you eat three before they even cooled? I want to hear all of it. Leave a comment below or tag me in your photos. Happy baking, friend.
Frequently Asked Questions
Can I use salted butter instead of unsalted?
Yes, you can. Just reduce the added salt in the recipe to 1/8 teaspoon, or leave it out entirely. Salted butter has varying amounts of salt depending on the brand, so it’s harder to control the final flavor. I prefer unsalted for baking because it gives me more control, but in a pinch, salted butter works fine.
Why did my cookies spread too much?
This usually happens for one of three reasons: the butter was too soft or melted, the dough wasn’t chilled long enough, or the baking sheet was too warm. Make sure your butter is softened but not greasy, and don’t skip the freezer step. Also, let your baking sheet cool completely between batches if you’re reusing it.
Can I make the dough ahead of time?
Absolutely. You can prepare the dough, shape it into balls, and refrigerate them for up to 2 days before baking. Just cover the baking sheet tightly with plastic wrap. You can also freeze the unbaked dough balls for up to 3 months — just thaw them in the fridge overnight before making the indentations and baking.
My jam sank to the bottom of the cookie. What happened?
This can happen if the indentation isn’t deep enough, or if the dough was too warm when you added the jam. Make sure you’re pressing a deep well into the chilled dough — about halfway through. Also, don’t overfill the indentations. A little jam goes a long way, and too much liquid can cause it to sink.
Can I use a different type of jam?
Yes! This recipe works with almost any jam or preserve. Strawberry, apricot, blackberry, fig, and even marmalade all work beautifully. Just avoid jam with large fruit chunks, as they can be hard to spoon into the small indentations. Seedless jam gives the smoothest finish, but I personally love the texture of seeds.
PrintCozy Raspberry Almond Thumbprint Cookies with Vanilla Glaze

These buttery, tender thumbprint cookies are filled with sweet-tart raspberry jam and finished with a glossy vanilla glaze. A quick freezer trick cuts chilling time to just 10 minutes, making them perfect for cozy evenings and holiday cookie swaps.
- Prep Time: 15 minutes
- Cook Time: 12-14 minutes
- Total Time: 45 minutes
- Yield: 24 cookies 1x
- Category: Dessert
- Cuisine: American
Ingredients
- 1 cup (226g) unsalted butter, softened to room temperature
- 2/3 cup (133g) granulated sugar
- 1 large egg yolk, room temperature
- 1 teaspoon almond extract
- 1/2 teaspoon vanilla extract
- 2 cups (250g) all-purpose flour, spooned and leveled
- 1/4 teaspoon salt
- 1/2 cup (160g) raspberry jam or preserves
- 1 cup (120g) powdered sugar, sifted
- 2–3 tablespoons whole milk or heavy cream
- 1/2 teaspoon vanilla extract
- Optional: 1/4 cup sliced almonds, for garnish
Instructions
- Preheat the oven to 350°F (175°C). Line two baking sheets with parchment paper.
- In a large mixing bowl, beat the softened butter and granulated sugar together on medium speed until light and fluffy, about 2-3 minutes. Scrape down the sides of the bowl halfway through.
- Beat in the egg yolk, almond extract, and vanilla extract until combined.
- In a separate small bowl, whisk together the flour and salt. Gradually add this to the wet mixture, mixing on low speed until just combined. Do not overmix.
- Using a small cookie scoop or a tablespoon, scoop out rounded balls of dough (about 1.5 tablespoons each). Roll them between your palms into smooth balls. Place them on the prepared baking sheets, spacing them about 2 inches apart.
- Place the baking sheet with the dough balls into the freezer for exactly 10 minutes.
- Remove the dough from the freezer. Use your thumb or the back of a 1/2 teaspoon measuring spoon to press a deep well into the center of each dough ball, leaving about 1/4 inch of dough at the bottom. If the dough cracks, gently pinch it back together.
- Warm the raspberry jam in a small saucepan over low heat or in the microwave for 15-20 seconds until loose. Spoon about 1/2 teaspoon of jam into each indentation.
- Bake one sheet at a time on the center rack for 12-14 minutes, or until the edges are lightly golden and the bottoms are just starting to brown. Let them cool on the baking sheet for 5 minutes, then transfer to a wire rack to cool completely.
- While the cookies are cooling, whisk together the sifted powdered sugar, 2 tablespoons of milk or cream, and the vanilla extract until thick but pourable. Add more milk if too thick, or more powdered sugar if too thin.
- Once the cookies are completely cool, drizzle the glaze over the tops using a spoon or a small piping bag. If using sliced almonds, sprinkle them on top while the glaze is still wet.
- Let the cookies sit at room temperature for about 20-30 minutes until the glaze is firm and set.
Notes
Don’t skip the freezer step—it firms up the butter so cookies hold their shape. Use a light-colored baking sheet to prevent over-browning. Toast sliced almonds for extra crunch. Cookies taste even better the next day.
Nutrition
- Serving Size: 1 cookie
- Calories: 165
- Sugar: 14
- Sodium: 40
- Fat: 8
- Saturated Fat: 5
- Carbohydrates: 22
- Protein: 2
Keywords: thumbprint cookies, raspberry almond, vanilla glaze, easy cookies, holiday cookies, freezer trick