Love this? Save it for later!
Share the inspiration with your friends
I was halfway through setting up for a dinner party when it happened. The butter—my perfectly planned, salted, compound butter—was supposed to be the star of the bread basket. But I’d left it out too long, it had melted into a sad puddle, and I had exactly fifteen minutes before guests walked through the door. I grabbed the wrong honey from the pantry (the crystallized one, not the runny kind), threw it in the stand mixer with the softened butter I was frantically trying to re-chill, and figured I’d just serve it as a weird, chunky mess and apologize. What came out was nothing like the plan—and better. That pale, fluffy, sweet-salty cloud of honey butter was so good, my neighbor Susan asked for the recipe before she even took off her coat. I stood there, whisk in hand, realizing I’d stumbled onto something I’d be making for years.
Honestly, that first batch was a total accident. The crystallized honey gave it this slightly grainy texture that I thought was a disaster, but it actually made the butter feel more rustic and interesting. I’d been trying to make a fancy herb butter for the roasted chicken, but the universe had other plans. Let me tell you, sometimes the best recipes come from the moments you’re sure you’ve ruined everything. Maybe you’ve been there—standing in your kitchen, staring at a mess, convinced dinner is a lost cause. That was me, holding a bowl of what I thought was failure, only to taste the most crowd-pleasing spread I’d ever made.
That night, the honey butter stole the table. People were slathering it on dinner rolls, yes, but also on roasted carrots, on grilled steak, even on the apple tart I’d served for dessert. It became the thing everyone talked about, the secret ingredient they all wanted to know. And I’ve been making it ever since, tweaking it just a little to make it foolproof for when you need to impress without the stress.
Why You’ll Love This Recipe
This homemade honey butter in a jar is the kind of recipe that makes you look like a kitchen hero with almost zero effort. I’ve tested it at brunches, potlucks, and holiday dinners, and it never fails to get that “wait, you made this?” reaction. Here is why it works so well for hosts like us:
- Quick & Easy: Comes together in under 10 minutes with a stand mixer or hand mixer. No cooking, no chilling required before serving.
- Simple Ingredients: You likely already have butter and honey in your pantry. That is it—two main ingredients, plus a pinch of salt if you want to be fancy.
- Perfect for Hosting: Make it ahead of time and store it in the fridge. Pull it out when guests arrive, and they will think you spent hours on it. Great for dinner parties, holiday brunches, or summer barbecues.
- Crowd-Pleaser: Kids love the sweetness, adults appreciate the balance. It pairs with everything from biscuits to grilled meats.
- Unbelievably Delicious: The texture is light and fluffy, like a sweet cloud you can spread on anything. The honey flavor is front and center, but the salt brings it all together.
What makes this version different from just mixing butter and honey? It is the whipping technique. By beating the butter until it is pale and aerated before adding the honey, you get a spread that is impossibly light and creamy. No dense, greasy mess here—just pure, spreadable joy. This is not just another butter recipe; it is your best version, the one you will reach for every time you want to impress without stress.
This recipe is the kind that makes you close your eyes after the first bite. It is comfort food reimagined—simpler, faster, but with the same soul-soothing satisfaction. Perfect for impressing guests without stress, or turning a simple dinner roll into something memorable.
What Ingredients You Will Need
This recipe uses simple, wholesome ingredients to deliver bold flavor and satisfying texture without the fuss. Most of these are pantry staples, which makes this perfect for last-minute hosting.
- 1 cup (2 sticks) unsalted butter, softened to room temperature — The base of our spread. I recommend using a high-quality European-style butter like Plugrà or Kerrygold for the richest flavor. The butter must be truly softened—leave it out for at least an hour before starting. If you are in a rush, cut it into small cubes and let it sit for 30 minutes.
- 1/3 cup honey — Use a mild, runny honey like clover or orange blossom for a smooth texture. If you only have crystallized honey (like I did in my original accident), warm it gently in a bowl of hot water until it loosens up. Avoid strong-flavored honeys like buckwheat unless you want a very distinct taste.
- 1/4 teaspoon sea salt (optional but recommended) — This balances the sweetness and makes the honey flavor pop. I use flaky Maldon salt for a subtle crunch, but fine sea salt works perfectly too.
- Optional: 1/2 teaspoon vanilla extract — Adds a warm, aromatic note that complements the honey beautifully. I add this when I am serving the butter with sweet things like pancakes or muffins.
Substitution guidance: If you need a dairy-free option, use a high-quality vegan butter stick (not margarine). The texture will be slightly different, but still delicious. For a sugar-free version, swap the honey with a honey-flavored sugar-free syrup—though the texture will be thinner. I have tested this with both, and the original remains my favorite for its perfect balance.
Equipment Needed
You do not need a professional kitchen to make this honey butter. Here is what you will need:
- Stand mixer or hand mixer — A stand mixer with the paddle attachment is ideal for achieving that light, fluffy texture. A hand mixer works just as well; just be prepared to hold it for a few minutes. I have made this with both, and honestly, the hand mixer gives me a tiny arm workout, which I consider a bonus.
- Medium mixing bowl — If using a hand mixer, a wide, shallow bowl works best for even mixing.
- Rubber spatula — For scraping down the sides of the bowl. Trust me, you will need this.
- Measuring cups and spoons — Precision matters here, especially with the honey.
- Airtight jar or container — A 12-ounce mason jar works perfectly for storing and gifting. I love using a wide-mouth jar because it makes scooping easy.
Budget-friendly tip: If you do not own a stand mixer, a hand mixer is a worthwhile investment for recipes like this. I bought mine for $20 years ago, and it still works perfectly.
Preparation Method
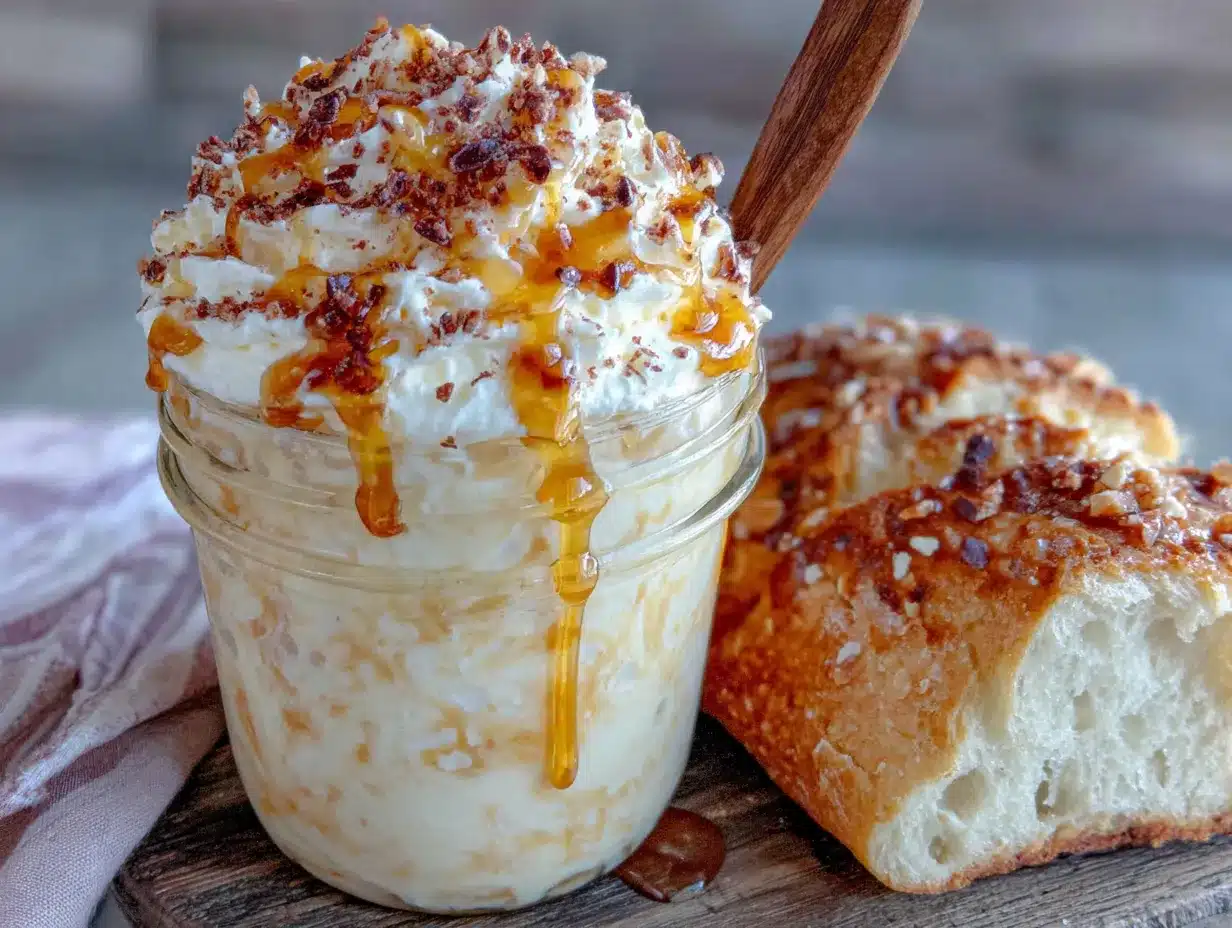
Follow these steps carefully, and you will have the fluffiest honey butter of your life.
- Soften the butter properly. Take your 2 sticks of unsalted butter out of the fridge at least 1 hour before you plan to start. It should be soft enough that a finger pressed into it leaves an indent without sinking all the way through. If you forgot to plan ahead (we have all been there), cut the butter into small cubes and microwave it in 5-second bursts, checking after each one. Do not let it melt—melted butter will not whip properly.
- Whip the butter. Place the softened butter in the bowl of your stand mixer fitted with the paddle attachment. Beat on medium-high speed for 3 to 4 minutes, until the butter is pale, light, and fluffy. Scrape down the sides of the bowl with a rubber spatula halfway through. This step is crucial—do not skip it. The butter should look almost like whipped cream at this point.
- Add the honey. With the mixer running on low speed, slowly drizzle in the 1/3 cup honey. If you add it all at once, the mixture might separate. Take your time—about 30 seconds to a minute of drizzling. Once all the honey is in, increase the speed to medium and beat for another 1 to 2 minutes, until the mixture is smooth and well combined. Scrape down the bowl again.
- Season and flavor. Add the 1/4 teaspoon sea salt and, if using, the 1/2 teaspoon vanilla extract. Beat on low speed for 10 seconds to incorporate. Taste the butter at this point—it should be sweet but balanced. If it tastes too sweet, add another pinch of salt. If it needs more honey flavor, add an extra tablespoon.
- Transfer to a jar. Use your rubber spatula to scrape every last bit of honey butter into your clean, airtight jar. Smooth the top with the back of a spoon. If you are serving it immediately, let it sit at room temperature for 15 minutes to soften slightly. Otherwise, cover and refrigerate.
- Make it pretty (optional). For hosting, I like to add a drizzle of honey on top of the butter in the jar before serving. It creates a beautiful marbled effect when people scoop into it. You can also sprinkle a few flakes of sea salt on top for visual appeal.
Sensory cue: At the end of whipping, the butter should look like a pale, billowy cloud. When you taste it, the first thing you should notice is the creamy sweetness, followed by a subtle saltiness that makes you want another bite.
Cooking Tips & Techniques
I have made this honey butter more times than I can count, and I have learned a few things the hard way. Here are my best tips:
- Temperature is everything. If your butter is too cold, it will not whip properly and will stay dense. If it is too warm (melted), it will turn into a soupy mess. Room temperature means 65-70°F—think of a cool spring day, not a hot summer afternoon.
- Do not over-whip. Once the butter is pale and fluffy, stop. Over-whipping can cause the butter to break and become greasy. I did this once when I got distracted by a phone call, and the butter turned into a separated, oily disaster. It still tasted okay, but the texture was ruined.
- Honey matters. The type of honey you use changes the final flavor dramatically. A light, floral honey like orange blossom gives a delicate sweetness. A darker honey like wildflower adds a more robust, almost caramel-like note. Experiment to find your favorite.
- Make it ahead. This honey butter actually improves after a day in the fridge. The flavors meld together, and the texture becomes even creamier. I always make it the day before a party.
- Scaling for a crowd. This recipe easily doubles or triples. Just make sure your mixer bowl is big enough—I use a 5-quart mixer for a triple batch. Increase the whipping time slightly to incorporate the extra volume.
One failure I will never forget: I once tried to make this with salted butter and omitted the extra salt. It turned out flat and one-dimensional. The salt is not just for flavor—it brightens the honey and makes the butter taste more complex. Do not skip it.
Variations & Adaptations
This honey butter is incredibly versatile. Here are some ways to make it your own:
- Cinnamon Honey Butter: Add 1 teaspoon of ground cinnamon along with the salt. This is my go-to for serving with sweet potato biscuits or pumpkin bread. The cinnamon gives it a warm, cozy vibe that is perfect for fall.
- Spicy Honey Butter: Mix in 1/4 teaspoon of cayenne pepper or a pinch of chili flakes. This is amazing on grilled corn or roasted sweet potatoes. The heat sneaks up on you—in the best way.
- Citrus Honey Butter: Add 1 teaspoon of finely grated orange or lemon zest along with the salt. The brightness cuts through the richness and makes it perfect for morning pastries or scones.
- Vegan Version: Use a high-quality vegan butter stick (like Miyoko’s or Earth Balance). The texture will be slightly softer, but the flavor is still fantastic. I have served this to non-vegans, and no one noticed the difference.
- Herb Honey Butter: Fold in 1 tablespoon of finely chopped fresh thyme or rosemary after whipping. This is unexpectedly wonderful on dinner rolls or even on a charcuterie board.
I once made a batch with lavender honey and a pinch of dried lavender buds for a garden party. It was a huge hit, though I will warn you—lavender can be overpowering if you use too much. Start with a small amount and taste as you go.
Serving & Storage Suggestions
This honey butter is best served at room temperature so it is soft and spreadable. Take it out of the fridge 20-30 minutes before you plan to serve it. If you are hosting, I recommend putting it out alongside a basket of warm dinner rolls, crusty bread, or flaky biscuits. It also pairs beautifully with:
- Fresh fruit like sliced apples, pears, or strawberries
- Waffles, pancakes, or French toast
- Grilled meats like steak or pork chops (trust me on this one)
- Roasted vegetables like carrots, sweet potatoes, or butternut squash
- Cornbread or corn muffins
For storage, keep the honey butter in an airtight container in the refrigerator for up to 2 weeks. The flavors will continue to develop, so it actually gets better after a few days. You can also freeze it for up to 3 months—just wrap the jar tightly in plastic wrap and then foil. Thaw it in the refrigerator overnight before serving.
One note: If you are making this for a party, do not be afraid to double the recipe. I have never had leftovers, and guests always ask for the recipe. I usually make two jars and keep one for myself.
Nutritional Information & Benefits
Here is the honest truth: this is butter and honey, so it is not a health food. But it is made from real, whole ingredients, and a little goes a long way. One tablespoon of this honey butter contains approximately:
- Calories: 100
- Fat: 11g (7g saturated)
- Carbohydrates: 6g (6g sugar)
- Protein: 0g
- Sodium: 30mg (with added salt)
Honey is a natural sweetener with trace amounts of antioxidants and antibacterial properties. Butter provides fat-soluble vitamins like A, D, and E. When you use high-quality ingredients, you get a product that is far superior to anything store-bought. Plus, since you are making it yourself, you control exactly what goes in—no preservatives, no artificial flavors, no hydrogenated oils.
For those with dietary restrictions: this recipe is gluten-free and contains no nuts or soy. It is not dairy-free unless you use a vegan butter substitute. As always, check your honey source if you have specific allergies.
Conclusion
This homemade honey butter in a jar is proof that the best things in life are often the simplest. It started as a kitchen accident, but it has become my secret weapon for every dinner party, potluck, and holiday gathering. The look on people’s faces when they taste it for the first time—that moment of surprised delight—is worth every second of effort.
I encourage you to make this recipe your own. Play with the honey, add your favorite spices, or keep it classic. It is forgiving, it is flexible, and it always delivers. Whether you are serving it to a crowd or just treating yourself to a fancy breakfast, this honey butter will make everything taste a little more special.
I would love to hear how it turns out for you! Drop a comment below with your favorite way to use it, or share a photo of your jar on social media. And if you have a variation I have not tried, please tell me—I am always looking for new ideas. Until next time, happy hosting!
Frequently Asked Questions
Can I use salted butter instead of unsalted?
You can, but I recommend skipping the extra salt in the recipe. Taste the butter after mixing, and add salt only if needed. Salted butter can vary widely in saltiness, so it is safer to start with unsalted and control the flavor yourself.
How long does homemade honey butter last?
Stored in an airtight container in the refrigerator, it will stay fresh for up to 2 weeks. You can also freeze it for up to 3 months. Just thaw it in the fridge overnight before serving.
Can I make this without a mixer?
Yes, but it will take some elbow grease. Use a whisk and a bowl, and beat the softened butter vigorously for about 5 minutes until it is light and fluffy. Then whisk in the honey and salt. The texture will be slightly denser, but it will still taste delicious.
Why did my honey butter separate?
This usually happens if the butter was too warm or if you added the honey too quickly. Make sure your butter is softened but not melted, and drizzle the honey in slowly while the mixer is running on low. If it does separate, try chilling the mixture for 10 minutes and then re-whipping it.
Can I use this honey butter for baking?
Absolutely! Use it as a spread for baked goods, or substitute it for regular butter in recipes like cookies or cakes for a subtle honey flavor. Keep in mind that the honey adds extra sugar, so you may need to adjust the sweetness of your recipe slightly.
PrintEasy Homemade Honey Butter in a Jar: Best Whipped Spread Recipe

This light and fluffy honey butter is a crowd-pleasing spread made with just butter, honey, and a pinch of salt. Perfect for dinner rolls, roasted vegetables, or grilled meats, it comes together in under 10 minutes and makes any meal feel special.
- Prep Time: 10 minutes
- Cook Time: 0 minutes
- Total Time: 10 minutes
- Yield: 12 servings 1x
- Category: Condiment
- Cuisine: American
Ingredients
- 1 cup (2 sticks) unsalted butter, softened to room temperature
- 1/3 cup honey (mild, runny like clover or orange blossom)
- 1/4 teaspoon sea salt (optional but recommended)
- 1/2 teaspoon vanilla extract (optional)
Instructions
- Soften the butter properly: Take the butter out of the fridge at least 1 hour before starting. It should be soft enough that a finger pressed into it leaves an indent without sinking all the way through. If short on time, cut into small cubes and microwave in 5-second bursts, checking after each one—do not let it melt.
- Whip the butter: Place the softened butter in the bowl of a stand mixer fitted with the paddle attachment. Beat on medium-high speed for 3 to 4 minutes, until pale, light, and fluffy. Scrape down the sides of the bowl halfway through.
- Add the honey: With the mixer running on low speed, slowly drizzle in the honey over 30 seconds to 1 minute. Once all honey is added, increase speed to medium and beat for another 1 to 2 minutes until smooth and well combined. Scrape down the bowl again.
- Season and flavor: Add the sea salt and vanilla extract (if using). Beat on low speed for 10 seconds to incorporate. Taste and adjust salt or honey as needed.
- Transfer to a jar: Use a rubber spatula to scrape the honey butter into a clean, airtight jar. Smooth the top with the back of a spoon. If serving immediately, let sit at room temperature for 15 minutes to soften. Otherwise, cover and refrigerate.
- Make it pretty (optional): For hosting, drizzle a little honey on top of the butter in the jar before serving, or sprinkle with a few flakes of sea salt for visual appeal.
Notes
For best results, use high-quality European-style butter like Plugrà or Kerrygold. The butter must be truly softened (65-70°F) to whip properly. If using crystallized honey, warm it gently in a bowl of hot water until it loosens. This honey butter improves after a day in the fridge—make it ahead for parties. To freeze, wrap the jar tightly in plastic wrap and foil for up to 3 months; thaw in the refrigerator overnight.
Nutrition
- Serving Size: 1 tablespoon
- Calories: 100
- Sugar: 6
- Sodium: 30
- Fat: 11
- Saturated Fat: 7
- Carbohydrates: 6
Keywords: honey butter, whipped butter, homemade butter, easy spread, honey butter recipe, whipped honey butter, compound butter