Love this? Save it for later!
Share the inspiration with your friends
Last winter, I was at my local farmers market, and this older gentleman named Leo was selling the most incredible caramels I’d ever tasted. I was hovering near his stall, probably looking a little too eager, and he just slid a sample across the counter without saying a word. It was soft, rich, and had these little flakes of sea salt that melted on my tongue. I told him I was trying to figure out a cookie that could handle a caramel kiss without getting all soggy, and he just laughed. “You’re overthinking it,” he said. “You need a cookie that’s sturdy but soft, and a caramel that knows how to hold its own.” He didn’t give me a recipe, just that one piece of advice, and honestly, it was all I needed.
I went home and started playing with my standard peanut butter blossom recipe, the one with the chocolate kisses that everyone loves. But I wanted something different—something warmer, more decadent. I swapped the chocolate for Leo’s salted caramels, and the first batch was a disaster. The cookies spread too much, and the caramels just melted into a puddle. I mean, it was a delicious puddle, but not a cookie. So I tweaked the dough, added a bit more flour, chilled it longer, and finally—finally—I got it right. The cookie was soft and chewy, the caramel stayed intact, and that little pop of salt on top? Absolute magic.
These Cozy Peanut Butter Blossom Cookies with Salted Caramel Kisses have become my go-to for those cold, quiet evenings when all you want is a warm cookie and a blanket. Maybe you’ve been there—staring into the pantry, craving something sweet but not sure what. This is that cookie. It’s the one that makes you close your eyes after the first bite, the one that feels like a hug from the inside out. Leo’s caramels are long gone, but his advice stuck, and now I’m passing it along to you.
Why You’ll Love This Recipe
I’ve tested this recipe more times than I care to admit, and let me tell you, it’s been through the wringer. I’ve tried it with natural peanut butter (too oily), with crunchy peanut butter (surprisingly good, but changes the texture), and with different types of caramel candies. The version I’m sharing with you is the one that works every single time, and here’s why you’re going to love it.
- Quick & Easy: From start to finish, these cookies come together in about 30 minutes. The dough chills for just 20 minutes, so you’re not waiting around all day.
- Simple Ingredients: You probably have most of these in your pantry right now. No fancy trips to specialty stores—just good old-fashioned baking staples.
- Perfect for Cozy Nights: These are the cookies you make when the weather turns cold, or when you’ve had a rough day and need something that feels like a warm blanket in cookie form.
- Crowd-Pleaser: I’ve brought these to potlucks, holiday parties, and casual get-togethers, and they disappear faster than anything else on the table. Kids love them, adults love them, everyone wins.
- Unbelievably Delicious: The combination of soft, peanut-buttery cookie with that gooey, salted caramel center is next-level comfort food. It’s sweet, salty, and perfectly chewy all at once.
What makes this recipe different from all the other peanut butter blossom cookies out there? Two things. First, the caramel kisses. I use soft, individually wrapped salted caramel candies—the kind that melt in your mouth but hold their shape in the oven. Second, the dough. I’ve added a touch of cornstarch to keep the cookies soft and tender, and I use brown sugar instead of all white sugar for a deeper, more complex sweetness. This isn’t just another version of a classic cookie. It’s the best version.
Honestly, this recipe is comfort food reimagined. It’s familiar enough to feel nostalgic, but different enough to feel special. It’s perfect for impressing guests without any stress, or for turning a simple Tuesday night into something memorable.
What Ingredients You Will Need
This recipe uses simple, wholesome ingredients that come together to create something truly special. Most of these are pantry staples, and the ones that aren’t are easy to find at any grocery store. I’ve tested this with different brands and variations, so I’ll share what works best.
For the Cookie Dough
- 1/2 cup unsalted butter, softened (I prefer Land O’Lakes for consistent results—the butter should be at room temperature, not melted)
- 1/2 cup creamy peanut butter (Use a standard brand like Jif or Skippy for best texture. Natural peanut butter is too oily and will cause the cookies to spread)
- 1/2 cup granulated sugar (Plus extra for rolling the dough balls)
- 1/2 cup packed light brown sugar (This adds moisture and a deeper flavor than white sugar alone)
- 1 large egg, room temperature (Cold eggs will seize the butter, so let it sit out for 15-20 minutes)
- 1 teaspoon vanilla extract (Pure vanilla extract, not imitation—it makes a difference)
- 1 3/4 cups all-purpose flour (Spoon and level it—don’t scoop directly from the bag or you’ll get too much)
- 1 teaspoon baking soda (Check the expiration date—old baking soda won’t give you the right rise)
- 1/2 teaspoon salt (Fine sea salt works best)
- 1 tablespoon cornstarch (This is my secret ingredient for soft, tender cookies)
For the Topping
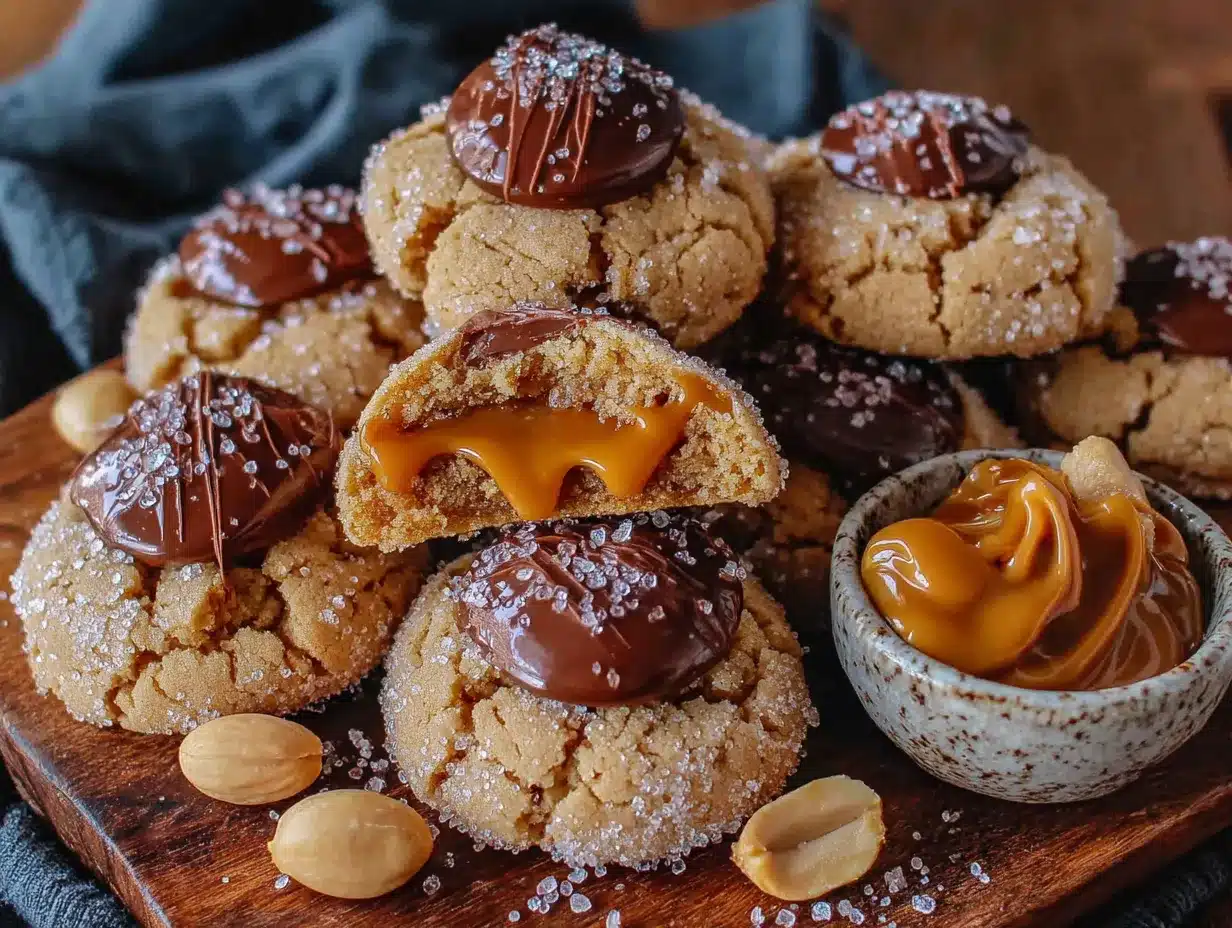
- 24-30 soft salted caramel candies, unwrapped (I use Werther’s Soft Caramels or Kraft Caramels—look for the individually wrapped ones. They should be soft and pliable, not hard)
- Flaky sea salt, for sprinkling (Maldon sea salt is my favorite, but any flaky salt will work. Don’t use table salt—it’s too fine and will dissolve)
Ingredient Tips & Substitutions
If you’re dairy-free, you can use a plant-based butter substitute, but the texture will be slightly different. I’ve tried it with Earth Balance, and it works, but the cookies are a bit more delicate. For a gluten-free version, swap the all-purpose flour with a 1:1 gluten-free baking blend that contains xanthan gum. Cup4Cup is my go-to brand for this.
You can also experiment with different types of caramel. I’ve tried homemade caramel, but it’s too soft and melts completely. Stick with the soft, wrapped caramels—they’re designed to hold their shape when baked.
Equipment Needed
You don’t need any fancy equipment for this recipe, which is part of the beauty of it. Here’s what you’ll need:
- Large mixing bowl (Any medium-to-large bowl will work. I use a ceramic one because it’s heavy and doesn’t slide around)
- Electric hand mixer or stand mixer (A hand mixer is fine, but if you’re using a stand mixer, use the paddle attachment. You can also mix by hand with a wooden spoon, but it’ll take a bit more elbow grease)
- Measuring cups and spoons (Invest in a good set of dry measuring cups for flour and sugar. Liquid measuring cups are for liquids only—don’t mix them up)
- Baking sheets (I use light-colored aluminum baking sheets. Dark sheets absorb more heat and can burn the bottoms of your cookies)
- Parchment paper or silicone baking mat (Parchment paper is cheap and disposable. Silicone mats are reusable and work just as well. Either one prevents sticking)
- Cooling rack (A wire rack is essential for cooling the cookies evenly. If you don’t have one, you can use a clean dish towel, but the bottoms might get soggy)
- Small bowl for rolling sugar (Any small bowl works. I use a shallow ramekin)
If you don’t have an electric mixer, you can cream the butter and sugars by hand. It takes about 5 minutes of vigorous stirring, but it’s totally doable. I’ve done it when my mixer was broken, and the cookies still turned out great. Just make sure you’re using softened butter, or your arm will get a serious workout.
Preparation Method
Alright, let’s get baking. I’ve broken this down into clear, manageable steps. Take your time, and don’t rush the chilling step—it’s crucial for keeping the cookies from spreading too much.
- Preheat and prep. Preheat your oven to 350°F (175°C). Line two baking sheets with parchment paper or silicone mats. Set them aside.
- Cream the butter and sugars. In a large mixing bowl, beat the softened butter, peanut butter, granulated sugar, and brown sugar together until light and fluffy. This takes about 2-3 minutes with an electric mixer on medium speed. You’ll know it’s ready when the mixture looks pale and almost grainy—that’s the sugar dissolving into the butter. Scrape down the sides of the bowl with a spatula halfway through.
- Add the wet ingredients. Beat in the egg and vanilla extract until fully combined. The mixture might look a little separated at this point, but that’s normal. Don’t overmix—just until it comes together.
- Mix the dry ingredients. In a separate bowl, whisk together the flour, baking soda, salt, and cornstarch. This ensures the baking soda and salt are evenly distributed. If you skip this step, you might end up with a pocket of baking soda in one cookie—trust me, it’s not pleasant.
- Combine wet and dry. Gradually add the dry ingredients to the wet mixture, mixing on low speed until just combined. The dough will be thick and slightly sticky. Don’t overmix, or the cookies will be tough. Stop as soon as you don’t see any more streaks of flour.
- Chill the dough. Cover the bowl with plastic wrap and refrigerate for at least 20 minutes. This is non-negotiable. Chilling the dough firms up the butter, which prevents the cookies from spreading too much in the oven. If you skip this step, your cookies will be flat and thin, and the caramels will slide right off.
- Shape the cookies. While the dough chills, unwrap your caramel candies and place them on a plate. Pour about 1/4 cup of granulated sugar into a small bowl for rolling. Once the dough is chilled, use a cookie scoop or your hands to form 1-inch balls (about 1 tablespoon of dough each). Roll each ball between your palms until smooth, then roll it in the sugar until fully coated.
- Bake. Place the sugar-coated dough balls on the prepared baking sheets, spacing them about 2 inches apart. Bake for 10-12 minutes, or until the edges are lightly golden and the centers look set but still soft. Don’t overbake—the cookies will continue to cook on the hot baking sheet after you take them out. You want them to be soft and tender, not crispy.
- Add the caramel kisses. Remove the baking sheets from the oven and let the cookies cool on the sheets for 2 minutes. While they’re still warm, gently press a salted caramel candy into the center of each cookie. The caramel should sink slightly into the cookie, but if it’s too firm, press a little harder. Be careful—the cookies are hot! If the caramel doesn’t stick, the cookies have cooled too much. Work quickly.
- Finish with salt. Sprinkle a tiny pinch of flaky sea salt over each caramel kiss. This is optional, but honestly, it takes the cookies from great to unforgettable. The salt cuts through the sweetness and makes the caramel pop.
- Cool completely. Transfer the cookies to a wire rack to cool completely. The caramel will be very hot at first, so give them at least 10 minutes before digging in. I know it’s hard to wait, but trust the process.
Cooking Tips & Techniques
I’ve made these cookies more times than I can count, and I’ve learned a few things along the way. Here are my best tips for getting perfect results every time.
Use room temperature ingredients. This is one of those baking rules that actually matters. Cold butter won’t cream properly with the sugar, and cold eggs can cause the butter to seize up. Let your butter and egg sit on the counter for about 20 minutes before you start. I learned this the hard way when I made a batch with cold butter and ended up with lumpy dough that spread into a giant puddle.
Don’t skip the cornstarch. I know it seems like a small thing, but that one tablespoon of cornstarch makes a huge difference. It tenderizes the gluten in the flour, giving you a softer, more delicate cookie. Without it, the cookies are still good, but they’re a bit more dense and cakey. With it, they’re melt-in-your-mouth tender.
Chill the dough, no exceptions. I cannot stress this enough. If you skip the chilling step, the butter will melt too quickly in the oven, and your cookies will spread into thin, flat discs. The caramel won’t have a cookie to sit on—it’ll just melt into the pan. I’ve made this mistake exactly once, and I spent the next hour scraping burnt caramel off my baking sheet. Not fun.
Work in batches. Don’t try to cram all the cookies onto one baking sheet. They need room to spread, and overcrowding will cause them to bake unevenly. I usually bake 12 cookies per sheet, and I rotate the sheets halfway through baking for even browning.
Press the caramels in while the cookies are hot. This is the most important step for presentation. If you wait too long, the cookies will cool and firm up, and the caramel won’t stick. I press the caramels in about 2 minutes after the cookies come out of the oven. If they start to cool too quickly, pop the baking sheet back in the oven for 30 seconds to soften them up.
Use a light touch with the salt. A little flaky sea salt goes a long way. You want just enough to balance the sweetness, not so much that you’re crunching on salt crystals. I hold my thumb and forefinger about 6 inches above the cookie and sprinkle from there—it gives a nice, even distribution.
Variations & Adaptations
One of the best things about this recipe is how versatile it is. I’ve played around with different flavors and ingredients, and here are some of my favorite variations.
Chocolate Peanut Butter Blossoms: If you’re a purist, swap the salted caramel kisses for traditional chocolate kisses. The recipe works exactly the same way—just press a chocolate kiss into the center instead of a caramel. I do this sometimes when I’m craving the classic version, and it never disappoints.
Gluten-Free Version: Use a 1:1 gluten-free baking blend that contains xanthan gum. I’ve tested this with Cup4Cup, and the cookies come out slightly more delicate but still delicious. Add an extra tablespoon of cornstarch to help with tenderness. Just make sure your gluten-free blend is all-purpose, not a specific flour like almond or coconut—those will change the texture too much.
Vegan Adaptations: You can make these cookies vegan by using a plant-based butter substitute and a flax egg (1 tablespoon ground flaxseed mixed with 3 tablespoons water, let sit for 5 minutes). The texture will be a bit more crumbly, but the flavor is still great. For the caramels, look for vegan soft caramels—they exist, but they can be hard to find. I’ve used homemade date caramel in a pinch, but it doesn’t hold its shape as well.
Spiced Up Version: Add 1/2 teaspoon of cinnamon and 1/4 teaspoon of nutmeg to the dry ingredients. This gives the cookies a warm, cozy flavor that’s perfect for fall and winter. I made a batch with these spices for a Thanksgiving potluck, and they were gone in 10 minutes.
Extra Salty Version: If you’re a salt lover like me, double the flaky sea salt on top. You can also add 1/2 teaspoon of sea salt flakes to the dough itself. It sounds like a lot, but the salt balances the sweetness beautifully. Just don’t use table salt—it’s too fine and will make the dough taste metallic.
Peanut Butter Alternative: If you’re allergic to peanuts or just want to switch things up, use almond butter or sunflower seed butter instead. Keep in mind that sunflower seed butter can turn green when baked (it’s a chemical reaction, totally safe), so don’t panic if your cookies look a little strange. The flavor is still great.
Serving & Storage Suggestions
These cookies are best served warm, when the caramel is still soft and gooey and the cookie is tender. I like to let them cool for about 10 minutes on the baking sheet, then transfer them to a wire rack for another 5 minutes. At that point, the caramel is still warm but not scorching hot, and the cookie has set enough to hold its shape.
For a truly indulgent experience, serve these cookies with a glass of cold milk or a warm cup of coffee. The saltiness of the caramel pairs beautifully with the bitterness of coffee, and the sweetness of the cookie is balanced by the milk. I’ve also been known to crumble one over a bowl of vanilla ice cream for a quick dessert sundae—it’s absolutely ridiculous in the best way.
Storage: Store the cookies in an airtight container at room temperature for up to 5 days. Place a piece of parchment paper between layers to prevent the caramels from sticking to each other. If you live in a humid climate, the cookies might get a bit soft, but they’ll still taste great.
Freezing: These cookies freeze beautifully. Place them in a single layer on a baking sheet and freeze until solid (about 1 hour), then transfer them to a freezer-safe bag or container. They’ll keep for up to 3 months. To thaw, let them sit at room temperature for about 20 minutes. You can also reheat them in a 300°F oven for 5 minutes to restore that fresh-baked texture.
Reheating: If you’re reheating a single cookie, pop it in the microwave for 10-15 seconds. The caramel will get soft and gooey again, and the cookie will taste almost as good as fresh. For a whole batch, warm them in a 300°F oven for 5-7 minutes.
One thing I love about these cookies is that the flavors actually develop over time. The peanut butter gets more pronounced after a day or two, and the caramel softens into the cookie. They’re amazing fresh, but they’re also amazing on day three—if they last that long.
Nutritional Information & Benefits
Let’s be real: these are not health cookies. They’re a treat, something you make for special occasions or when you need a little comfort. But that doesn’t mean they don’t have some redeeming qualities.
Estimated Nutritional Values (per cookie, based on 24 cookies):
- Calories: 185
- Total Fat: 9g
- Saturated Fat: 4g
- Cholesterol: 20mg
- Sodium: 135mg
- Total Carbohydrates: 24g
- Dietary Fiber: 1g
- Sugars: 16g
- Protein: 3g
Health Benefits: Peanut butter is a good source of protein and healthy monounsaturated fats, which can help keep you full and satisfied. It also contains vitamin E, magnesium, and potassium. The butter in these cookies provides a small amount of vitamin A and calcium. And while caramel is mostly sugar, the salt on top helps balance out the sweetness and provides a tiny bit of sodium—which, let’s face it, you probably need after a long day.
Dietary Considerations: These cookies are vegetarian. For a gluten-free version, use a 1:1 gluten-free flour blend. For a vegan version, use plant-based butter and a flax egg. They contain peanuts, dairy, and eggs, so they’re not suitable for those with allergies to those ingredients.
I’m not a nutritionist, and I don’t pretend to be. I believe in balance—eat your veggies, move your body, and enjoy a cookie (or two) when the mood strikes. These cookies are worth every single calorie.
FAQs
Can I use natural peanut butter in this recipe?
I wouldn’t recommend it. Natural peanut butter is much oilier than standard peanut butter, and the extra oil will cause the cookies to spread too much. Stick with a classic brand like Jif or Skippy for the best texture.
Why did my cookies spread into flat discs?
This usually happens for one of three reasons: your butter was too soft or melted, you didn’t chill the dough long enough, or you used too much sugar. Make sure your butter is softened but not melted, and don’t skip the 20-minute chill time. If your kitchen is very warm, chill the dough for 30 minutes instead.
Can I use homemade caramel instead of wrapped caramels?
I’ve tried it, and it doesn’t work as well. Homemade caramel is too soft and will melt into a puddle in the oven. The wrapped caramels are designed to hold their shape when baked, which is exactly what you need for these cookies.
How do I keep the caramels from sticking to my fingers when pressing them into the cookies?
Lightly grease your fingers with a little butter or cooking spray. You can also use the back of a spoon to gently press the caramels into the cookies. Just be gentle—you don’t want to squish the cookie.
Can I make the dough ahead of time?
Absolutely. You can make the dough up to 3 days in advance and keep it covered in the refrigerator. When you’re ready to bake, let it sit at room temperature for about 10 minutes to soften slightly, then roll and bake as directed. You can also freeze the dough balls for up to 3 months—just bake them straight from frozen, adding an extra minute or two to the baking time.
Conclusion
These Cozy Peanut Butter Blossom Cookies with Salted Caramel Kisses are everything I want in a cookie: soft, chewy, sweet, salty, and absolutely comforting. They’re the kind of cookies you make when you need a little pick-me-up, or when you want to share something special with the people you love. They’re not complicated, they don’t require fancy ingredients, and they come together in less than an hour. Honestly, what more could you ask for?
I hope you give these a try, and I hope they bring you as much joy as they’ve brought me. Don’t be afraid to play around with the variations—swap in chocolate kisses, add some cinnamon, or go all-in on the salt. The beauty of this recipe is that it’s a starting point, not a rulebook. Make it your own, and let me know how it turns out.
Have you made these cookies? Did you try a fun variation? Drop a comment below and let me know—I love hearing about your kitchen adventures. And if you share them on social media, tag me so I can see your beautiful creations. Happy baking, friends!
Pin This Recipe!
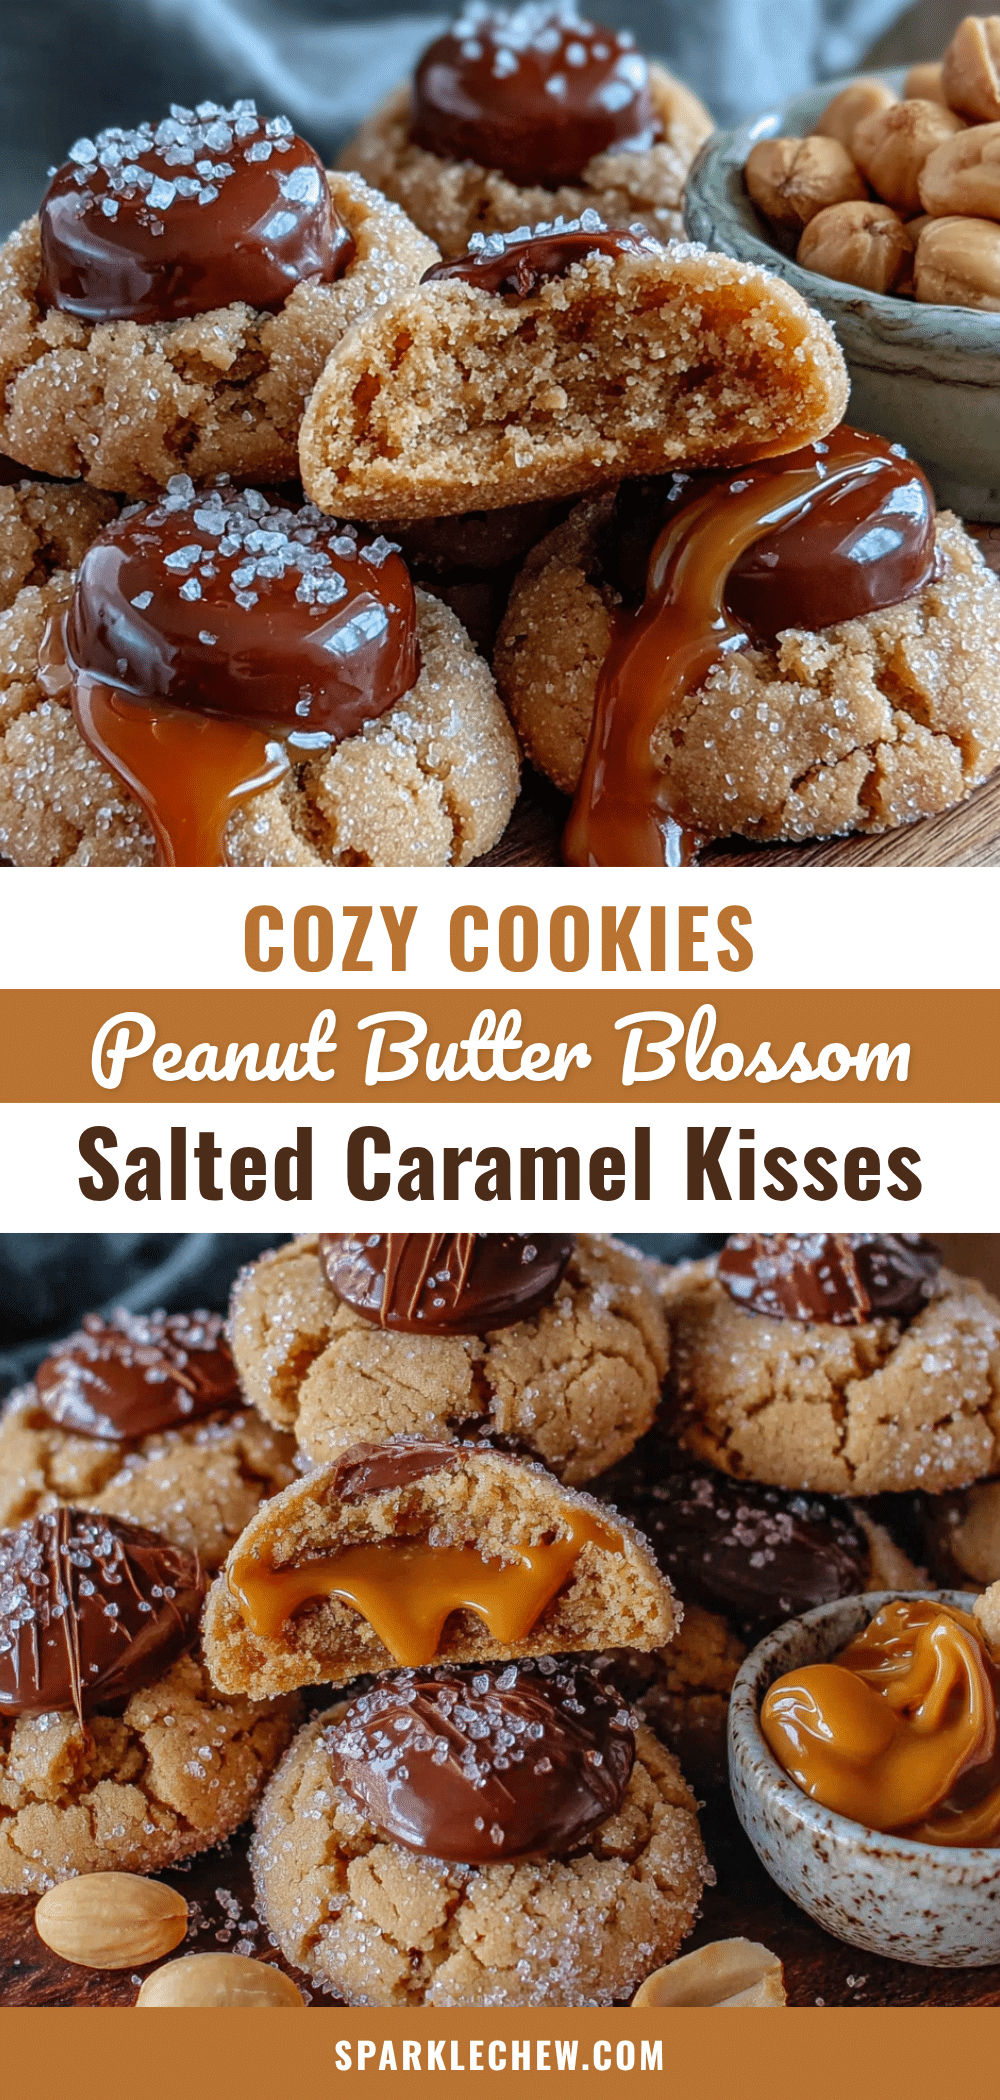
Cozy Peanut Butter Blossom Cookies with Salted Caramel Kisses
Soft and chewy peanut butter cookies topped with a gooey salted caramel kiss and a sprinkle of flaky sea salt. These cozy treats are perfect for cold evenings and are sure to become a new favorite.
- Prep Time: 20 minutes
- Cook Time: 12 minutes
- Total Time: 32 minutes
- Yield: 24-30 cookies 1x
- Category: Dessert
- Cuisine: American
Ingredients
- 1/2 cup unsalted butter, softened
- 1/2 cup creamy peanut butter (e.g., Jif or Skippy)
- 1/2 cup granulated sugar (plus extra for rolling)
- 1/2 cup packed light brown sugar
- 1 large egg, room temperature
- 1 teaspoon vanilla extract
- 1 3/4 cups all-purpose flour
- 1 teaspoon baking soda
- 1/2 teaspoon salt
- 1 tablespoon cornstarch
- 24–30 soft salted caramel candies, unwrapped (e.g., Werther’s Soft Caramels or Kraft Caramels)
- Flaky sea salt, for sprinkling (e.g., Maldon)
Instructions
- Preheat oven to 350°F (175°C). Line two baking sheets with parchment paper or silicone mats.
- In a large mixing bowl, beat the softened butter, peanut butter, granulated sugar, and brown sugar together until light and fluffy, about 2-3 minutes on medium speed. Scrape down the sides halfway through.
- Beat in the egg and vanilla extract until fully combined.
- In a separate bowl, whisk together the flour, baking soda, salt, and cornstarch.
- Gradually add the dry ingredients to the wet mixture, mixing on low speed until just combined. The dough will be thick and slightly sticky.
- Cover the bowl with plastic wrap and refrigerate for at least 20 minutes.
- While the dough chills, unwrap the caramel candies and place them on a plate. Pour about 1/4 cup of granulated sugar into a small bowl for rolling.
- Once the dough is chilled, form 1-inch balls (about 1 tablespoon each). Roll each ball in the sugar until fully coated.
- Place the sugar-coated dough balls on the prepared baking sheets, spacing them about 2 inches apart. Bake for 10-12 minutes, until edges are lightly golden and centers are set but still soft.
- Remove from oven and let cool on the sheets for 2 minutes. While still warm, gently press a salted caramel candy into the center of each cookie.
- Sprinkle a tiny pinch of flaky sea salt over each caramel kiss.
- Transfer cookies to a wire rack to cool completely before serving.
Notes
Chilling the dough is essential to prevent spreading. Use room temperature ingredients for best results. Press caramels into cookies while they are still hot. For a gluten-free version, use a 1:1 gluten-free baking blend with xanthan gum. For a vegan version, use plant-based butter and a flax egg.
Nutrition
- Serving Size: 1 cookie
- Calories: 185
- Sugar: 16
- Sodium: 135
- Fat: 9
- Saturated Fat: 4
- Carbohydrates: 24
- Fiber: 1
- Protein: 3
Keywords: peanut butter blossoms, salted caramel cookies, easy cookie recipe, holiday cookies, comfort food