Love this? Save it for later!
Share the inspiration with your friends
“You gotta try my banana pudding,” my neighbor, Mrs. Langston, said one humid Saturday afternoon as I was lugging a cracked mixing bowl out of my car. Honestly, I wasn’t expecting much—she’s known for her no-nonsense approach to cooking, not for fancy desserts. But the smell wafting from her kitchen was undeniably inviting, something warm and sweet that reminded me of simpler times.
Mrs. Langston doesn’t fuss with complicated recipes. Instead, she told me how this classic creamy banana pudding with Nilla Wafers was a staple she picked up from her childhood friend in New Orleans. She shared how it was the perfect treat after a long day, always crowd-pleasing yet somehow humble. I watched her effortlessly layer the pudding, bananas, and those crisp little wafers. The texture was dreamy—smooth pudding, soft ripe bananas, and just enough crunch. I mean, I’d tried banana pudding before, but this version? It stayed with me.
Maybe you’ve been there—staring at a dessert that looks simple but tastes like a comforting hug. It’s that kind of recipe that sneaks into your rotation, even though you swear you’ll save it for “special” occasions. For me, it’s become both a quick fix and a nostalgic treat I whip up when I want to impress without stress, or just when I need that creamy, sweet comfort. So let me tell you about this classic creamy banana pudding with Nilla Wafers that I keep making, partly because it’s easy, partly because it’s delicious, and partly because it feels like a little piece of kindness on a plate.
Why You’ll Love This Recipe
This classic creamy banana pudding with Nilla Wafers is a total winner in my kitchen for all the right reasons. After multiple tests (and some taste-testing mishaps), I can say it’s a recipe that balances ease and deliciousness in just the right way. Here’s why it might become your new favorite go-to dessert:
- Quick & Easy: Ready in under 30 minutes, it’s perfect for those busy weeknights or sudden dessert cravings.
- Simple Ingredients: You don’t need to hunt down anything fancy—everything is probably already in your pantry or fridge.
- Perfect for Gatherings: Whether it’s a casual family dinner or a backyard potluck, this pudding always disappears fast.
- Crowd-Pleaser: Kids love the sweet bananas and wafers, while adults appreciate the creamy texture and nostalgic vibe.
- Unbelievably Delicious: The combo of velvety pudding, fresh bananas, and crisp Nilla Wafers creates a texture and flavor that feels like classic Southern comfort food at its best.
What sets this recipe apart is the way the pudding is made from scratch—no instant mixes here. I blend the vanilla custard gently to get that rich, silky consistency, and layering it with just the right amount of ripe bananas keeps it fresh and vibrant. Honestly, it’s the kind of dessert that makes you close your eyes after the first spoonful, savoring that perfect balance of creamy sweetness and light crunch.
Whether you want to impress guests or just treat yourself, this classic creamy banana pudding with Nilla Wafers brings warmth and ease to the table every time.
What Ingredients You Will Need
This recipe uses simple, wholesome ingredients to deliver bold flavor and satisfying texture without the fuss. Most are pantry staples, and you can easily swap a few to fit your needs.
- For the Pudding:
- 2 cups whole milk (or substitute with almond milk for a lighter option)
- 3/4 cup granulated sugar (adjust to taste)
- 3 tablespoons cornstarch (for that thick, creamy custard)
- 1/4 teaspoon salt
- 4 large egg yolks, room temperature (adds richness – don’t skip!)
- 2 tablespoons unsalted butter, softened (I like Kerrygold for creaminess)
- 2 teaspoons pure vanilla extract (fresh vanilla makes a big difference)
- For the Assembly:
- 4 to 5 ripe bananas, sliced (choose firm yet sweet bananas for best texture)
- 1 box Nilla Wafers (about 11 ounces) – these add the perfect crunch and are essential for authenticity
- Optional: Whipped cream for topping (homemade or store-bought)
Feel free to swap the Nilla Wafers with gluten-free vanilla cookies if you have dietary restrictions, or use coconut milk in the pudding for a tropical twist. The freshness of the bananas is key here; I recommend slicing them right before layering to avoid browning. And if you’re curious, the egg yolks give the pudding that velvety texture you just can’t get from instant mixes.
Equipment Needed
- Medium saucepan – essential for cooking the pudding gently without burning
- Whisk – to keep the custard smooth and lump-free
- Mixing bowls – for beating egg yolks and assembling layers
- Measuring cups and spoons – precise measurements make all the difference here
- Spatula – for folding in butter and vanilla
- 9×13-inch baking dish or a trifle bowl – for layering the pudding, bananas, and wafers
- Fine mesh sieve (optional) – to strain the custard for extra silkiness, but I sometimes skip it when in a hurry
If you don’t have a whisk, a fork can work in a pinch, though it might take a little longer to get a smooth custard. As for the baking dish, any clear dish works great so you can admire the beautiful pudding layers. Honestly, the simpler the tools, the better—this recipe is all about comfort, not complicated gear.
Preparation Method
- Prepare the custard base: In a medium saucepan, whisk together sugar, cornstarch, and salt. Slowly pour in the 2 cups of milk while whisking to combine. Place the saucepan over medium heat.
- Cook the mixture: Stir constantly with a whisk or spatula to prevent lumps. After about 5-7 minutes, the mixture will thicken and start to bubble gently. Keep stirring to avoid scorching.
- Temper the egg yolks: In a separate bowl, lightly beat the 4 egg yolks. Slowly ladle about 1 cup of the hot milk mixture into the yolks while whisking constantly to warm them up without scrambling.
- Combine and cook: Pour the tempered yolk mixture back into the saucepan. Continue cooking on medium heat for another 2-3 minutes, whisking constantly until the custard thickens further. It should coat the back of a spoon.
- Finish the pudding: Remove the pan from heat. Stir in the softened butter and vanilla extract until fully incorporated and smooth. If you want, strain through a fine mesh sieve for extra smoothness.
- Cool the custard: Transfer the pudding to a bowl. Cover with plastic wrap pressed directly on the surface to prevent a skin from forming. Refrigerate for at least 1 hour until fully chilled.
- Slice the bananas: Just before assembling, slice the bananas into thin rounds. If you slice them too early, they might brown, which affects the look and taste.
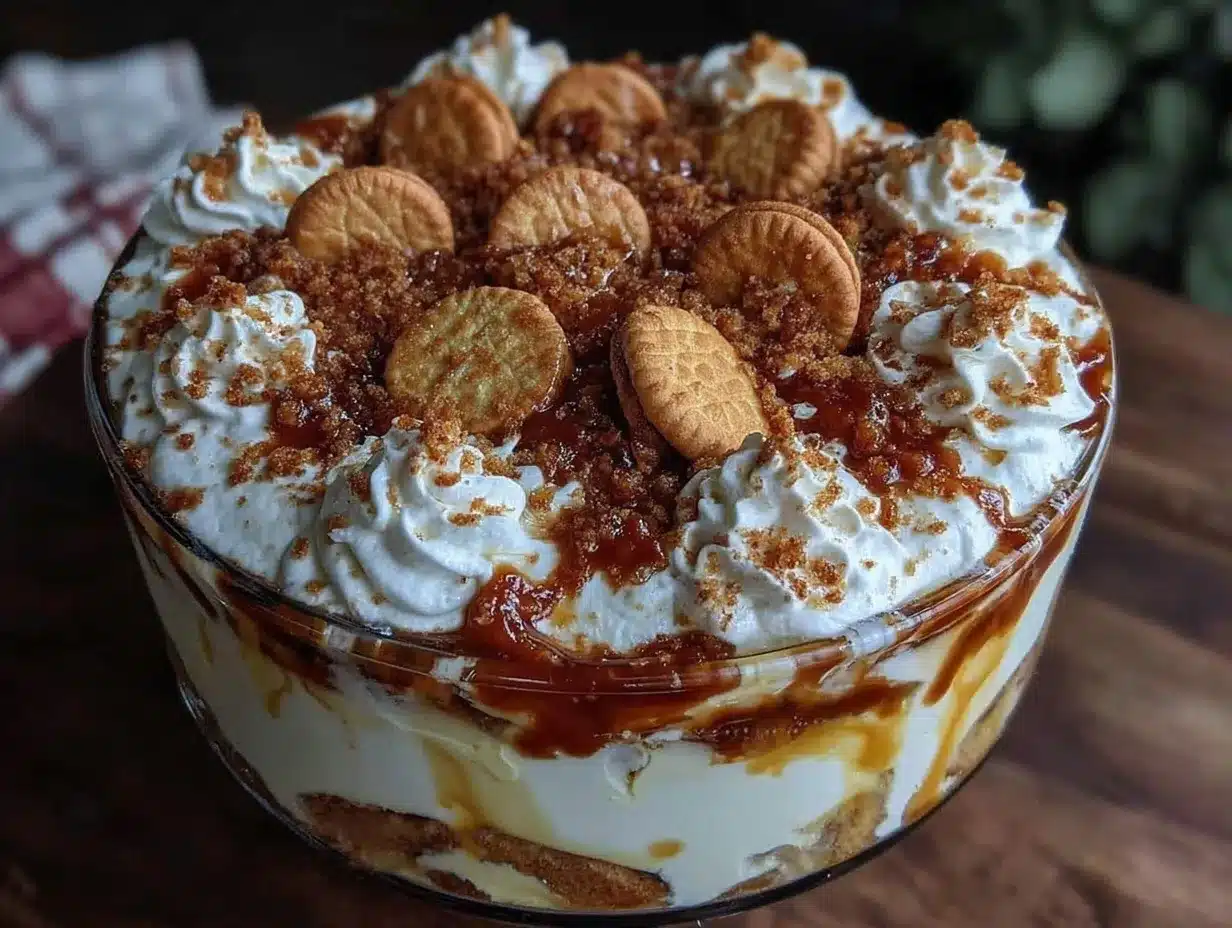
- Assemble the pudding: In your chosen dish, start with a layer of Nilla Wafers, followed by a layer of banana slices, and then a layer of pudding. Repeat the layers until ingredients are used up, finishing with a pudding layer on top.
- Chill before serving: Cover with plastic wrap and refrigerate for at least 2 hours, preferably overnight, to let the flavors meld and wafers soften slightly but still hold some crunch.
- Add optional whipped cream: Just before serving, spread or pipe whipped cream over the top for that extra creamy finish.
Pro tip: If the pudding seems too thick after chilling, you can gently fold in a splash of milk to loosen it. Also, be patient during cooking—stirring constantly keeps it silky smooth. I once got distracted and ended up with lumps, and trust me, it’s worth the little extra attention!
Cooking Tips & Techniques
Making classic creamy banana pudding with Nilla Wafers is pretty straightforward, but a few tricks help you get it right every time.
- Constant stirring is key: When cooking the custard, don’t leave it unattended. The sugar and cornstarch can burn easily on the bottom, which ruins the flavor.
- Use room temperature eggs: Cold eggs can curdle when added to hot milk. Letting them come to room temperature helps the mixture blend beautifully.
- Temper the eggs carefully: Adding hot liquid slowly while whisking stops the yolks from scrambling—a small step that makes a big difference.
- Layering matters: Alternate wafers, bananas, and pudding evenly to get every bite balanced. I like to use a shallow dish to maximize layers.
- Don’t slice bananas too early: Fresh slices keep the pudding looking bright and fresh.
- Chill long enough: Give the pudding time (at least a few hours) to let the wafers soften slightly but not lose all their crunch. It’s that contrast that makes this dessert special.
- Whipped cream finishing touch: It isn’t necessary but adds a lovely lightness and makes the presentation pop.
One lesson I learned the hard way: rushing the chilling step results in less cohesive flavors and a watery texture. So plan ahead when you can. Also, if you’re making this for a crowd, it scales easily and can be prepped a day ahead.
Variations & Adaptations
This classic creamy banana pudding with Nilla Wafers is a great base for mixing things up. Here are some ideas you might enjoy:
- Chocolate Banana Pudding: Add a layer of chocolate pudding or sprinkle cocoa powder between layers for a chocolate-banana twist.
- Vegan Version: Use coconut milk instead of dairy, replace eggs with cornstarch mixed in water, and swap Nilla Wafers for vegan vanilla cookies.
- Berry Banana Pudding: Add fresh raspberries or blueberries alongside the bananas for a burst of tartness and color.
- Gluten-Free Option: Substitute Nilla Wafers with gluten-free vanilla cookies or crushed gluten-free graham crackers.
- Crunchy Topping: Sprinkle chopped toasted pecans or crushed pralines on top for extra texture and Southern flair.
Personally, I once tried folding in a spoonful of cream cheese for tanginess—it was an unexpected winner! Feel free to experiment by swapping ingredients based on what you have or your dietary preferences. The key is keeping the creamy pudding and fresh bananas front and center.
Serving & Storage Suggestions
This pudding is best served chilled, straight from the fridge. The creaminess shines when it’s cool, and the wafers have softened just enough for a tender crunch.
For a classic Southern touch, serve it in a clear glass bowl to show off the pretty layers. Pair it with a hot cup of coffee or a cold iced tea for ultimate comfort.
To store, cover the dish tightly with plastic wrap and refrigerate up to 3 days. The bananas may darken a bit over time, but the flavor deepens. If you want to keep it longer, you can freeze the pudding (without the wafers) and thaw it gently in the fridge, then add fresh wafers before serving.
Reheating isn’t recommended since the pudding is best cold, but you can let it sit at room temperature for 10-15 minutes before serving if it feels too firm.
Nutritional Information & Benefits
Estimated per serving (based on 8 servings): approximately 250 calories, 6g fat, 40g carbohydrates, 3g protein.
Bananas provide potassium and vitamin C, while the eggs and milk contribute protein and calcium. This dessert strikes a nice balance between indulgence and some nutritional value thanks to the fresh fruit and homemade pudding.
For those watching sugar intake, you can reduce sugar slightly or use a sugar substitute, though it may affect texture. The recipe is naturally gluten-free if you swap to gluten-free wafers.
From my experience, this pudding feels like a treat that doesn’t leave you overly stuffed or guilty—it’s more about comfort and enjoyment.
Conclusion
If you’re looking for a dessert that’s easy to make, tastes like a warm hug, and pleases a crowd, this classic creamy banana pudding with Nilla Wafers is it. It’s one of those recipes I keep coming back to because it’s reliably delicious and simple—no fuss, just good food.
Feel free to tweak the layers or ingredients to fit your taste. Maybe you’ll add a little chocolate or nuts, or maybe you’ll stick to the classic version that Mrs. Langston shared with me on that sticky Saturday afternoon. Either way, I hope it brings a bit of joy and nostalgia to your table.
Let me know how your pudding turns out or if you have your own twist on this recipe—I love hearing about your kitchen wins and happy accidents!
Go ahead, grab some ripe bananas, and make yourself this creamy, dreamy dessert today.
FAQs about Classic Creamy Banana Pudding with Nilla Wafers
Can I make banana pudding ahead of time?
Absolutely. It actually tastes better after a few hours or overnight in the fridge as the flavors meld and wafers soften just right.
How do I keep the bananas from browning?
Slice the bananas right before assembling the pudding and cover the dish tightly with plastic wrap. You can also lightly brush them with lemon juice to slow browning.
Can I use instant pudding mix instead of homemade custard?
You can, but the homemade custard gives a richer, more authentic creamy texture and flavor that instant mixes lack.
What if I don’t have Nilla Wafers?
You can substitute with vanilla-flavored cookies, shortbread, or even graham crackers for a slightly different but still tasty crunch.
Is this recipe suitable for gluten-free diets?
Yes, if you use gluten-free vanilla wafers or cookies. The rest of the ingredients are naturally gluten-free.
For a sweet finish, you might enjoy pairing this pudding with my crispy garlic chicken for a full Southern-inspired meal or a fresh fruit salad to lighten things up.
Pin This Recipe!

Classic Creamy Banana Pudding Recipe Easy Homemade Dessert with Nilla Wafers

A classic creamy banana pudding made from scratch with homemade vanilla custard, ripe bananas, and crisp Nilla Wafers. This easy dessert is perfect for gatherings and nostalgic comfort food lovers.
- Prep Time: 15 minutes
- Cook Time: 15 minutes
- Total Time: 2 hours 30 minutes
- Yield: 8 servings 1x
- Category: Dessert
- Cuisine: Southern American
Ingredients
- 2 cups whole milk (or substitute with almond milk for a lighter option)
- 3/4 cup granulated sugar (adjust to taste)
- 3 tablespoons cornstarch
- 1/4 teaspoon salt
- 4 large egg yolks, room temperature
- 2 tablespoons unsalted butter, softened
- 2 teaspoons pure vanilla extract
- 4 to 5 ripe bananas, sliced
- 1 box Nilla Wafers (about 11 ounces)
- Optional: Whipped cream for topping (homemade or store-bought)
Instructions
- In a medium saucepan, whisk together sugar, cornstarch, and salt. Slowly pour in the 2 cups of milk while whisking to combine. Place the saucepan over medium heat.
- Stir constantly with a whisk or spatula to prevent lumps. After about 5-7 minutes, the mixture will thicken and start to bubble gently. Keep stirring to avoid scorching.
- In a separate bowl, lightly beat the 4 egg yolks. Slowly ladle about 1 cup of the hot milk mixture into the yolks while whisking constantly to warm them up without scrambling.
- Pour the tempered yolk mixture back into the saucepan. Continue cooking on medium heat for another 2-3 minutes, whisking constantly until the custard thickens further and coats the back of a spoon.
- Remove the pan from heat. Stir in the softened butter and vanilla extract until fully incorporated and smooth. Optionally, strain through a fine mesh sieve for extra smoothness.
- Transfer the pudding to a bowl. Cover with plastic wrap pressed directly on the surface to prevent a skin from forming. Refrigerate for at least 1 hour until fully chilled.
- Just before assembling, slice the bananas into thin rounds to avoid browning.
- In your chosen dish, start with a layer of Nilla Wafers, followed by a layer of banana slices, and then a layer of pudding. Repeat the layers until ingredients are used up, finishing with a pudding layer on top.
- Cover with plastic wrap and refrigerate for at least 2 hours, preferably overnight, to let the flavors meld and wafers soften slightly but still hold some crunch.
- Just before serving, spread or pipe whipped cream over the top for an extra creamy finish (optional).
Notes
Constant stirring during cooking prevents lumps and burning. Use room temperature eggs to avoid curdling. Slice bananas just before assembling to prevent browning. Chill pudding for at least 2 hours or overnight for best flavor and texture. Optional whipped cream topping adds lightness. Can substitute gluten-free vanilla cookies for Nilla Wafers for gluten-free option.
Nutrition
- Serving Size: 1 serving (about 1/8
- Calories: 250
- Fat: 6
- Carbohydrates: 40
- Protein: 3
Keywords: banana pudding, creamy banana pudding, Nilla Wafers, homemade dessert, classic banana pudding, easy dessert, Southern dessert