Love this? Save it for later!
Share the inspiration with your friends
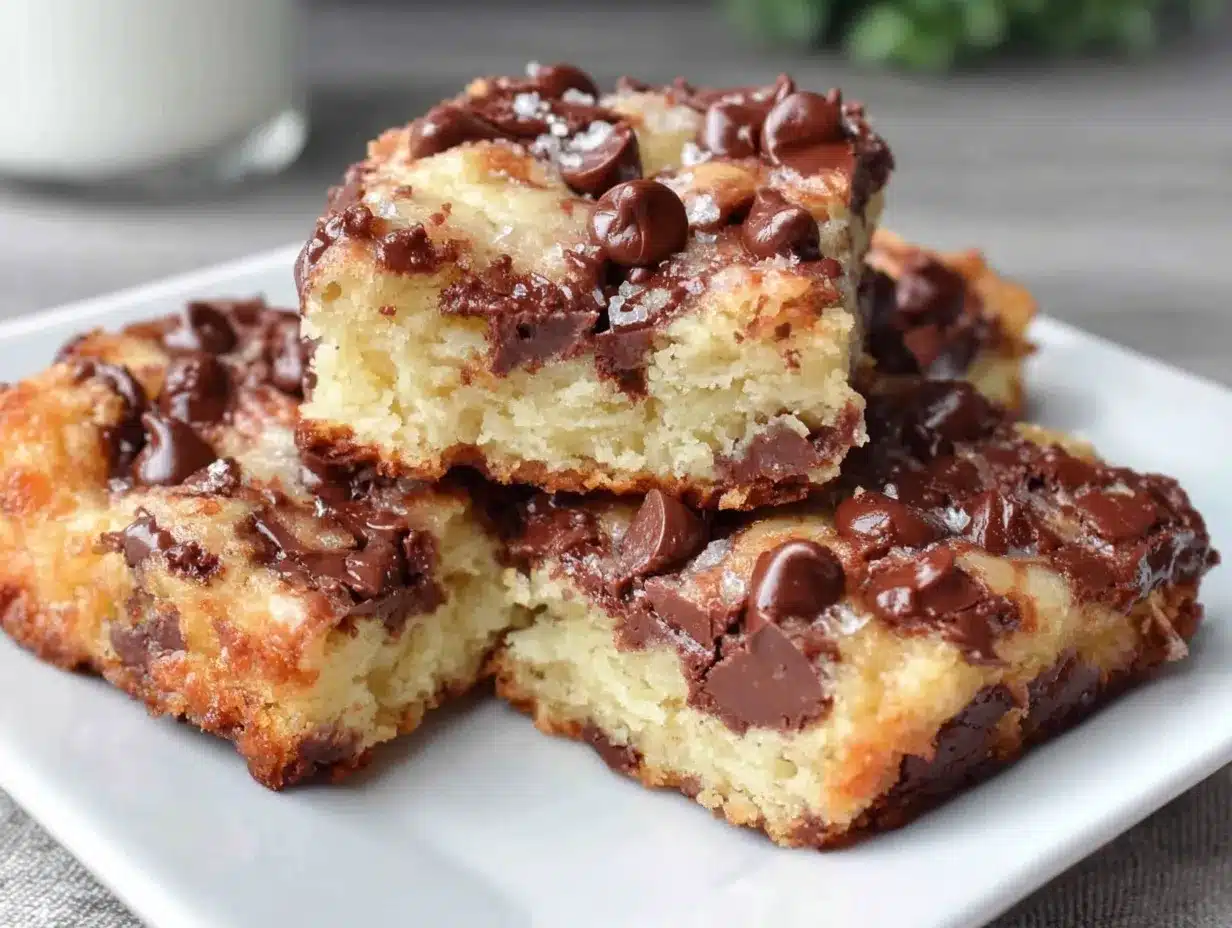
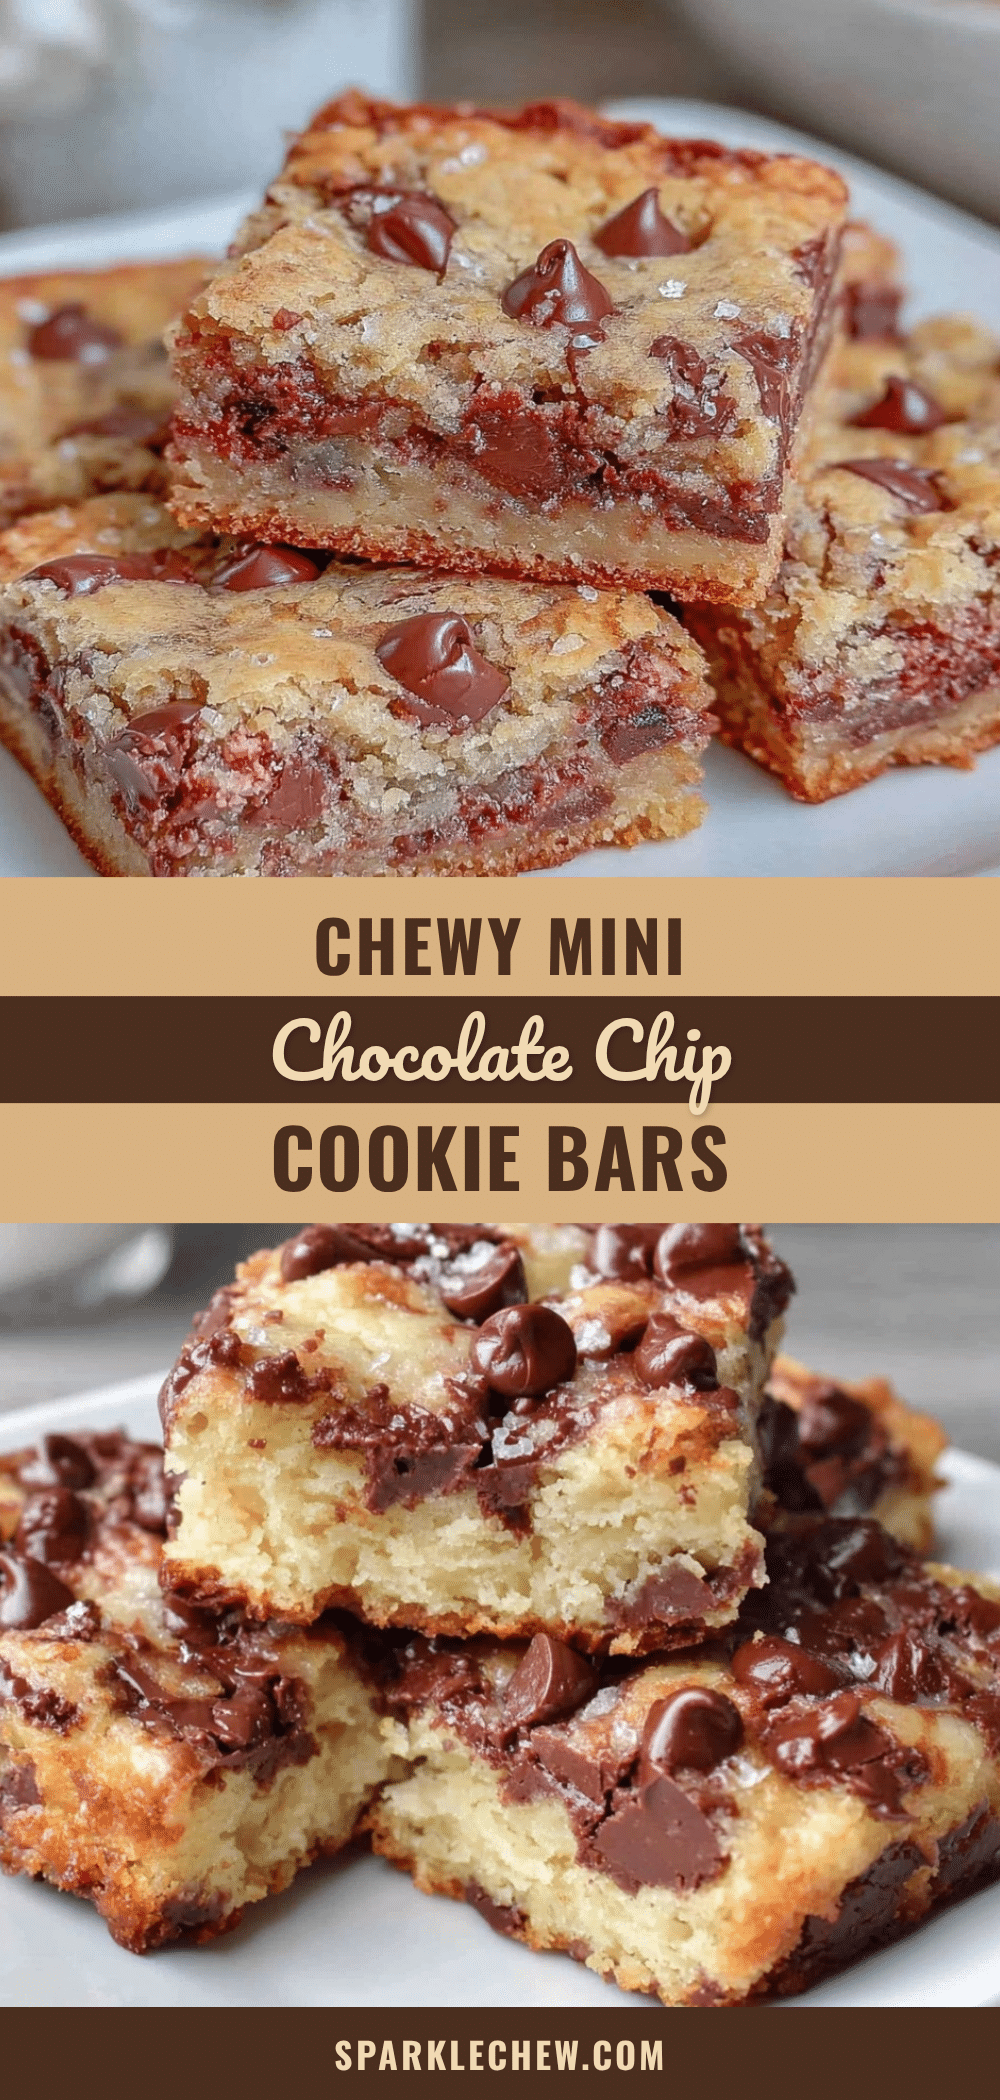
This was supposed to be a batch of classic chocolate chip cookies, the kind I’d send off in my daughter’s lunchbox with a little handwritten note. But I grabbed the wrong baking pan—the one meant for brownies, not cookies. The oven was running hotter than usual because I’d forgotten to adjust the temperature after preheating. And, honestly, I was already half-distracted by a phone call from an old friend. What came out of the oven was nothing like the neat, round cookies I’d planned—more like a big, chewy slab dotted with chocolate chips. At first, I was ready to toss them. Yet, after a bite, I realized these chewy mini chocolate chip cookie bars were something special.
You know that feeling when a kitchen mishap turns out better than the original idea? Maybe you’ve been there, juggling too many things and ending up with a surprising winner. These bars stayed with me because they’re perfect for lunchbox treats—easy to slice, less crumbly, and just the right chewy texture to please picky eaters. Plus, they pack that familiar chocolate chip cookie flavor but without the mess of loose crumbs. I’ve kept tweaking the recipe since that chaotic afternoon, but the essence remains: a happy, chewy accident that turned into a lunchbox favorite.
Why You’ll Love This Recipe
Having made these chewy mini chocolate chip cookie bars dozens of times, I can honestly say they’ve become my go-to for quick, fuss-free treats. Tested on both kids and adults (and passed with flying colors), these bars bring a satisfying chew that regular cookies sometimes miss. Here’s why you’ll want to keep this recipe at hand:
- Quick & Easy: Ready in under 30 minutes, these bars are perfect for busy mornings or last-minute lunch packing.
- Simple Ingredients: No exotic spices or hard-to-find items—just pantry staples you probably already have.
- Perfect for Lunchboxes: Mini bars are kid-friendly, less crumbly, and slice neatly for portion control.
- Crowd-Pleaser: Whether it’s a school snack or an office treat, these bars always get rave reviews.
- Unbelievably Delicious: The chewy texture combined with melty chocolate chips makes every bite satisfying and comforting.
This isn’t just another chocolate chip cookie recipe. The secret lies in the pan choice and a slightly higher moisture dough that keeps the bars chewy but not gooey. I’ve also found that chilling the dough before baking helps with that perfect texture. Honestly, it’s the kind of recipe that makes you close your eyes after the first bite and smile. Whether you’re packing lunchboxes or craving a quick sweet, these bars deliver comfort food with a neat, manageable twist.
What Ingredients You Will Need
This recipe uses simple, wholesome ingredients to deliver bold flavor and satisfying texture without the fuss. Most are pantry staples, and substitutions are easy if you need them. Here’s what you’ll gather:
- All-purpose flour: 1 ¾ cups (220g) – the base for structure; I prefer King Arthur Flour for consistency.
- Baking soda: ½ teaspoon – for just enough rise without puffing up like regular cookies.
- Salt: ½ teaspoon – balances sweetness and enhances flavor.
- Unsalted butter: ¾ cup (170g), softened – adds richness; use real butter for best taste.
- Brown sugar: ¾ cup (150g), packed – provides chewiness and depth of flavor.
- Granulated sugar: ¼ cup (50g) – balances the brown sugar’s moisture.
- Large eggs: 2, room temperature – bind everything together.
- Pure vanilla extract: 2 teaspoons – brings that classic cookie aroma.
- Mini semisweet chocolate chips: 1 ½ cups (270g) – mini chips distribute evenly for every chewy bite; Ghirardelli mini chips work great.
Substitution tips: For gluten-free, swap all-purpose flour with a 1:1 gluten-free baking blend. Dairy-free? Replace butter with coconut oil and use dairy-free chocolate chips. If you want to sneak in some nutrition, add ¼ cup finely chopped walnuts or oats for texture variation without losing chewiness.
Equipment Needed
For these chewy mini chocolate chip cookie bars, you don’t need fancy tools, but a few basics make the process smoother:
- 9×9-inch baking pan: Metal or glass works, but metal pans tend to give a crisper edge (non-stick is helpful).
- Mixing bowls: One large for wet ingredients and one for dry.
- Electric mixer or sturdy whisk: I use a handheld mixer for speed, but a whisk works if you have the arm power.
- Spatula: For folding in chocolate chips without overmixing.
- Parchment paper: Makes cleanup easy and ensures bars come out cleanly.
- Measuring cups and spoons: Precision counts here to get texture right.
If you don’t have a 9×9 pan, an 8×8 will work—just bake a bit longer and adjust slicing size. I once used a disposable aluminum pan when I was out of my usual one, and it still turned out pretty well. Just keep an eye on baking time as thinner bars bake faster.
Preparation Method
- Preheat your oven to 350°F (175°C). Prepare your 9×9-inch pan by lining it with parchment paper, leaving some overhang for easy removal later. This step saves you from scrubbing later and helps the bars come out clean.
- Mix dry ingredients: In a medium bowl, whisk together 1 ¾ cups (220g) all-purpose flour, ½ teaspoon baking soda, and ½ teaspoon salt. Set aside. This ensures even distribution of leavening agents.
- Cream the butter and sugars: In a large bowl, use an electric mixer on medium speed to beat ¾ cup (170g) softened unsalted butter, ¾ cup (150g) packed brown sugar, and ¼ cup (50g) granulated sugar until light and fluffy, about 2-3 minutes. Don’t skip this—it’s key for that chewy texture.
- Add eggs and vanilla: Beat in 2 large eggs, one at a time, then stir in 2 teaspoons pure vanilla extract. Make sure everything is well combined but don’t overbeat, or the bars can become cakey.
- Combine wet and dry: Gradually add the dry ingredients to the wet, mixing on low speed or folding gently with a spatula. Stop as soon as you see no visible flour. Overmixing can make the bars tough.
- Fold in mini chocolate chips: Gently fold in 1 ½ cups (270g) mini semisweet chocolate chips for even distribution. Mini chips melt just right and spread flavor without overwhelming.
- Spread the batter: Transfer the dough into your prepared pan, spreading evenly with a spatula. Smooth the top to ensure even baking.
- Bake: Place the pan in the preheated oven and bake for 22-26 minutes. Start checking at 22 minutes—edges should be golden, and the center set but still soft. A toothpick inserted will come out with a few moist crumbs but not wet batter.
- Cool completely: Allow the bars to cool in the pan on a wire rack for at least 30 minutes before slicing. This step helps them firm up and slice cleanly.
- Slice into mini bars: Using a sharp knife, cut into about 16 squares for perfect lunchbox-sized treats. Store any extras in an airtight container.
Pro tip: If your oven runs hot, tent the bars loosely with foil halfway through baking to prevent over-browning. Also, chilling the dough for 20 minutes before baking can improve texture if you have time.
Cooking Tips & Techniques
Making chewy mini chocolate chip cookie bars is easier when you keep these tips in mind:
- Butter temperature matters: Softened butter creams better with sugars, trapping air that creates the chewy bite. Too melted and the dough gets oily; too cold and it won’t mix well.
- Don’t overmix flour: Stir just until combined. Overmixing develops gluten, leading to tough bars rather than chewy.
- Use mini chocolate chips: Regular chips can clump, and bars might crumble. Minis melt evenly and spread flavor without breaking the dough’s structure.
- Watch your baking time: Oven temperatures vary, so start checking early. Undercooked bars are gooey; overcooked lose that chew.
- Cooling is crucial: The bars firm up as they cool. Cutting too soon can cause crumbling and uneven slices.
- Multitask during baking: While bars bake, clean up your prep area or prep the next lunchbox item—makes the process less tedious.
Honestly, I learned the hard way that baking time is everything here. One batch I left in too long, and the bars were dry as cardboard. Since then, I set a timer and peek early. Also, I prefer using a non-stick pan or lining with parchment paper to avoid scraping stuck bits.
Variations & Adaptations
Feel free to make these chewy mini chocolate chip cookie bars your own with these easy tweaks:
- Nutty twist: Add ½ cup chopped toasted pecans or walnuts for crunch and flavor depth. I like this version with a cup of strong coffee.
- Seasonal swap: Stir in ½ cup dried cranberries or chopped dried apricots for a fruity surprise, perfect for holiday lunchboxes.
- Healthier option: Substitute half the flour with whole wheat pastry flour and reduce sugar by 2 tablespoons for a slightly denser but still chewy bar.
- Gluten-free adaptation: Use a 1:1 gluten-free baking blend and add an extra egg yolk to boost moisture.
- Chocolate upgrade: Mix half semisweet and half white chocolate chips for a sweeter, creamier bite.
Once, I tried adding a tablespoon of instant espresso powder to the batter—it brought out the chocolate flavor in a subtle but impressive way. If you’re adventurous, these bars handle flavor twists well without losing their chewy charm.
Serving & Storage Suggestions
These chewy mini chocolate chip cookie bars are best served at room temperature. They’re perfect as an afternoon pick-me-up or tucked into lunchboxes alongside a fresh fruit cup or a glass of cold milk. For a fun twist, try warming a bar slightly and topping it with a scoop of vanilla ice cream for a quick dessert.
To store, keep bars in an airtight container at room temperature for up to 4 days. For longer storage, freeze them in a sealed bag or container for up to 3 months. When ready to eat, thaw overnight in the fridge or microwave briefly (about 15 seconds) to regain softness.
Flavors actually meld and improve a bit after a day or two, so if you can wait, that’s even better. These bars travel well too, making them ideal for lunchbox treats or snacks on the go.
Nutritional Information & Benefits
Each chewy mini chocolate chip cookie bar (assuming 16 bars per batch) contains approximately:
| Nutrient | Amount |
|---|---|
| Calories | 140 |
| Fat | 7g |
| Saturated Fat | 4g |
| Carbohydrates | 19g |
| Sugar | 12g |
| Protein | 1.5g |
| Fiber | 0.5g |
These bars provide a quick energy boost thanks to the carbs and sugars, while the butter and eggs add some protein and fat for satiety. Using real butter and quality chocolate chips means you get satisfying flavor and texture. If you opt for whole wheat or add nuts, you boost fiber and healthy fats.
Keep in mind, this recipe contains gluten, dairy, and eggs, so it’s not suitable for everyone. But with simple swaps, it can fit gluten-free or dairy-free diets. From a wellness perspective, having a homemade treat like this means you control ingredients and avoid preservatives found in store-bought snacks.
Conclusion
These chewy mini chocolate chip cookie bars turned a kitchen mishap into a recipe I rely on time and again. They’re easy to make, kid-approved, and perfect for lunchbox treats that won’t crumble into a mess. Whether you customize them with nuts, fruit, or a gluten-free twist, they bring that familiar, comforting chocolate chip cookie flavor in a portable, chewy package.
I love these bars because they’re forgiving—both in the kitchen and in life. If you’re juggling a busy schedule but want to treat your family with something homemade, this recipe fits right in. Give it a try, tweak it as you like, and let me know how your batch turns out. Trust me, your lunchbox game will thank you!
FAQs
Can I use regular-sized chocolate chips instead of mini chips?
You can, but mini chips distribute more evenly and help keep the bars from crumbling. If using regular chips, expect a slightly different texture and slice carefully.
How do I make these bars gluten-free?
Swap the all-purpose flour with a 1:1 gluten-free baking blend. Adding an extra egg yolk helps with moisture and binding.
Can I make these bars ahead of time?
Absolutely! They store well at room temperature for several days and freeze nicely for months. Just thaw or warm briefly before serving.
What if my bars turn out cakey instead of chewy?
That usually means the dough was overmixed or baked too long. Mix just until combined and watch the baking time closely. Cooling completely before slicing also helps.
Can I add nuts or dried fruit to the recipe?
Yes! Chopped nuts or dried fruit (like cranberries) make great additions. Add about ½ cup during the chocolate chip folding step.
Pin This Recipe!
Chewy Mini Chocolate Chip Cookie Bars Easy Lunchbox Treat Recipe
These chewy mini chocolate chip cookie bars are perfect for lunchbox treats—easy to slice, less crumbly, and just the right chewy texture to please picky eaters. They pack the familiar chocolate chip cookie flavor without the mess of loose crumbs.
- Prep Time: 10 minutes
- Cook Time: 22-26 minutes
- Total Time: 40-45 minutes
- Yield: 16 mini bars 1x
- Category: Dessert
- Cuisine: American
Ingredients
- 1 ¾ cups (220g) all-purpose flour
- ½ teaspoon baking soda
- ½ teaspoon salt
- ¾ cup (170g) unsalted butter, softened
- ¾ cup (150g) packed brown sugar
- ¼ cup (50g) granulated sugar
- 2 large eggs, room temperature
- 2 teaspoons pure vanilla extract
- 1 ½ cups (270g) mini semisweet chocolate chips
Instructions
- Preheat your oven to 350°F (175°C). Prepare your 9×9-inch pan by lining it with parchment paper, leaving some overhang for easy removal later.
- In a medium bowl, whisk together 1 ¾ cups (220g) all-purpose flour, ½ teaspoon baking soda, and ½ teaspoon salt. Set aside.
- In a large bowl, use an electric mixer on medium speed to beat ¾ cup (170g) softened unsalted butter, ¾ cup (150g) packed brown sugar, and ¼ cup (50g) granulated sugar until light and fluffy, about 2-3 minutes.
- Beat in 2 large eggs, one at a time, then stir in 2 teaspoons pure vanilla extract. Mix until well combined but do not overbeat.
- Gradually add the dry ingredients to the wet, mixing on low speed or folding gently with a spatula until no visible flour remains. Avoid overmixing.
- Gently fold in 1 ½ cups (270g) mini semisweet chocolate chips for even distribution.
- Transfer the dough into your prepared pan, spreading evenly with a spatula and smoothing the top.
- Bake for 22-26 minutes. Start checking at 22 minutes; edges should be golden and center set but still soft. A toothpick inserted should come out with a few moist crumbs but not wet batter.
- Allow the bars to cool in the pan on a wire rack for at least 30 minutes before slicing.
- Using a sharp knife, cut into about 16 squares for mini bars. Store extras in an airtight container.
Notes
Use softened butter (not melted) for best texture. Do not overmix the flour to avoid tough bars. Mini chocolate chips distribute flavor evenly and help prevent crumbling. Start checking baking time early to avoid overbaking. Cooling completely before slicing helps bars firm up and slice cleanly. Chilling dough for 20 minutes before baking can improve texture. Tent with foil if oven runs hot to prevent over-browning.
Nutrition
- Serving Size: 1 mini bar (1/16 of
- Calories: 140
- Sugar: 12
- Sodium: 100
- Fat: 7
- Saturated Fat: 4
- Carbohydrates: 19
- Fiber: 0.5
- Protein: 1.5
Keywords: chewy chocolate chip cookie bars, mini cookie bars, lunchbox treats, easy cookie bars, chocolate chip bars, kid-friendly dessert