Love this? Save it for later!
Share the inspiration with your friends
I had sworn off candy corn. Years of it. Every October, those little orange, yellow, and white triangles would appear in bowls at every party, and I’d walk right past them. Too sweet. Kind of waxy. Honestly, I couldn’t understand the appeal. Then last Tuesday, my neighbor Sarah knocked on my door holding a half-empty bag of leftover Halloween candy and a desperate look. “Please,” she said. “Take these before I eat them all while folding laundry.” I took the bag, mostly out of pity, and tossed it in my pantry without a second thought.
But that bag sat there for three days, staring at me every time I grabbed the flour. I started thinking about those little candies differently. What if they weren’t meant to be eaten alone? What if they needed something else to shine? I mean, candy corn has that perfect chewy texture when it melts just a little. And the colors? They’d look gorgeous studded through a blondie. So I grabbed a mixing bowl, some white chocolate chips, and decided to give those unloved candies a second chance. Let me tell you, the first bite caught me completely off guard.
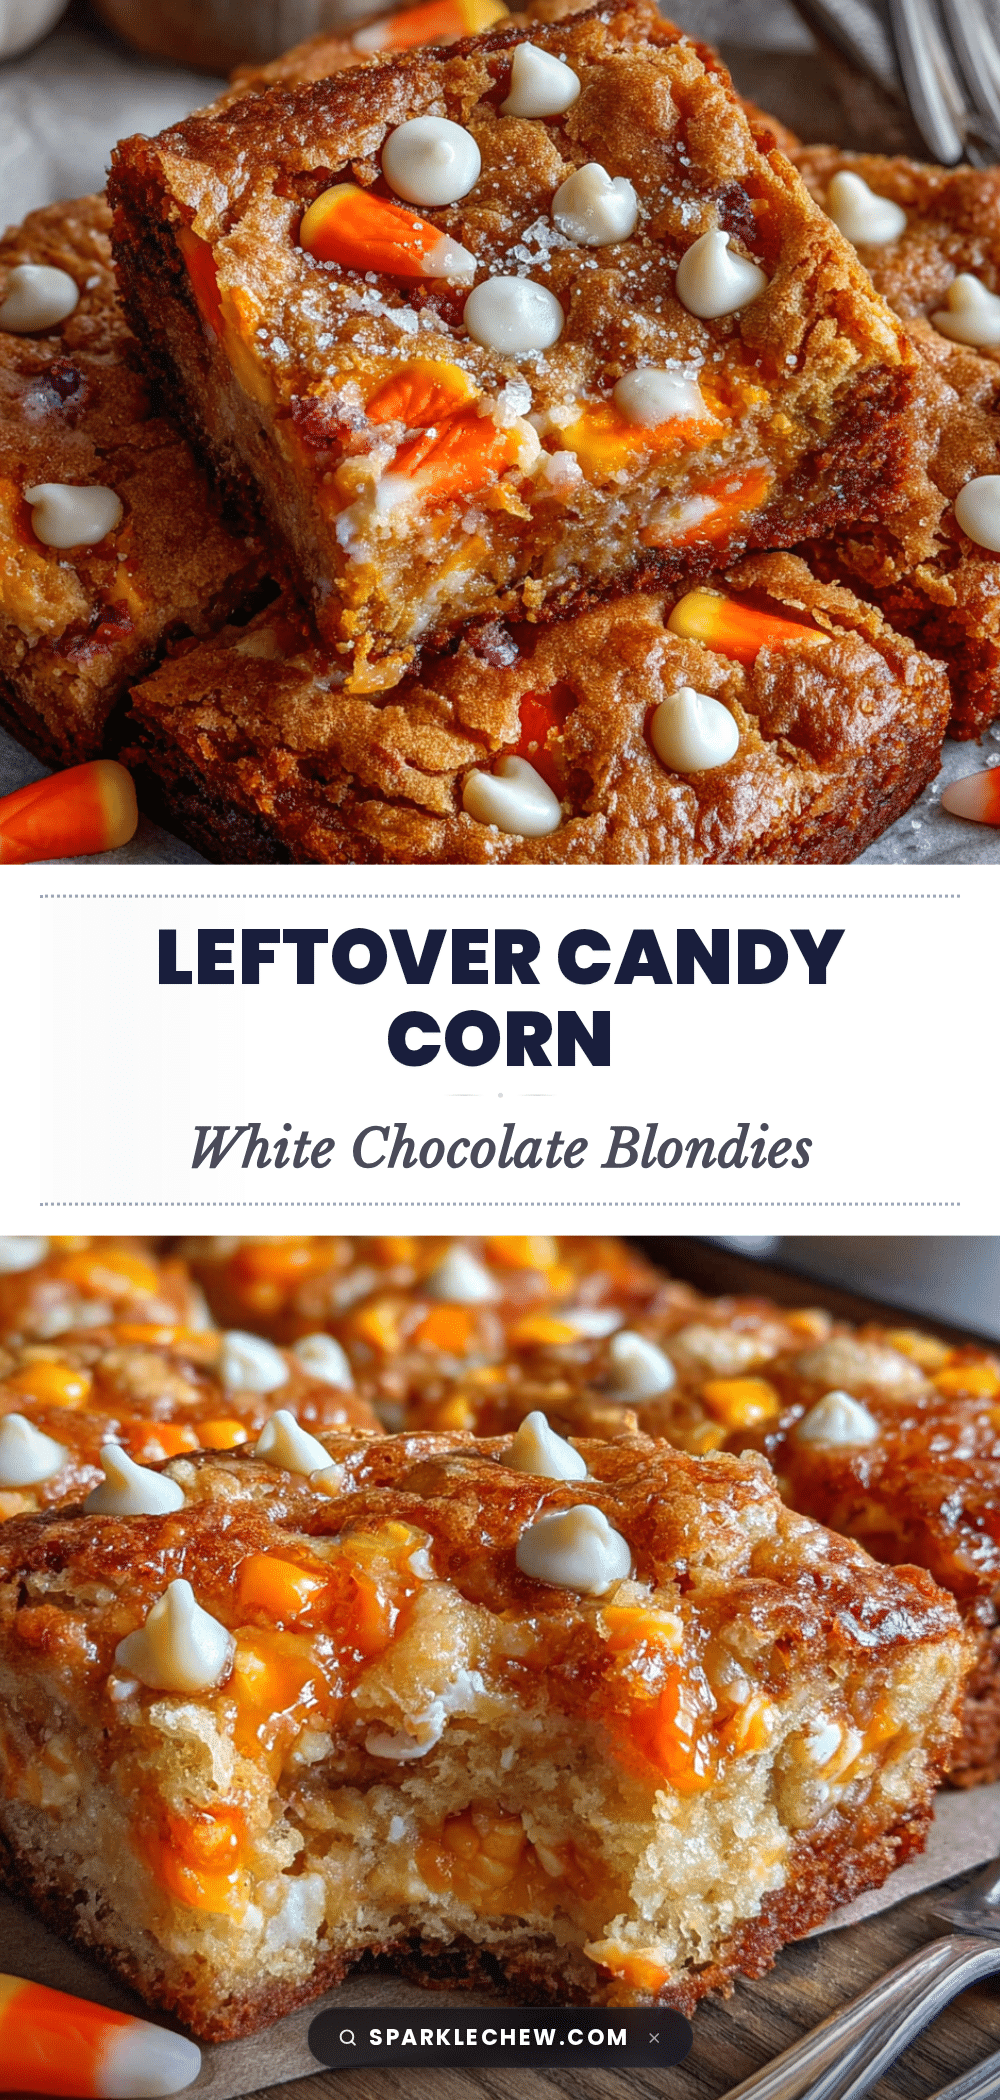
That golden-brown square with gooey pockets of melted candy corn and creamy white chocolate chips was nothing short of a revelation. The candy corn softens into these little chewy bursts of sweetness that play beautifully against the buttery blondie base. It’s not too sweet either, which surprised me. The salt in the butter and a pinch of flaky salt on top balance everything out. Maybe you’ve been there, staring at a bag of candy corn wondering what to do with it. This is your answer. I keep making these because they turn something I used to avoid into something I genuinely crave.
Why You’ll Love This Recipe
These chewy leftover candy corn blondies solve a very real problem. What do you do with all that Halloween candy that nobody wants to eat plain? You bake it into something irresistible. I tested this recipe four times to get the texture just right, and my entire street happily volunteered as taste testers. Here is why these blondies deserve a spot in your baking rotation:
- Quick & Easy: From start to oven in under 15 minutes. No mixer required, just one bowl and a spatula.
- Simple Ingredients: You likely have everything except the candy corn in your pantry right now. Butter, sugar, eggs, flour, vanilla, and white chocolate chips.
- Perfect for Post-Halloween: Great for classroom treats, office parties, or just using up that half-eaten bag of candy taking up space in your cupboard.
- Crowd-Pleaser: Kids love the colorful bits, and adults are always surprised by how good it actually tastes. I’ve watched skeptics go back for seconds.
- Unbelievably Chewy: The candy corn adds a unique texture you cannot get from any other mix-in. It melts into soft, taffy-like pockets that make every bite interesting.
What makes these blondies different from every other recipe? It is the way the candy corn transforms during baking. It doesn’t disappear or turn into a sticky mess. It softens into these little chewy nuggets that taste like caramel with a hint of honey. The white chocolate chips add creaminess, and the blondie base stays perfectly dense and buttery. This is not just another way to use up candy. It is the best way.
Honestly, these blondies are the kind of treat that makes you close your eyes after the first bite. They are comfort food reimagined with a seasonal twist, faster than making actual caramel, and with the same soul-soothing satisfaction. Perfect for impressing guests without any stress, or turning a random Tuesday into something memorable.
What Ingredients You Will Need
This recipe uses simple, wholesome ingredients to deliver bold flavor and that signature chewy texture. Most of these are pantry staples, which makes this the perfect last-minute baking project.
For the Blondie Base
- 1/2 cup (113g) unsalted butter, melted and slightly cooled (I use Kerrygold for the rich flavor, but any good unsalted butter works)
- 1 cup (200g) packed light brown sugar (adds moisture and that deep, almost caramel-like sweetness)
- 1 large egg, room temperature (cold eggs can seize the melted butter)
- 1 teaspoon vanilla extract (pure, not imitation, for the best flavor)
- 1 cup (125g) all-purpose flour (spooned and leveled, not scooped, to avoid dense blondies)
- 1/2 teaspoon baking powder (for a slight lift without making them cakey)
- 1/4 teaspoon salt (essential for balancing the sweetness)
For the Mix-Ins
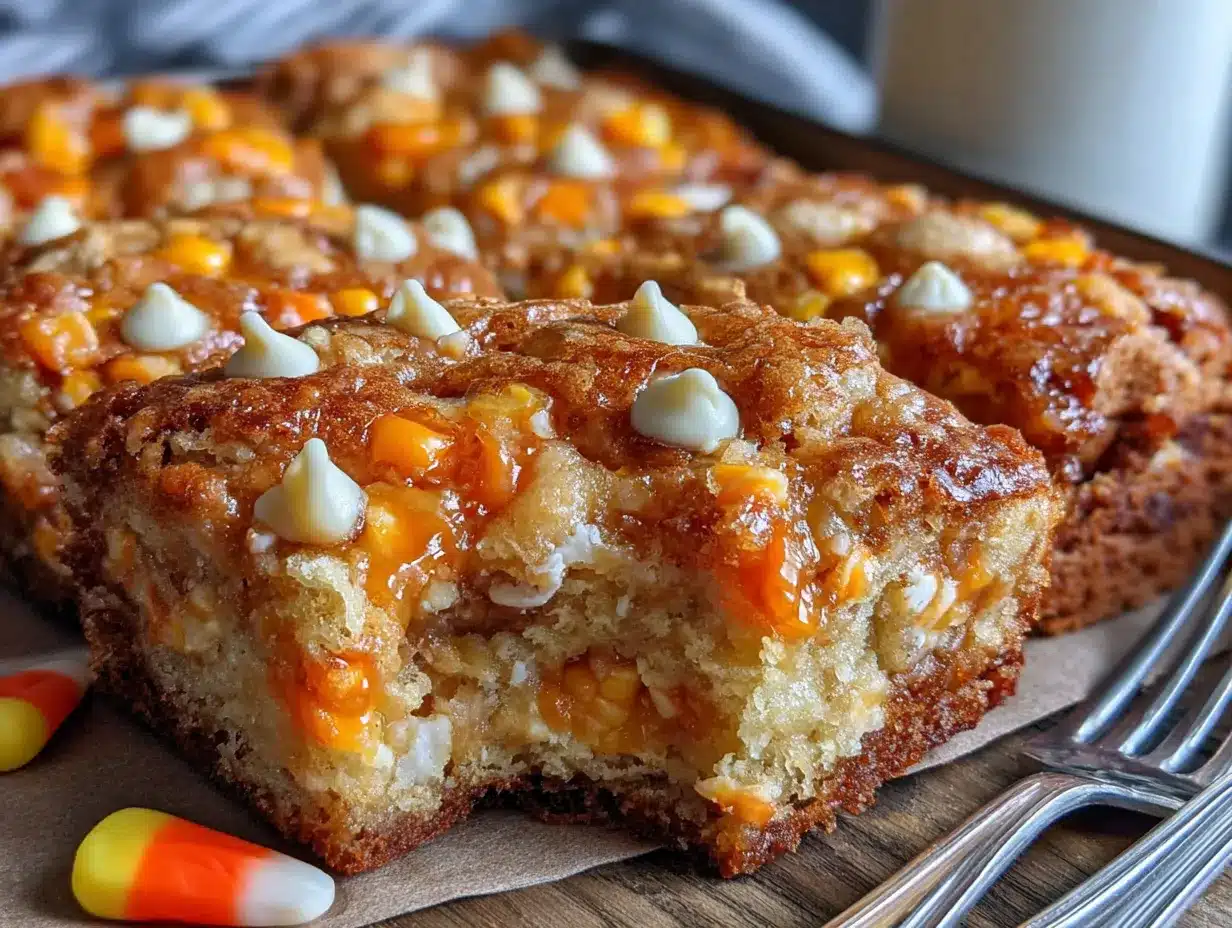
- 1 cup (about 150g) leftover candy corn (the classic orange, yellow, and white kind, not the flavored varieties)
- 1/2 cup (90g) white chocolate chips (I prefer Ghirardelli or Guittard for the best melt and creaminess)
Optional Topping
- Flaky sea salt (like Maldon, for sprinkling on top right after baking, it makes a huge difference)
A few ingredient notes from my testing. The candy corn you use matters a little. Fresh bags from this year work best because they are softer. Stale, rock-hard candy corn from last Halloween won’t soften properly during baking. If your candy corn feels hard, try microwaving it for 10 seconds before folding it in. Also, do not use the autumn blend with the pumpkin-shaped pieces. Those have a different texture and don’t melt the same way. Stick with the classic triangles.
For the white chocolate chips, avoid the white baking chips that are labeled as “white morsels” if possible. Real white chocolate contains cocoa butter and melts beautifully. The cheaper alternatives can turn gritty. If you only have white baking chips, they will still work, just expect a slightly different texture.
You can substitute the all-purpose flour with a gluten-free 1:1 baking blend if needed. I have tested this with Bob’s Red Mill gluten-free flour, and it works well. Just add an extra tablespoon of flour to compensate for the denser texture of gluten-free blends.
Equipment Needed
You do not need any fancy equipment for these blondies. That is part of the beauty. Here is what you will need:
- 8×8-inch baking pan (a 9×9 works too, but the blondies will be slightly thinner and bake faster)
- Parchment paper (for easy lifting and cleanup, I never skip this)
- Large mixing bowl (any size works, just make sure it is big enough for folding)
- Whisk or spatula (a wooden spoon works fine too)
- Measuring cups and spoons (for accuracy, especially with the flour)
- Cooling rack (optional but helps the blondies cool evenly)
If you do not have an 8×8 pan, you can use a 9-inch round cake pan. Just adjust the baking time down by about 5 minutes and check early. I have also baked these in a 9×13 pan for thinner, bar-style blondies. That takes about 18 to 20 minutes. A tip from experience: line your pan with parchment paper that hangs over two sides. This creates handles that let you lift the entire batch out cleanly. No scraping, no broken edges, no frustration.
Preparation Method
Preheat your oven to 350°F (175°C). Line your 8×8 baking pan with parchment paper, leaving some overhang on two opposite sides. This will be your lifeline later. Set the pan aside while you make the batter.
- Melt the butter. Place the 1/2 cup of unsalted butter in a microwave-safe bowl and heat in 20-second bursts until fully melted. Let it cool for about 5 minutes. You want it warm, not hot. Hot butter can scramble the egg, and nobody wants chunks of cooked egg in their blondies. I learned this the hard way on my first test batch.
- Mix the sugar and butter. Pour the melted butter into your large mixing bowl. Add the 1 cup of packed light brown sugar. Whisk them together until the mixture looks like wet sand and smells amazing. This takes about 30 seconds. Do not skip this step, it helps dissolve the sugar for a smoother texture.
- Add the egg and vanilla. Crack the room-temperature egg into the bowl. Add the 1 teaspoon of vanilla extract. Whisk vigorously until the mixture is smooth, pale, and slightly thickened. This should take about 1 minute. The batter should look glossy and fall off the whisk in a thick ribbon. If it looks separated or greasy, your butter was too hot. No worries, just whisk in a tablespoon of flour to bring it back together.
- Combine the dry ingredients. In a separate small bowl, whisk together the 1 cup of all-purpose flour, 1/2 teaspoon of baking powder, and 1/4 teaspoon of salt. This ensures the baking powder is evenly distributed so you don’t get one puffy blondie and one flat one.
- Fold in the dry ingredients. Add the flour mixture to the wet ingredients. Use a spatula to fold gently. Stop as soon as you no longer see streaks of flour. Overmixing will make the blondies tough. A few small lumps are perfectly fine. The batter will be thick and slightly sticky, that is what you want.
- Fold in the candy corn and white chocolate chips. Add the 1 cup of candy corn and 1/2 cup of white chocolate chips to the batter. Fold them in with a few gentle strokes. The candy corn will want to clump together, so take an extra moment to distribute them evenly. If the batter feels too stiff to fold, let it sit for 2 minutes. The moisture from the butter will soften the dough slightly.
- Transfer to the pan. Scrape the batter into your prepared baking pan. Use the spatula to spread it evenly into all corners. The batter will be thick, so press it down gently. Wet your spatula slightly if the batter sticks to it. Smooth the top as best you can, but it does not need to be perfect.
- Bake. Place the pan on the middle rack of your preheated oven. Bake for 22 to 26 minutes. At 22 minutes, start checking. The edges should be golden brown and set, but the center should still look slightly soft and underdone. A toothpick inserted into the center should come out with a few moist crumbs, not wet batter. If it comes out clean, you have overbaked them. Trust the jiggle. A slight wobble in the center means fudgy, chewy blondies.
- Cool completely. Place the pan on a cooling rack. Sprinkle flaky sea salt over the top while the blondies are still warm. Let them cool in the pan for at least 30 minutes. Then use the parchment paper handles to lift the entire block out onto the cooling rack. Let them cool completely before cutting. This is the hardest part. I know you want to cut into them immediately. Wait. Warm blondies will crumble and fall apart. Patience rewards you with clean, perfect squares.
- Cut and serve. Use a sharp chef’s knife to cut the blondies into 9 or 16 squares, depending on how generous you feel. Wipe the knife clean between cuts for the neatest edges. Serve immediately or store for later.
Cooking Tips & Techniques
Here are the things I wish someone had told me before my first batch. The biggest mistake people make with candy corn blondies is overbaking them. Candy corn is already very sweet and contains a lot of sugar. When it bakes, that sugar melts and creates these soft, chewy pockets. But if you overbake, those pockets turn into hard, crunchy bits that can crack your teeth. Pull the blondies out when the center still looks slightly underdone. The residual heat will finish the cooking process as they cool.
Another tip I learned through trial and error. Chop the candy corn in half if you want smaller, more evenly distributed pieces. Some of the larger triangles can create big pockets of melted sugar that make cutting difficult. A quick rough chop with a knife solves this. I actually prefer leaving them whole because I love biting into a big chewy piece, but it is your call.
If you are making these for a party or bake sale, double the recipe and use a 9×13 pan. The baking time increases to about 28 to 32 minutes. Cover the pan loosely with foil halfway through if the top is browning too quickly. I have also made these as mini blondies in a muffin tin. Grease the tin well, fill each cup about two-thirds full, and bake for 14 to 16 minutes. They are adorable and perfect for portion control.
Timing tip: These blondies are actually better the next day. The flavors meld together overnight, and the texture becomes even more fudgy and cohesive. I often make them the night before I need them. Just cool them completely, cover the pan tightly with plastic wrap, and leave them on the counter. Cut them the next morning. Your future self will thank you.
One more thing. If your white chocolate chips sink to the bottom of the batter, toss them in a tablespoon of flour before folding them in. This creates a little coating that helps them stay suspended in the batter. Same trick works for the candy corn if you are worried about them all sinking to the bottom.
Variations & Adaptations
These blondies are wonderfully adaptable. Here are some variations I have tried and loved.
Chocolate Lover’s Version: Swap the white chocolate chips for dark chocolate chips or semi-sweet chunks. The bitterness of dark chocolate cuts through the sweetness of the candy corn beautifully. I have also used chopped chocolate bars for larger, more decadent pools of chocolate.
Fall Spice Blondies: Add 1 teaspoon of pumpkin pie spice or cinnamon to the flour mixture. This gives the blondies a warm, cozy flavor that pairs perfectly with the candy corn. I made this version for Thanksgiving last year, and it disappeared before the turkey hit the table.
Nutty Crunch: Fold in 1/2 cup of toasted pecans or walnuts along with the candy corn. The crunch adds a lovely textural contrast to the chewy blondies. Toast the nuts first at 350°F for 5 to 7 minutes to bring out their flavor.
Gluten-Free Option: Use a 1:1 gluten-free baking flour blend. Add an extra tablespoon of flour to the recipe. The texture will be slightly more tender, but still delicious. I tested this with King Arthur Measure for Measure, and it worked great.
Vegan Adaptation: Use melted coconut oil or vegan butter instead of dairy butter. Replace the egg with a flax egg (1 tablespoon ground flaxseed mixed with 3 tablespoons water, let sit for 5 minutes). Use vegan white chocolate chips. The texture will be slightly more cakey, but the flavor is still wonderful.
Peppermint Holiday Version: Substitute the vanilla extract with 1/2 teaspoon of peppermint extract. Use red and green candy corn if you can find it, or just add crushed candy canes on top after baking. This is a fun Christmas treat that always gets attention.
Serving & Storage Suggestions
These blondies are best served at room temperature. The texture is perfectly chewy, and the white chocolate chips are set but still creamy. If you want to serve them warm, pop a square in the microwave for 10 seconds. The candy corn softens slightly, and the white chocolate gets melty. It is a completely different experience and equally delicious.
For presentation, I like to arrange the blondies on a wooden board or a simple white plate. A light dusting of powdered sugar makes them look extra special. Or drizzle a little melted white chocolate over the top in zigzag patterns. It looks impressive but takes about 30 seconds.
These blondies pair beautifully with a cold glass of milk, a hot cup of coffee, or a scoop of vanilla ice cream. For a dessert board, serve them alongside fresh berries, dark chocolate pieces, and a pile of salted caramel popcorn. The salty-sweet combination is irresistible.
Storage: Keep the blondies in an airtight container at room temperature for up to 5 days. Place a sheet of parchment paper between layers to prevent sticking. Do not refrigerate them unless absolutely necessary. The refrigerator dries out blondies and makes them crumbly.
Freezer Instructions: These blondies freeze beautifully. Wrap each square individually in plastic wrap, then place them in a freezer-safe bag or container. Freeze for up to 3 months. To thaw, leave them on the counter for about 30 minutes. You can also microwave a frozen blondie for 20 seconds for an instant treat.
One thing I have noticed. The flavors actually improve after a day or two. The candy corn melds into the blondie base more fully, and the sweetness becomes more balanced. So do not worry if you have leftovers. They will be even better tomorrow.
Nutritional Information & Benefits
Here is the approximate nutritional breakdown for one blondie (based on 9 servings):
| Nutrient | Amount per Blondie |
|---|---|
| Calories | 320 |
| Total Fat | 14g |
| Saturated Fat | 8g |
| Cholesterol | 45mg |
| Sodium | 180mg |
| Total Carbohydrates | 48g |
| Dietary Fiber | 1g |
| Sugars | 35g |
| Protein | 3g |
These blondies are definitely a treat, not an everyday snack. But they do have a few redeeming qualities. The butter provides a small amount of vitamin A, and the egg adds protein. The white chocolate chips contain calcium from the milk solids. If you use dark chocolate chips instead, you will get some antioxidants. The flaky sea salt helps balance the sugar and provides trace minerals.
For anyone watching their sugar intake, these are best enjoyed in moderation. One small blondie is plenty satisfying. I like to cut mine into 16 smaller squares instead of 9. That way, I can enjoy one without overdoing it. They are also a great option for gluten-free diets if you use the right flour blend. Just be aware that candy corn is not gluten-free certified in all brands, so check the label if that matters to you.
Conclusion
These chewy leftover candy corn blondies with white chocolate chips turned me from a candy corn skeptic into someone who actually looks forward to Halloween leftovers. They are proof that even the most questionable ingredients can become something wonderful with a little creativity and a hot oven. The combination of chewy candy corn, creamy white chocolate, and buttery blondie base is genuinely surprising. I have made these for neighbors, coworkers, and family gatherings, and every single person has asked for the recipe.
I encourage you to make these your own. Add nuts, swap the chocolate, throw in some cinnamon, or keep it exactly as written. The beauty of this recipe is how forgiving and adaptable it is. Use up that bag of candy corn sitting in your pantry. Give it a second chance. You might just surprise yourself.
I would love to hear how these turn out for you. Drop a comment below and let me know if you tried any variations. Share a photo of your blondies if you feel like it. And if you have another creative way to use up leftover Halloween candy, I am all ears. Happy baking, friends!
Frequently Asked Questions
Can I use stale candy corn for this recipe?
Stale candy corn that has hardened will not soften properly during baking. It will stay crunchy instead of becoming chewy. If your candy corn feels rock hard, try microwaving it for 10 to 15 seconds before adding it to the batter. This helps rehydrate it slightly. Fresh candy corn from this year’s bag works best.
Why did my blondies turn out cakey instead of chewy?
Cakey blondies usually mean you overmixed the batter or used too much flour. Mix the dry ingredients in gently and stop as soon as the flour disappears. Also, make sure you are measuring your flour correctly. Spoon it into the measuring cup and level it off. Scooping directly from the bag packs in too much flour and leads to dry, cakey results.
Can I freeze these blondies?
Absolutely. Wrap each blondie individually in plastic wrap, then place them in a freezer-safe bag or container. They will stay fresh for up to 3 months. To thaw, leave them on the counter for about 30 minutes. You can also microwave a frozen blondie for 20 seconds for a warm treat.
Do I have to use white chocolate chips?
Not at all. White chocolate chips add creaminess and balance the sweetness, but you can use semi-sweet, dark chocolate, or even butterscotch chips. Milk chocolate chips will make the blondies very sweet, so I recommend dark chocolate if you want to cut the sugar. Chopped chocolate bars also work great.
How do I keep the candy corn from sinking to the bottom?
Toss the candy corn in a tablespoon of flour before folding it into the batter. This creates a light coating that helps the pieces stay suspended. Also, make sure your batter is thick enough. If the batter seems too thin, let it rest for 2 minutes. The flour will absorb some moisture and thicken up, which helps hold the mix-ins in place.
Pin This Recipe!
Chewy Leftover Candy Corn Blondies: Easy White Chocolate Recipe
Transform leftover Halloween candy into irresistible chewy blondies with gooey pockets of melted candy corn and creamy white chocolate chips. This quick and easy one-bowl recipe turns a questionable ingredient into a crowd-pleasing treat.
- Prep Time: 15 minutes
- Cook Time: 25 minutes
- Total Time: 40 minutes
- Yield: 9 servings 1x
- Category: Dessert
- Cuisine: American
Ingredients
- 1/2 cup (113g) unsalted butter, melted and slightly cooled
- 1 cup (200g) packed light brown sugar
- 1 large egg, room temperature
- 1 teaspoon vanilla extract
- 1 cup (125g) all-purpose flour, spooned and leveled
- 1/2 teaspoon baking powder
- 1/4 teaspoon salt
- 1 cup (about 150g) leftover candy corn (classic orange, yellow, and white)
- 1/2 cup (90g) white chocolate chips
- Flaky sea salt (for topping, optional)
Instructions
- Preheat oven to 350°F (175°C). Line an 8×8-inch baking pan with parchment paper, leaving overhang on two opposite sides.
- Melt the butter in a microwave-safe bowl in 20-second bursts. Let cool for about 5 minutes until warm, not hot.
- In a large mixing bowl, whisk together the melted butter and brown sugar until the mixture looks like wet sand (about 30 seconds).
- Add the room-temperature egg and vanilla extract. Whisk vigorously until smooth, pale, and slightly thickened (about 1 minute). The batter should be glossy and fall off the whisk in a thick ribbon.
- In a separate small bowl, whisk together the flour, baking powder, and salt.
- Add the flour mixture to the wet ingredients. Fold gently with a spatula until just combined. Do not overmix; a few small lumps are fine.
- Fold in the candy corn and white chocolate chips with a few gentle strokes, distributing evenly.
- Scrape the batter into the prepared pan and spread evenly. The batter will be thick; press it down gently and smooth the top.
- Bake on the middle rack for 22 to 26 minutes. The edges should be golden brown and set, but the center should still look slightly soft and underdone. A toothpick inserted into the center should come out with a few moist crumbs.
- Place the pan on a cooling rack. Sprinkle flaky sea salt over the top while still warm. Let cool in the pan for at least 30 minutes.
- Use the parchment paper handles to lift the entire block onto the cooling rack. Cool completely before cutting.
- Cut into 9 or 16 squares using a sharp chef’s knife, wiping the knife clean between cuts. Serve immediately or store.
Notes
For best results, use fresh candy corn from the current year; stale candy corn won’t soften properly. If candy corn feels hard, microwave for 10 seconds before folding in. Toss candy corn or white chocolate chips in a tablespoon of flour to prevent sinking. Blondies are actually better the next day as flavors meld. Store in an airtight container at room temperature for up to 5 days. Freeze individually wrapped for up to 3 months.
Nutrition
- Serving Size: 1 blondie (based on
- Calories: 320
- Sugar: 35
- Sodium: 180
- Fat: 14
- Saturated Fat: 8
- Carbohydrates: 48
- Fiber: 1
- Protein: 3
Keywords: candy corn blondies, leftover candy corn recipe, white chocolate blondies, easy blondie recipe, Halloween dessert, chewy blondies