Love this? Save it for later!
Share the inspiration with your friends
My neighbor’s cat, a scruffy black stray named Binx, watched me from the windowsill as I pulled out my cookie cutters last October. I was wrestling with a batch of sugar cookie dough that refused to cooperate — too sticky, too warm, the whole mess of it. Binx didn’t say anything at first. He just blinked slowly, the way cats do when they’re judging you without the energy to actually care. Then he yawned, stretched, and walked off. Honestly, that was the moment I knew I needed a simpler cookie. Not just for Halloween, but for the kind of weeknight where you want something festive without spending three hours chilling dough and cleaning flour off every surface in your kitchen.
I went back inside, opened my pantry, and decided I wasn’t going to fight with butter that needed softening or dough that needed hours in the fridge. I wanted a cookie I could mix, roll, and bake in under thirty minutes. Something that looked adorable — black cat shaped, obviously — but didn’t require a pastry degree or a full afternoon of patience. And let me tell you, that first batch of quick black cat sugar cookies came out of the oven looking like they’d been made by someone who actually had their life together. I stood there holding a slightly lopsided cat cookie, crumbs on my shirt, and thought, this is the one.
Maybe you’ve been there — the week before Halloween, kids are buzzing, you promised to bring treats to the school party or the office potluck, and suddenly it’s 8 PM and you haven’t even started. These cookies are for that exact moment. They’re forgiving, they’re fast, and they somehow manage to look impressive even when you’re rushing. I’ve made them every Halloween since, and Binx still watches from the window. I like to think he approves.
Why You’ll Love This Recipe
Let’s be real — Halloween treats can be a hassle. Between the complicated royal icing, the multiple chilling steps, and the sheer amount of time some recipes demand, it’s easy to just buy a bag of candy and call it a day. But these quick black cat sugar cookies are different. They’re designed for people who want homemade charm without the stress.
- Ready in under 30 minutes — No chilling, no waiting. From mixing bowl to cooling rack in less than half an hour.
- Simple pantry ingredients — You probably have everything already. Butter, sugar, flour, eggs, vanilla. No specialty extracts or hard-to-find items.
- Perfect for Halloween chaos — Whether it’s a classroom party, a last-minute costume gathering, or just a fun Tuesday night, these cookies fit right in.
- Kid-friendly to make — The dough is easy to handle, and the decorating is as simple as pressing in candy eyes. No piping bags required.
- Actually delicious — Not just cute. These cookies have that perfect sugar cookie texture — soft in the middle, slightly crisp at the edges, with a buttery vanilla flavor that disappears fast.
What makes this version different from every other black cat cookie recipe out there? It’s the technique. Most sugar cookie recipes require at least an hour of chilling to prevent spreading. This one uses a clever combination of room-temperature butter and a slightly higher flour ratio to give you clean, sharp cat shapes without the wait. I tested this recipe six times — yes, six — to get the balance right. The first batch spread into blobs. The second was too dry. But by batch three, I had cookies that held their shape, tasted amazing, and didn’t require me to plan my entire afternoon around them.
These cookies are the kind that make you close your eyes after the first bite. I’m not exaggerating. There’s something about that soft, buttery crumb paired with the slight crunch of the black cocoa that just hits differently. It’s comfort food reimagined — faster, simpler, but with the same soul-soothing satisfaction. Perfect for impressing a crowd without breaking a sweat, or turning an ordinary weeknight into something memorable.
What Ingredients You Will Need
This recipe uses simple, wholesome ingredients to deliver bold flavor and satisfying texture without the fuss. Most of these are standard baking staples you likely already have on hand.
- Unsalted butter, softened (1 cup / 226g) — I always use unsalted so I can control the salt level. Let it sit out for about 20 minutes — you want it soft but not greasy. Land O’Lakes is my go-to for consistent results.
- Granulated sugar (1 cup / 200g) — Standard white sugar gives these cookies their delicate crisp edges. No need for anything fancy.
- Large egg (1, room temperature) — Room temperature eggs incorporate more evenly into the creamed butter and sugar. If you forgot to take it out early, place it in a bowl of warm water for 5 minutes.
- Vanilla extract (1 teaspoon) — Pure vanilla makes a difference here. Imitation works in a pinch, but pure adds a deeper, warmer flavor that complements the black cocoa.
- All-purpose flour (2 cups / 250g) — Spoon and level your flour. Scooping directly from the bag packs in too much and leads to dry cookies. This is the most common mistake I see.
- Black cocoa powder (¼ cup / 25g) — This is the secret to the dark, dramatic color. Regular cocoa powder won’t give you that deep black hue. I recommend Rodelle or King Arthur Flour brand. It has a mild, Oreo-like flavor that’s subtle but distinct.
- Baking powder (½ teaspoon) — Helps the cookies puff just slightly without spreading too much.
- Salt (¼ teaspoon) — Balances the sweetness and enhances the cocoa flavor.
- Candy eyes (about 24 pairs) — These are the little white and black edible eyes you find in the baking aisle. Wilton makes them, or you can find generic ones at craft stores. They’re what make these cookies instantly recognizable as cats.
Substitution notes: If you don’t have black cocoa powder, you can use Dutch-process cocoa mixed with a tiny drop of black food coloring (gel works best). For a dairy-free version, swap the butter with a high-quality vegan butter stick — I’ve had good luck with Miyoko’s. The texture will be slightly less tender, but still delicious. If you’re avoiding eggs, try a flax egg (1 tablespoon ground flaxseed mixed with 3 tablespoons water, let sit for 5 minutes). The cookies will be a bit more cake-like, but the cat shape will still hold.
Equipment Needed
You don’t need a fully stocked bakery to pull these off. Here’s what you’ll actually use:
- Mixing bowls — One large, one medium. I use glass because it’s easy to see when the butter and sugar are properly creamed.
- Electric hand mixer or stand mixer — A hand mixer works perfectly. If you’re using a stand mixer, use the paddle attachment. You can mix by hand with a wooden spoon, but your arm will get a workout.
- Cat-shaped cookie cutter — About 3 inches wide works best. I found mine at a craft store for $3. If you don’t have one, you can freehand the shape with a knife — it doesn’t have to be perfect. Imperfect cats have character.
- Baking sheets — Two standard half-sheet pans. Line them with parchment paper or silicone baking mats. No greasing needed.
- Cooling rack — Wire racks let air circulate so the cookies cool evenly. Stacking warm cookies traps steam and makes them soft.
- Spatula — A thin metal spatula is best for transferring the delicate cookies. I’ve broken more than a few using a thick plastic one.
- Rolling pin — A regular rolling pin works, but I actually prefer using a wine bottle in a pinch. It’s the same motion, and the bottle is already at room temperature.
Budget tip: Skip the fancy rolling pin with thickness rings. Just use two wooden spoons or chopsticks placed on either side of the dough as guides. That way you roll to a consistent thickness without spending extra money.
Preparation Method
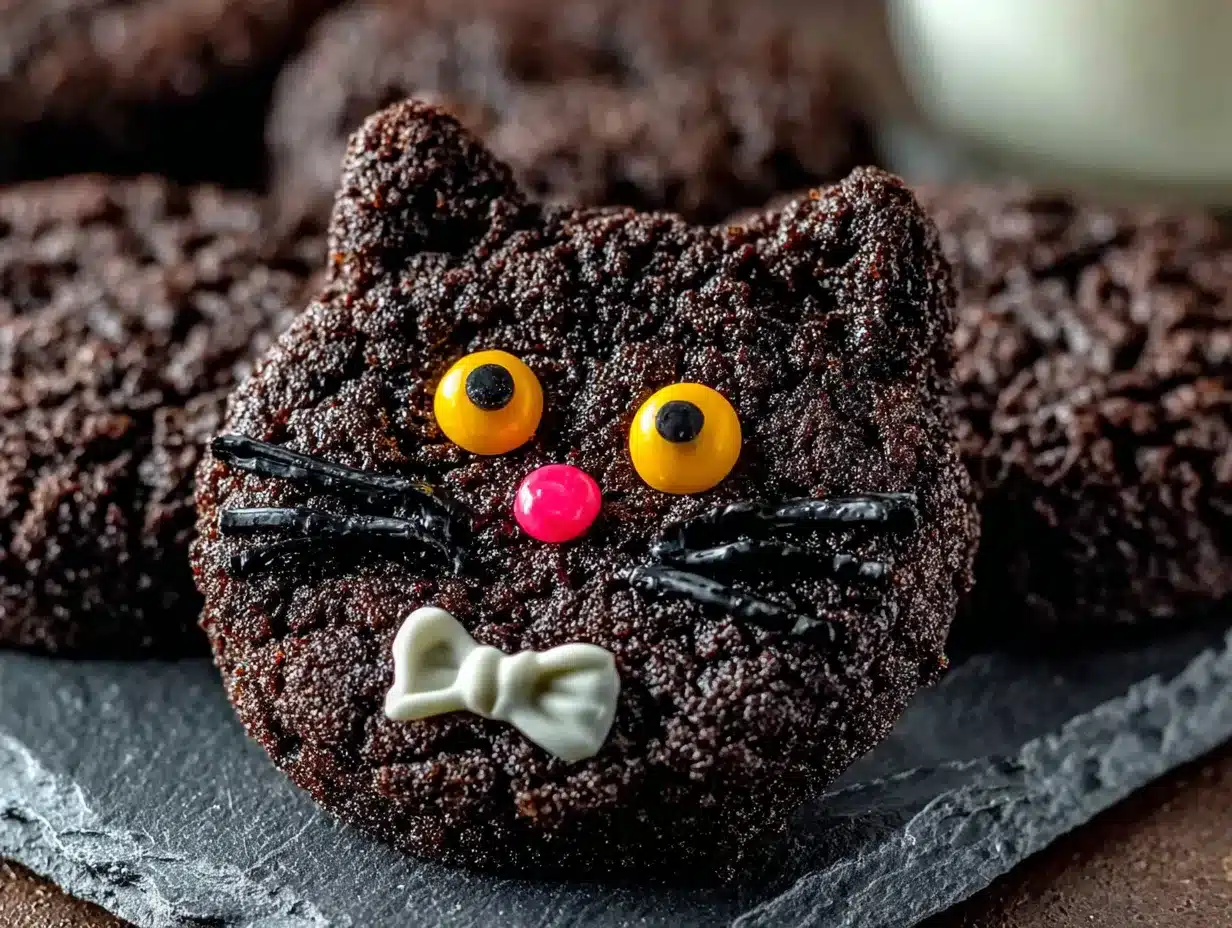
Let’s make some cat cookies. This whole process takes about 25 minutes from start to finish.
- Preheat your oven to 350°F (175°C). Line two baking sheets with parchment paper. Don’t skip this — parchment prevents sticking and makes cleanup a breeze.
- Cream the butter and sugar. In a large bowl, beat the softened butter and granulated sugar together until light and fluffy, about 2 minutes. You’re looking for a pale, creamy texture. Scrape down the sides of the bowl halfway through. If you see butter chunks, keep going — they should disappear.
- Add the egg and vanilla. Crack the egg into the bowl, add the vanilla, and beat until fully combined. The mixture might look slightly curdled at this point — that’s normal. Don’t panic. It will come together when you add the dry ingredients.
- Whisk the dry ingredients separately. In a medium bowl, whisk together the flour, black cocoa powder, baking powder, and salt. Whisking aerates the mixture and ensures the cocoa is evenly distributed. No one wants a bite of pure black cocoa powder.
- Combine wet and dry. Gradually add the dry mixture to the wet ingredients, mixing on low speed or stirring with a wooden spoon. Stop as soon as the dough comes together. Overmixing develops gluten and makes cookies tough. The dough will be soft but not sticky — it should hold together when pressed.
- Roll out the dough. Lightly flour your work surface and rolling pin. Place the dough on the floured surface and roll to about ¼-inch thickness. Here’s a tip: place the dough between two sheets of parchment paper before rolling. It prevents sticking without extra flour, which can dry out the cookies.
- Cut out the cat shapes. Press your cat cookie cutter firmly into the dough and lift straight up. Gently transfer the cut shapes to the prepared baking sheets, spacing them about 2 inches apart. They spread slightly, but not much. Gather the scraps, re-roll, and cut again. You should get about 24 cookies depending on cutter size.
- Press in the candy eyes. Before baking, gently press two candy eyes into each cat cookie. Push them in just enough so they’re secure — they’ll stay put during baking. If you wait until after baking, the cookies will be too firm to insert the eyes cleanly.
- Bake for 8-10 minutes. The cookies are done when the edges look set and the tops are slightly puffed. They won’t look brown — the black cocoa hides that — so watch the time carefully. At 8 minutes, they’ll be softer. At 10, they’ll be crisper. I prefer 9 minutes for that perfect middle ground.
- Cool on the baking sheet for 5 minutes. Then transfer to a wire rack to cool completely. The cookies will continue to firm up as they cool. Don’t skip this resting step — moving them too early can cause breakage.
Troubleshooting note: If your cookies spread into unrecognizable blobs, your butter was too soft or your dough wasn’t chilled enough. Pop the rolled-out dough in the freezer for 10 minutes before cutting. If they’re too dry and crumbly, you added too much flour. Next time, spoon and level more carefully.
Cooking Tips & Techniques
I’ve made these cookies about a dozen times now, and I’ve learned a few things the hard way. Let me save you the trouble.
Don’t overwork the dough. This is the number one mistake I made early on. The more you handle sugar cookie dough, the tougher it gets. Mix just until the flour disappears, then stop. If the dough feels slightly sticky, dust your hands with flour instead of adding more to the bowl.
Use a kitchen scale for accuracy. I know it’s an extra step, but measuring flour by weight (250g for this recipe) guarantees consistent results. Volume measurements vary wildly depending on how you scoop. One cup of flour can be anywhere from 120g to 150g depending on technique. That’s a big difference in a small batch of cookies.
Chill if you have time, but you don’t have to. This recipe works without chilling, but if you can spare 15 minutes in the freezer, your cookies will hold sharper shapes. I’ve done both — chilled and unchilled — and honestly, the difference is subtle. The unchilled version spreads just a tiny bit more, but they still look like cats. For Halloween, that’s good enough.
Bake one sheet at a time. I know it’s tempting to cram both sheets in the oven, but the heat circulates unevenly and you’ll end up with some cookies overdone and others underdone. Bake one sheet on the middle rack, then swap. It adds 10 minutes total but gives you consistent results.
Let the cookies cool completely before stacking. Warm cookies are fragile. Stacking them too soon leads to broken tails and missing ears. I learned this the hard way when I tried to pack a batch for my daughter’s class party and ended up with a bag of cat-shaped crumbs. Patience, my friend.
Variations & Adaptations
These black cat cookies are a blank canvas. Here are some ways to switch things up.
Gluten-free version: Substitute the all-purpose flour with a 1:1 gluten-free baking flour blend. I’ve tested this with King Arthur’s Measure for Measure blend, and it works beautifully. The cookies are slightly more delicate, so handle them gently when transferring to the baking sheet.
Vegan adaptation: Use a flax egg (1 tablespoon flaxseed meal + 3 tablespoons water) and a high-quality vegan butter. The flavor is a little less rich, but the texture holds up well. I’d recommend adding an extra tablespoon of plant-based milk if the dough seems too dry.
Flavor twist — Orange cream cats: Add 1 teaspoon of orange zest and ½ teaspoon of orange extract to the dough. The orange and black cocoa combination tastes like a Halloween version of a chocolate orange. It’s unexpectedly delicious and looks festive with a tiny orange sprinkle on the tail.
Spiced pumpkin cats: Swap the black cocoa for 2 tablespoons of pumpkin pie spice and reduce the flour by 2 tablespoons. The cookies turn a warm brownish-orange instead of black, but they taste like fall in cookie form. Decorate with candy eyes and a tiny pretzel stick tail.
Royal icing option: If you want to get fancy, skip the candy eyes and bake plain cookies. Once cooled, pipe on white icing eyes and a little pink nose. It takes more time, but the result is stunning. I’ve done this for Halloween parties where presentation mattered more than speed.
Serving & Storage Suggestions
These cookies are best served at room temperature, straight from the cooling rack. The texture is soft but sturdy — perfect for little hands to grab without crumbling everywhere.
For a Halloween party: Arrange the cookies on a black or orange platter. Add a few candy corn around the edges for color contrast. Kids love them, but adults go just as crazy. I once brought these to a work potluck and they disappeared before the main course.
Pairing ideas: Serve with a glass of cold milk, a warm apple cider, or even a pumpkin spice latte for the grown-ups. The mild cocoa flavor of the black cat cookies complements both sweet and spiced drinks beautifully.
Storage: Store in an airtight container at room temperature for up to 5 days. Layer them between sheets of parchment paper to prevent the candy eyes from sticking to each other. Do not refrigerate — the fridge dries out cookies and makes them stale faster.
Freezing instructions: These freeze beautifully. Place the baked, cooled cookies in a single layer in a freezer-safe container with parchment between layers. They’ll keep for up to 3 months. To thaw, let them sit at room temperature for about 20 minutes. The candy eyes might loosen slightly, but the flavor stays perfect.
Make-ahead tip: You can freeze the unbaked cookie dough for up to 2 months. Roll it out, cut the shapes, and place them on a parchment-lined baking sheet in the freezer. Once frozen solid, transfer the shapes to a freezer bag. Bake straight from frozen — just add 2 minutes to the baking time. This is my secret for Halloween morning chaos.
Nutritional Information & Benefits
Let’s be honest — these are cookies, not health food. But here’s what you’re looking at per cookie (based on 24 cookies):
| Nutrient | Amount per cookie |
|---|---|
| Calories | 145 |
| Total Fat | 8g |
| Saturated Fat | 5g |
| Carbohydrates | 17g |
| Sugar | 9g |
| Protein | 2g |
| Fiber | 1g |
Health highlights: Black cocoa powder contains antioxidants called flavonoids, which are also found in dark chocolate. It has less fat and sugar than milk chocolate, so you get a rich chocolate flavor with fewer calories. Plus, because these cookies are homemade, you control exactly what goes in — no preservatives, no artificial flavors, no hydrogenated oils. If you’re watching your sugar intake, you can reduce the sugar to ¾ cup without significantly affecting the texture. The cookies will be slightly less tender, but still delicious.
Allergen note: This recipe contains wheat (gluten), dairy, and eggs. The candy eyes may contain traces of soy or corn. Check the packaging if you’re baking for someone with severe allergies.
Conclusion
These quick black cat sugar cookies have become my Halloween tradition for a reason. They’re fast enough for a busy weeknight, simple enough for kids to help with, and cute enough to impress anyone who sees them. Every time I make them, I think back to that first batch — the slightly lopsided cat, Binx watching from the window, and the realization that homemade treats don’t have to be complicated to be special.
I hope you give these a try, whether it’s for a classroom party, a Halloween gathering, or just because you want something fun to bake on a Tuesday night. Customize them however you like — different colors, different decorations, different flavors. That’s the beauty of a simple recipe. It becomes yours.
If you make these, I’d love to hear about it. Drop a comment below with your favorite variation or tag me in your photos. And if you’re looking for more easy Halloween treats, you might enjoy my easy pumpkin bars or these spiderweb brownies for another quick, festive option. Happy baking, and may your cookies always come out looking like cats — not blobs!
Frequently Asked Questions
Can I use regular cocoa powder instead of black cocoa?
You can, but the cookies will be a dark brown rather than black. The flavor will also be more intense and less Oreo-like. If you want true black cookies, stick with black cocoa powder or add a tiny bit of black food coloring gel to regular cocoa.
Why did my cookies spread so much?
Most likely your butter was too soft or your dough wasn’t chilled. Make sure your butter is softened but still cool to the touch — not melted or greasy. If your kitchen is warm, chill the rolled-out dough for 10 minutes before cutting.
Can I make the dough ahead of time?
Absolutely. Wrap the dough tightly in plastic wrap and refrigerate for up to 3 days, or freeze for up to 2 months. Let it sit at room temperature for about 10 minutes before rolling so it’s pliable enough to work with.
How do I get the candy eyes to stay on?
Press them gently into the dough before baking. The cookie dough will slightly puff around them as it bakes, locking them in place. If you add them after baking, use a tiny dab of royal icing or corn syrup as glue.
Can I double this recipe?
Yes, this recipe doubles perfectly. Just make sure your mixing bowl is large enough to accommodate the extra dough. You may need to bake in batches or use three baking sheets. The baking time stays the same.
Pin This Recipe!

Easy Black Cat Sugar Cookies: Best Halloween Treat

These quick black cat sugar cookies are ready in under 30 minutes with no chilling required. They’re soft, buttery, and decorated with candy eyes for a festive Halloween treat that’s perfect for busy weeknights or last-minute parties.
- Prep Time: 15 minutes
- Cook Time: 9 minutes
- Total Time: 24 minutes
- Yield: 24 cookies 1x
- Category: Dessert
- Cuisine: American
Ingredients
- 1 cup (226g) unsalted butter, softened
- 1 cup (200g) granulated sugar
- 1 large egg, room temperature
- 1 teaspoon vanilla extract
- 2 cups (250g) all-purpose flour
- ¼ cup (25g) black cocoa powder
- ½ teaspoon baking powder
- ¼ teaspoon salt
- About 24 pairs candy eyes
Instructions
- Preheat your oven to 350°F (175°C). Line two baking sheets with parchment paper.
- In a large bowl, beat the softened butter and granulated sugar together until light and fluffy, about 2 minutes. Scrape down the sides of the bowl halfway through.
- Add the egg and vanilla, and beat until fully combined. The mixture might look slightly curdled; that’s normal.
- In a medium bowl, whisk together the flour, black cocoa powder, baking powder, and salt.
- Gradually add the dry mixture to the wet ingredients, mixing on low speed or stirring with a wooden spoon. Stop as soon as the dough comes together. The dough will be soft but not sticky.
- Lightly flour your work surface and rolling pin. Roll the dough to about ¼-inch thickness. For easier handling, roll between two sheets of parchment paper.
- Press a cat-shaped cookie cutter firmly into the dough and lift straight up. Transfer the cut shapes to the prepared baking sheets, spacing them about 2 inches apart. Gather scraps, re-roll, and cut again. You should get about 24 cookies.
- Before baking, gently press two candy eyes into each cat cookie, pushing them in just enough so they’re secure.
- Bake for 8-10 minutes. The cookies are done when the edges look set and the tops are slightly puffed. At 8 minutes they’ll be softer; at 10 minutes, crisper.
- Cool on the baking sheet for 5 minutes, then transfer to a wire rack to cool completely.
Notes
If your cookies spread into blobs, your butter was too soft or dough wasn’t chilled enough. Pop the rolled-out dough in the freezer for 10 minutes before cutting. For sharper shapes, chill the cut cookies for 10 minutes before baking. Use a kitchen scale for accurate flour measurement (250g). Bake one sheet at a time for even results. Let cookies cool completely before stacking to prevent breakage.
Nutrition
- Serving Size: 1 cookie
- Calories: 145
- Sugar: 9
- Sodium: 50
- Fat: 8
- Saturated Fat: 5
- Carbohydrates: 17
- Fiber: 1
- Protein: 2
Keywords: black cat cookies, Halloween cookies, sugar cookies, easy Halloween treats, no chill cookies, black cocoa cookies