Love this? Save it for later!
Share the inspiration with your friends
Hand me that bowl, my neighbor said, not even looking up from the cookie sheet she was lining. I’d stopped by to borrow a cup of sugar, and the smell hit me before I even got through the door. It wasn’t cookies. It was something savory, something rich, something that made my stomach growl in a way that was honestly a little embarrassing. She was just making dinner for her kids on a random Tuesday night, completely nonchalant, like she wasn’t creating the most adorable thing I’d ever seen. Little round meatballs, each one wrapped in a single, thin strip of pasta, with tiny little eyes staring up from the pan. “Mummy meatballs,” she shrugged. “They take ten minutes.” I stood there, clutching my bag of sugar, completely floored. She wasn’t trying to impress anyone. She was just trying to get her kids to eat dinner without a fight. And let me tell you, that casual brilliance is the whole reason I’ve been making these ever since.
That was three Halloweens ago, and I still think about how effortlessly she pulled it off. The meatballs were perfectly seasoned, the pasta was just the right amount of chewy, and those little eyes—just dots of mozzarella and black olive—made me smile long after I’d finished eating. Maybe you’ve been there, staring at a recipe that looks way too complicated for a weeknight, wishing for something that feels special without the stress. Well, this is it. These Easy Halloween Mummy Meatballs are the kind of recipe that looks like you spent hours on it, but honestly, they come together in under 30 minutes. They’re fun, they’re festive, and they taste incredible. I’ve made them for Halloween parties, for picky kids, and even just for myself on a random Wednesday when I needed a little joy. Every single time, they vanish. So if you’re looking for a best festive dinner recipe that’s actually doable, you just found it.
Why You’ll Love This Recipe
Look, I’ve tested a lot of Halloween recipes over the years. Some are too fussy, some taste like cardboard dressed up in a costume, and some just take way too long for a busy weeknight. These mummy meatballs are none of those things. They hit that sweet spot where fun meets genuinely good food. Here’s why they’ve become my go-to:
- Quick & Easy: From start to finish, you’re looking at about 25 minutes. That’s faster than ordering pizza, and way more fun to make with the kids.
- Simple Ingredients: You probably already have ground beef, breadcrumbs, and an egg in your kitchen. The only “special” thing is refrigerated breadstick dough, which is in the dairy aisle of every grocery store.
- Perfect for Halloween: Whether it’s a school party, a family dinner before trick-or-treating, or a spooky movie night, these are the star of the show.
- Crowd-Pleaser: I’ve served these to adults and kids alike, and they disappear. The meatballs are juicy and flavorful, and the “bandages” are just fun to eat.
- Unbelievably Delicious: Let’s be real—some themed food is all show and no go. Not these. The meatballs are seasoned perfectly, and the dough gets golden and buttery. It’s comfort food at its best.
What makes this recipe different from the dozens of other versions out there? It’s the little details I’ve figured out through trial and error. I use a blend of ground beef and pork for extra juiciness (trust me on this), and I add a splash of Worcestershire sauce to the mix for that deep, savory flavor. The breadstick dough is key—it’s softer and more pliable than pizza dough, so it wraps around the meatballs without cracking. Plus, it bakes up golden and flaky, not tough. This isn’t just another Halloween recipe; it’s the one you’ll come back to year after year.
What Ingredients You Will Need
This recipe uses simple, wholesome ingredients to deliver bold flavor and satisfying texture without the fuss. Most of these are pantry staples, so you can whip these up on a whim. Here’s everything you need, with a few notes from my own kitchen:
- 1 lb ground beef (or a mix of beef and pork): I prefer 80/20 ground beef for the best flavor and moisture. If you want to lighten it up, ground turkey works too, but add a tablespoon of olive oil to keep it from drying out.
- 1/2 cup plain breadcrumbs: These help bind the meatballs and keep them tender. Panko breadcrumbs work perfectly if that’s what you have.
- 1 large egg: The egg is the glue that holds everything together. Make sure it’s at room temperature so it mixes in evenly.
- 1/4 cup grated Parmesan cheese: This adds a salty, nutty flavor that takes the meatballs to the next level. I recommend the good stuff in a block—grate it yourself for the best texture.
- 2 cloves garlic, minced: Fresh garlic is non-negotiable here. It adds a punch of flavor that jarred garlic just can’t match.
- 1 teaspoon onion powder: For that subtle sweetness without the texture of real onions (perfect for picky eaters).
- 1 teaspoon dried Italian seasoning: A blend of oregano, basil, and rosemary works beautifully.
- 1/2 teaspoon salt: I use fine sea salt for even seasoning.
- 1/4 teaspoon black pepper: Freshly ground is best.
- 1 tablespoon Worcestershire sauce: This is my secret ingredient. It adds a deep, umami richness that makes people ask, “What’s in these?”
- 1 can (11 oz) refrigerated breadstick dough: Pillsbury is my go-to brand. You need the kind that comes in strips, not the sheet dough. Each can usually has 8 strips, which is perfect for 8 meatballs.
- 8 small mozzarella pearls or cubes: These are for the eyes. If you can’t find mozzarella pearls, just cut a fresh mozzarella ball into small cubes.
- 16 black olive slices: These make the pupils. I buy a can of sliced black olives for convenience.
- Marinara sauce, for dipping: Optional, but highly recommended. It adds a nice tangy contrast to the rich meatballs.
Substitution Guidance: For a gluten-free option, use gluten-free breadcrumbs and a gluten-free pizza dough or breadstick dough (check the freezer section). For a dairy-free version, skip the Parmesan and use dairy-free mozzarella for the eyes. You can also swap ground beef for ground chicken or a plant-based meat alternative—just adjust the cooking time slightly, as they may cook faster.
Equipment Needed
You don’t need any fancy gadgets for this recipe. Here’s what you’ll need to pull it off:
- Large mixing bowl: For combining the meatball ingredients. I use a sturdy ceramic bowl, but any big bowl works.
- Baking sheet: A rimmed baking sheet is best to catch any drips. Line it with parchment paper or aluminum foil for easy cleanup.
- Parchment paper or foil: Trust me, this saves you from scrubbing later.
- Small cookie scoop or tablespoon: For portioning the meatballs evenly. A cookie scoop is my favorite tool for this—it makes perfectly round meatballs every time.
- Sharp knife or kitchen scissors: For cutting the breadstick dough into strips. Scissors are actually easier and faster.
- Toothpicks (optional): If the dough strips seem loose, a toothpick can help hold them in place during baking. Just remember to remove them before serving!
Budget-Friendly Options: If you don’t have a cookie scoop, just use your hands—it’s more rustic anyway. And if you don’t have a baking sheet, a large oven-safe skillet works in a pinch.
Preparation Method
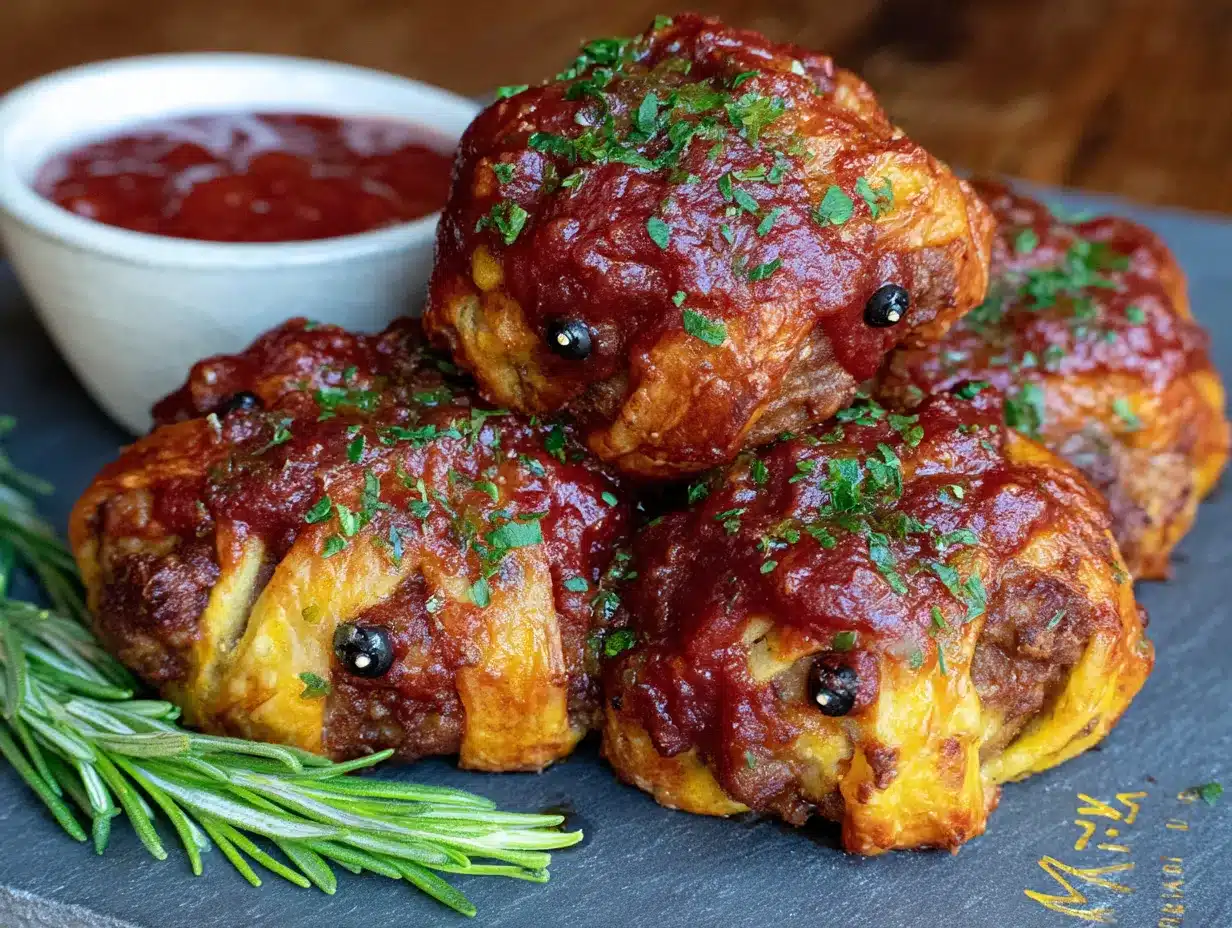
Alright, let’s get to the fun part. Here’s how to make these mummy meatballs step by step. I’ve included all the little tricks I’ve learned along the way so you don’t make the same mistakes I did.
- Preheat your oven to 375°F (190°C). Line a rimmed baking sheet with parchment paper or aluminum foil. This makes cleanup a breeze—trust me, you don’t want to scrub baked-on cheese later.
- Make the meatball mixture. In a large mixing bowl, combine 1 lb ground beef, 1/2 cup breadcrumbs, 1 large egg, 1/4 cup grated Parmesan, 2 minced garlic cloves, 1 teaspoon onion powder, 1 teaspoon Italian seasoning, 1/2 teaspoon salt, 1/4 teaspoon black pepper, and 1 tablespoon Worcestershire sauce. Use your hands to mix everything together gently. Don’t overmix—overworking the meat can make the meatballs tough. You want everything just combined.
- Form the meatballs. Scoop out about 2 tablespoons of the mixture and roll it into a ball. You should get about 8 meatballs total. Place them on the prepared baking sheet, spacing them about 2 inches apart. If the mixture feels sticky, lightly wet your hands with cold water.
- Bake the meatballs for 10 minutes. This partial bake firms them up so they hold their shape when you add the dough. While they’re baking, prep the dough. Open the can of refrigerated breadstick dough and separate it into 8 strips. Use a sharp knife or kitchen scissors to cut each strip lengthwise into 3 thinner strips. You’ll have 24 thin strips total.
- Wrap the meatballs. Remove the baking sheet from the oven (careful, it’s hot!). Let the meatballs cool for just a minute so you don’t burn your fingers. Take 3 thin dough strips and wrap them around each meatball, crossing them in the middle like a mummy’s bandages. Leave a small gap in the front for the eyes. Don’t worry if the strips overlap—that’s the whole point! The dough will puff up as it bakes, so leave a little space between the strips.
- Add the eyes. Press one small mozzarella pearl into the gap on each meatball. Then, press two black olive slices onto the mozzarella to make the pupils. If the olives don’t stick, dab a tiny bit of water on the cheese first.
- Bake again for 10-12 minutes. Return the baking sheet to the oven and bake until the dough is golden brown and the meatballs are cooked through (internal temperature should reach 160°F or 71°C). Keep an eye on them—ovens vary, and you don’t want the dough to burn.
- Cool and serve. Let the mummy meatballs rest on the baking sheet for 5 minutes before serving. This allows the dough to set and prevents it from being too soft. Serve warm with marinara sauce for dipping.
Sensory Cues: When the meatballs are done, the dough should be a deep golden brown and feel firm to the touch. The meatballs will smell rich and savory, with a hint of garlic. If you tap a meatball gently, it should feel springy, not hard.
Troubleshooting Tip: If the dough strips start to unravel during baking, use a toothpick to pin them in place. Just remember to remove the toothpicks before serving—you don’t want anyone biting into one!
Cooking Tips & Techniques
I’ve made these mummy meatballs more times than I can count, and I’ve learned a few things the hard way. Here are my best tips to make sure yours turn out perfect:
- Don’t skip the partial bake. I tried skipping this step once to save time, and the meatballs fell apart when I tried to wrap them. That first 10-minute bake firms them up just enough to handle the dough without crumbling.
- Let the dough come to room temperature. Cold dough is stiff and cracks when you try to wrap it. Let the can sit on the counter for 10 minutes before opening. It makes a huge difference.
- Use a light touch when wrapping. You want the dough to look like bandages, not a tight corset. Leave a little slack so the dough can puff up as it bakes. If it’s too tight, it will tear.
- Make the eyes pop. For the best effect, use small mozzarella pearls and press the olives in firmly. If the olives keep falling off, use a tiny dab of cream cheese as “glue.” It works like a charm.
- Double the recipe for a crowd. These disappear fast. If you’re serving a party, make a double batch. You’ll need two cans of breadstick dough and two baking sheets.
My Biggest Failure: The first time I made these, I forgot to pre-cook the meatballs. I wrapped raw meatballs in dough and baked them, and the dough got golden while the meatballs were still raw in the center. It was a mess. Learn from my mistake—always do that partial bake!
Variations & Adaptations
One of the best things about this recipe is how easy it is to adapt. Here are some of my favorite variations:
- Spicy Mummy Meatballs: Add 1/2 teaspoon red pepper flakes to the meatball mixture for a little heat. Serve with a spicy arrabbiata sauce for dipping.
- Turkey & Spinach Mummies: Swap the ground beef for ground turkey and add 1/4 cup finely chopped frozen spinach (thawed and squeezed dry). It’s a lighter option that still tastes amazing.
- Cheese-Stuffed Mummies: Hide a small cube of mozzarella in the center of each meatball before baking. When you bite into it, you get a gooey, cheesy surprise. This is my personal favorite.
- Gluten-Free Version: Use gluten-free breadcrumbs and a gluten-free pizza dough (found in the freezer section). Roll the dough out thin and cut it into strips. The texture will be slightly different, but it still works great.
- Air Fryer Adaptation: Cook the meatballs in an air fryer at 375°F for 8 minutes, then wrap with dough and air fry for another 5-6 minutes until golden. This is faster and gives the dough an extra-crispy texture.
Personal Variation: I once made these with a sweet chili glaze instead of marinara. I brushed the dough with a mixture of honey and sriracha before the final bake. They were sticky, spicy, and absolutely irresistible. I’ve been making them that way ever since.
Serving & Storage Suggestions
These mummy meatballs are best served warm, straight from the oven. The dough is at its peak flakiness, and the cheese eyes are still soft. Here’s how to make the most of them:
- Serving Temperature: Serve them hot, with a small bowl of warm marinara sauce for dipping. The contrast between the warm, savory meatball and the tangy sauce is perfect.
- Presentation: Arrange them on a platter with a few sprigs of fresh rosemary or thyme around the edges (it looks like little “spooky” trees). For a Halloween party, place them on a black or orange platter to really make them pop.
- Complementary Dishes: These pair beautifully with a simple green salad or roasted vegetables. For a full Halloween meal, serve them alongside creamy pumpkin pasta or a bowl of roasted butternut squash soup.
- Storage: Store leftover mummy meatballs in an airtight container in the refrigerator for up to 3 days. The dough will soften slightly, but they’re still delicious.
- Reheating: To reheat, place them on a baking sheet in a 350°F oven for 5-7 minutes. The oven method crisps the dough back up. Microwaving works in a pinch, but the dough will be soft.
- Freezing: You can freeze the baked mummy meatballs for up to 2 months. Place them in a single layer on a baking sheet and freeze until solid, then transfer to a freezer bag. Reheat directly from frozen in a 375°F oven for 12-15 minutes.
Flavor Development: Honestly, these are best the day they’re made. The dough is at its flakiest, and the meatballs are juiciest. But if you have leftovers, they’re still great—just don’t expect the same texture.
Nutritional Information & Benefits
While these mummy meatballs are a treat, they’re not totally indulgent. Here’s a rough breakdown per serving (2 meatballs with sauce):
| Nutrient | Amount |
|---|---|
| Calories | ~380 kcal |
| Protein | 28 g |
| Fat | 18 g |
| Carbohydrates | 24 g |
| Fiber | 2 g |
| Sodium | 720 mg |
Health Benefits: Ground beef is a great source of iron and B vitamins, which support energy levels. The Parmesan cheese adds calcium, and the garlic is known for its immune-boosting properties. If you use the turkey and spinach variation, you’ll get an extra dose of vitamin A and iron from the spinach.
Dietary Considerations: This recipe is naturally nut-free and can be made gluten-free and dairy-free with the substitutions mentioned above. It’s also a great option for kids who are picky eaters—the fun presentation makes them more willing to try new foods.
Conclusion
Look, I know Halloween can be a little chaotic. Between costumes, candy, and trying to get everyone out the door for trick-or-treating, the last thing you need is a complicated dinner. These Easy Halloween Mummy Meatballs are my answer to that chaos. They’re fun, they’re fast, and they taste like you actually tried. I love how they bring a smile to everyone’s face—kids light up when they see the little eyes, and adults appreciate that they’re actually delicious. I’ve made them for three Halloweens now, and they’ve become a tradition I look forward to every year.
So go ahead, give them a try. Customize them however you like—spicy, cheesy, or stuffed with a surprise. And when you make them, I’d love to hear about it. Leave a comment below and tell me how yours turned out. Did your kids love them? Did you try a fun variation? Share a photo if you’ve got one! And if you’re looking for more festive ideas, check out my spooky Halloween dinner ideas for the whole month. Happy Halloween, and happy cooking!
Frequently Asked Questions
Can I make these mummy meatballs ahead of time?
Yes! You can prepare the meatballs and wrap them with dough up to a day in advance. Store them on the baking sheet, covered with plastic wrap, in the refrigerator. Add the eyes just before baking, as the cheese can dry out. You may need to add 2-3 minutes to the final bake time since they’ll be cold.
Can I use homemade meatball mixture instead of store-bought?
Absolutely! In fact, I prefer homemade because you can control the seasoning. Just make sure your meatballs are about 1.5 inches in diameter so they cook through in the same time. If you’re using a pre-made frozen meatball, thaw it completely first and skip the partial bake step.
What if I can’t find refrigerated breadstick dough?
No worries! You can use refrigerated pizza dough, crescent roll dough, or even puff pastry. If using pizza dough, roll it out thin and cut it into strips. Crescent roll dough works well but is slightly sweeter. Puff pastry gives a flakier, more buttery result—just make sure to cut it into thin strips.
How do I keep the dough from burning?
If your oven runs hot, check the mummy meatballs at the 8-minute mark during the final bake. If the dough is browning too quickly, tent the baking sheet loosely with aluminum foil for the remaining time. Also, make sure you’re not over-baking—10-12 minutes is usually perfect.
Can I make these in an air fryer?
Yes! Air fryers work great for this recipe. Cook the meatballs at 375°F for 8 minutes, then wrap with dough and air fry for another 5-6 minutes until golden. The air fryer gives the dough an extra-crispy texture. Just make sure not to overcrowd the basket—work in batches if needed.
Pin This Recipe!

Easy Halloween Mummy Meatballs: Best Festive Dinner Recipe

These Easy Halloween Mummy Meatballs are a fun, festive, and delicious dinner that comes together in under 30 minutes. Perfect for Halloween parties or a quick weeknight meal, they feature juicy meatballs wrapped in breadstick dough with mozzarella and olive eyes.
- Prep Time: 15 minutes
- Cook Time: 20-22 minutes
- Total Time: 35-37 minutes
- Yield: 4 servings (2 meatballs per serving) 1x
- Category: Main Course
- Cuisine: American
Ingredients
- 1 lb ground beef (or a mix of beef and pork)
- 1/2 cup plain breadcrumbs
- 1 large egg
- 1/4 cup grated Parmesan cheese
- 2 cloves garlic, minced
- 1 teaspoon onion powder
- 1 teaspoon dried Italian seasoning
- 1/2 teaspoon salt
- 1/4 teaspoon black pepper
- 1 tablespoon Worcestershire sauce
- 1 can (11 oz) refrigerated breadstick dough
- 8 small mozzarella pearls or cubes
- 16 black olive slices
- Marinara sauce, for dipping (optional)
Instructions
- Preheat your oven to 375°F (190°C). Line a rimmed baking sheet with parchment paper or aluminum foil.
- In a large mixing bowl, combine 1 lb ground beef, 1/2 cup breadcrumbs, 1 large egg, 1/4 cup grated Parmesan, 2 minced garlic cloves, 1 teaspoon onion powder, 1 teaspoon Italian seasoning, 1/2 teaspoon salt, 1/4 teaspoon black pepper, and 1 tablespoon Worcestershire sauce. Use your hands to mix everything together gently. Don’t overmix.
- Scoop out about 2 tablespoons of the mixture and roll it into a ball. You should get about 8 meatballs total. Place them on the prepared baking sheet, spacing them about 2 inches apart.
- Bake the meatballs for 10 minutes. While they’re baking, prep the dough. Open the can of refrigerated breadstick dough and separate it into 8 strips. Use a sharp knife or kitchen scissors to cut each strip lengthwise into 3 thinner strips. You’ll have 24 thin strips total.
- Remove the baking sheet from the oven. Let the meatballs cool for just a minute. Take 3 thin dough strips and wrap them around each meatball, crossing them in the middle like a mummy’s bandages. Leave a small gap in the front for the eyes.
- Press one small mozzarella pearl into the gap on each meatball. Then, press two black olive slices onto the mozzarella to make the pupils.
- Return the baking sheet to the oven and bake for 10-12 minutes until the dough is golden brown and the meatballs are cooked through (internal temperature should reach 160°F or 71°C).
- Let the mummy meatballs rest on the baking sheet for 5 minutes before serving. Serve warm with marinara sauce for dipping.
Notes
Don’t skip the partial bake—it firms up the meatballs so they hold their shape when wrapped. Let the dough come to room temperature for easier handling. For a gluten-free version, use gluten-free breadcrumbs and gluten-free pizza dough. For dairy-free, skip the Parmesan and use dairy-free mozzarella for the eyes.
Nutrition
- Serving Size: 2 meatballs with sau
- Calories: 380
- Sugar: 4
- Sodium: 720
- Fat: 18
- Saturated Fat: 7
- Carbohydrates: 24
- Fiber: 2
- Protein: 28
Keywords: Halloween, mummy meatballs, festive dinner, easy recipe, meatballs, Halloween dinner, kid-friendly