Love this? Save it for later!
Share the inspiration with your friends
Introduction
“You know, I wasn’t planning on baking anything patriotic this year,” I said, standing in my tiny kitchen surrounded by flour dust and a box of mismatched baking pans. It was the morning of July 3rd, and honestly, my mind was elsewhere—mostly on the backyard BBQ and that infamous firework show. But then, my neighbor Joe popped by, holding an old, stained recipe card that looked like it had survived a few summers already.
“Try this,” he said with a grin, “my grandma’s Old-Glory Flag Cake. It’s kind of a big deal around here.” Now, Joe’s not the type to fuss over desserts, so I figured if this cake made his list, it had to be something special. The recipe wasn’t complicated, yet it promised layers of red, white, and blue that would turn any 4th of July gathering into a festive celebration.
What happened next was a bit of a miracle. I forgot to preheat the oven (classic me), mixed the batter a little too enthusiastically, and somehow ended up with the most charming, slightly imperfect flag cake you could imagine. That cracked top? Adds character. The slightly uneven stripes? Authentic as it gets. And the best part? It tasted like summer itself—sweet, fresh, and a little nostalgic.
Maybe you’ve been there—scrambling last minute, wondering if you can pull off a dessert that feels both homemade and special. This Old-Glory Flag Cake isn’t just a recipe; it’s a little slice of Americana, a sweet tradition that’s easy enough to make even if your kitchen looks like a tornado just passed through. Let me tell you, this cake has become my go-to for every Independence Day since—and I think it might just become yours, too.
Why You’ll Love This Recipe
Honestly, this Classic Homemade Old-Glory Flag Cake is the kind of dessert that brings people together without the fuss. I’ve tested this recipe multiple times in my own kitchen, and it’s always a hit—whether it’s for a casual family picnic or a spirited neighborhood potluck. Here’s why this recipe stands out:
- Quick & Easy: You can whip it up in under an hour, which is perfect when you’ve got a million other things to prepare for the 4th of July.
- Simple Ingredients: No need for specialty stores; most of what you need is probably sitting right in your pantry or fridge.
- Perfect for Celebration: The red, white, and blue layers are festive and fun, making it ideal for Independence Day or any patriotic occasion.
- Crowd-Pleaser: Kids love the colors, adults appreciate the classic flavors, and everyone gets that warm, homemade feeling.
- Unbelievably Delicious: The moist vanilla cake paired with fresh whipped cream and berries is a match made in dessert heaven.
What makes this Old-Glory Flag Cake different? It’s the thoughtful balance of flavors and textures—fluffy cake layers that aren’t too sweet, combined with just the right amount of fresh fruit and cream. Plus, the layering technique is straightforward, even if you’re not a seasoned baker. This isn’t just another layered cake; it’s a nostalgic crowd favorite that feels like a hug on a plate.
So, if you’re looking for a dessert that’s festive, easygoing, and downright tasty, this recipe has your name on it. It’s the kind of cake that makes you close your eyes after the first bite and smile—and isn’t that exactly what holiday desserts should do?
What Ingredients You Will Need
This recipe uses simple, wholesome ingredients to deliver bold flavor and a satisfying texture without the fuss. You’ll find most of these are pantry staples, with a few fresh touches to make the red, white, and blue pop.
- For the Cake Layers:
- 2 ½ cups (312g) all-purpose flour (I prefer King Arthur for consistent texture)
- 2 ½ tsp baking powder
- ½ tsp salt
- 1 cup (226g) unsalted butter, softened (room temperature for best creaming)
- 1 ¾ cups (350g) granulated sugar
- 4 large eggs, room temperature
- 1 tbsp pure vanilla extract
- 1 cup (240ml) whole milk, room temperature (substitute almond milk for dairy-free)
- Red food coloring (gel-based for vibrant color without thinning batter)
- Blue food coloring (gel-based)
- For the Frosting & Decoration:
- 2 cups (480ml) heavy whipping cream, chilled (use a brand like Horizon for best whipping results)
- ¼ cup (30g) powdered sugar (adjust to taste)
- 1 tsp vanilla extract
- Fresh strawberries, sliced (for the red stripes)
- Fresh blueberries (for the blue corner)
Some quick tips: If you’re baking in summer and strawberries aren’t at their best, frozen berries that have been thawed gently work fine too. For a gluten-free option, swap the all-purpose flour for a trusted gluten-free blend (I’ve had great results with Bob’s Red Mill). And if you want to keep it lighter, try using whipped coconut cream instead of heavy cream—just make sure it’s well chilled.
Equipment Needed

- Two 9-inch (23 cm) round cake pans (non-stick or well-greased and floured)
- Mixing bowls (large and medium-sized)
- Electric mixer or stand mixer (handheld works too, but a stand mixer makes it easier)
- Measuring cups and spoons (for accuracy, especially with baking powder)
- Rubber spatula (great for folding and scraping)
- Cooling racks (to cool cake layers evenly)
- Offset spatula or butter knife (for smooth frosting application)
- Optional: Piping bag or plastic sandwich bag for frosting details
If you don’t have two cake pans, you can bake the layers one at a time, but be prepared for some extra waiting. I once tried using a square pan and just trimmed it to shape, but that was messier than it sounds! Also, investing in a good electric mixer will save you elbow grease and make whipping cream a breeze. Keep your mixing bowls chilled in the fridge for better whipping results, especially on hot summer days.
Preparation Method
- Preheat and Prep: Preheat your oven to 350°F (175°C). Grease and flour two 9-inch round cake pans or line them with parchment paper. This step prevents sticking and ensures a clean release. (Time: 10 minutes)
- Mix Dry Ingredients: In a medium bowl, whisk together 2 ½ cups (312g) flour, 2 ½ tsp baking powder, and ½ tsp salt. Set aside. This ensures even distribution of leavening agents. (Time: 3 minutes)
- Cream Butter and Sugar: Using an electric mixer, beat 1 cup (226g) softened butter and 1 ¾ cups (350g) sugar on medium speed until light and fluffy, about 4-5 minutes. This step traps air, giving your cake a tender crumb. (Time: 5 minutes)
- Add Eggs and Vanilla: Add 4 large eggs one at a time, beating well after each addition. Stir in 1 tbsp vanilla extract. The eggs provide structure and moisture. (Time: 3 minutes)
- Alternate Adding Dry Ingredients and Milk: With the mixer on low, add the dry ingredients in three parts, alternating with 1 cup (240ml) milk. Begin and end with the flour mixture. Mix each addition just until combined—overmixing can make the cake tough. (Time: 5 minutes)
- Divide and Color the Batter: Divide the batter evenly into three bowls. Leave one portion plain (for white stripes). Add red gel food coloring to one bowl until you get a vibrant red, and blue gel food coloring to the last bowl for the blue layer. Stir gently to blend colors without overmixing. (Time: 5 minutes)
- Layer the Batter: In each cake pan, layer the colored batters carefully to create stripes. Start with red on one side, then white in the middle, and blue on the other side. You want clear, distinct stripes, so pour slowly. (Time: 5 minutes)
- Bake: Bake at 350°F (175°C) for 25-30 minutes or until a toothpick inserted in the center comes out clean. Rotate the pans halfway through baking for even cooking. (Time: 25-30 minutes)
- Cool: Let the cakes cool in the pans for 10 minutes, then turn out onto wire racks to cool completely before frosting. Cooling fully prevents the frosting from melting. (Time: 1 hour)
- Prepare the Whipped Cream: Chill your mixing bowl and beaters. Beat 2 cups (480ml) heavy whipping cream with ¼ cup (30g) powdered sugar and 1 tsp vanilla extract until stiff peaks form. Don’t overbeat or it will turn buttery. (Time: 5-7 minutes)
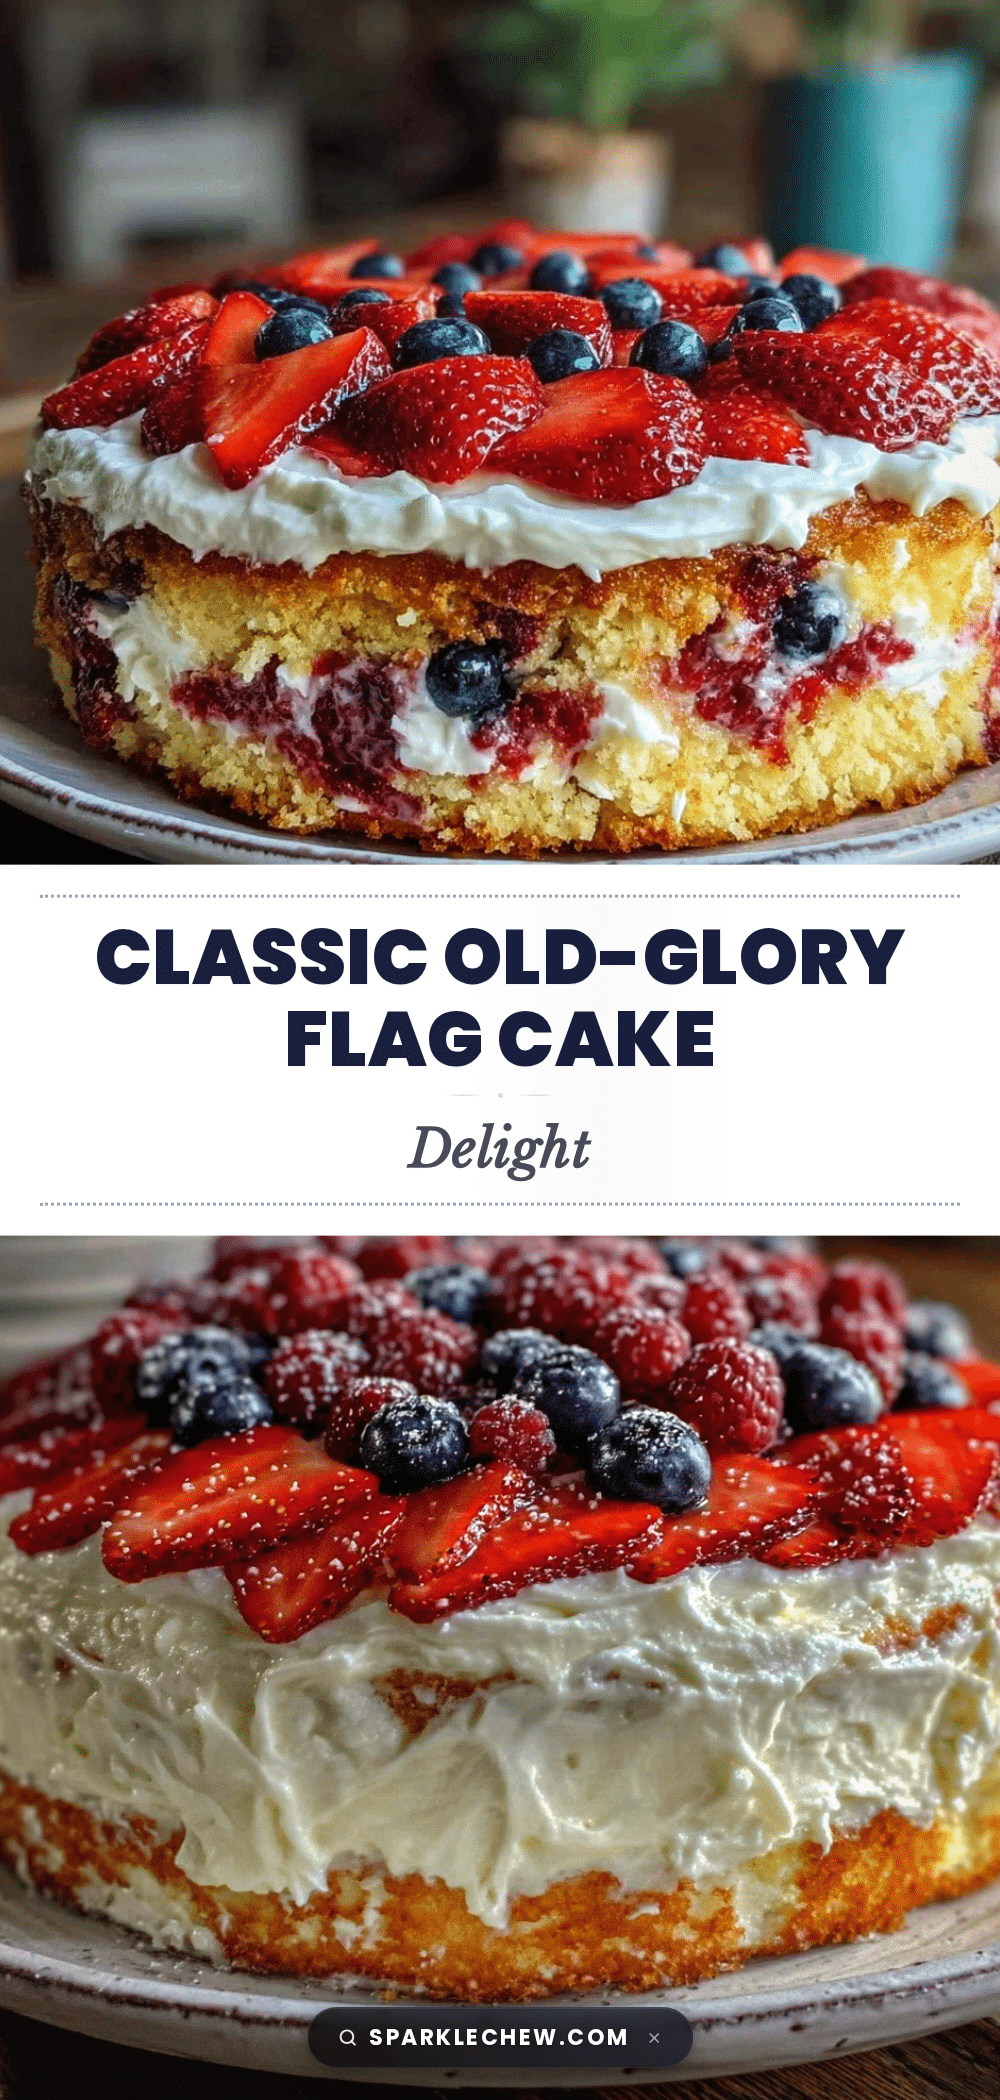
- Assemble the Cake: Place one cake layer on your serving plate. Spread a generous layer of whipped cream. Add sliced strawberries for the red stripes and a layer of plain cake or whipped cream for the white stripes. Top with the second cake layer and repeat. Decorate the top left corner with fresh blueberries to mimic the flag’s star field. (Time: 15 minutes)
- Chill Before Serving: Refrigerate the cake for at least 30 minutes before serving. This helps the whipped cream set and the flavors to meld. (Time: 30+ minutes)
Pro tip: If you notice your batter looks too runny when adding colors, don’t panic. A quick chill in the fridge for 10 minutes can help it firm up, making layering easier. And remember, a slightly imperfect flag is still a proud flag!
Cooking Tips & Techniques
Making the Classic Homemade Old-Glory Flag Cake is pretty straightforward, but there are a few tips I’ve picked up after a handful of kitchen adventures:
- Use Gel Food Coloring: Unlike liquid colorings, gel won’t thin your batter but will give you those vibrant reds and blues that really pop.
- Don’t Overmix: Once you add flour, mix just until incorporated. Overmixing leads to dense cakes, and honestly, no one wants that on the 4th.
- Room Temperature Ingredients: Butter, eggs, and milk at room temp blend better, giving a smooth batter and fluffy cake.
- Whip Cream Properly: Chill your equipment beforehand. Whipping cream in warm bowls is like trying to run uphill—possible but frustrating.
- Layer Carefully: Pour the colored batter slowly and use the back of a spoon if needed to nudge the batter into stripes without mixing the colors.
- Watch Your Bake Time: Ovens vary, so start checking at 25 minutes. A toothpick that comes out with moist crumbs (not wet batter) means it’s ready.
Once, I accidentally left the mixer on high while adding the eggs and ended up with batter splattered all over the counter. Not my proudest moment, but hey, it still baked up fine! Just a reminder—patience and a bit of good humor go a long way in the kitchen.
Variations & Adaptations
This recipe is as flexible as your summer plans. Here are a few ways to personalize your Old-Glory Flag Cake:
- Dietary Variation: For a gluten-free version, use a 1:1 gluten-free flour blend. I’ve had success with this swap, and the cake stays moist and flavorful.
- Flavor Twist: Add a teaspoon of lemon zest to the batter for a bright, citrusy note that pairs beautifully with the berries.
- Alternative Toppings: Swap the whipped cream for a cream cheese frosting if you want a richer texture—just keep it light to avoid overpowering the cake.
- Seasonal Switch: If fresh berries aren’t in season, use frozen mixed berries (thawed and drained) or even sliced kiwi for a green twist in place of the white stripes.
- Cooking Method: If you prefer cupcakes, this batter works perfectly—just reduce baking time to around 18-22 minutes.
One time, I subbed coconut whipped cream and added toasted coconut flakes on top. It was a tropical spin that surprised everyone at the picnic. Feel free to experiment; this cake is a canvas for your creativity.
Serving & Storage Suggestions
Serve this cake chilled or at room temperature—both work wonderfully. The whipped cream frosting is light and airy when fresh, but letting the cake sit for a few hours in the fridge lets the flavors meld and the cake soak up some moisture, making every bite tender.
Pair it with a cold glass of lemonade or iced tea for a classic summer vibe. If you want to round out your 4th of July spread, this cake pairs nicely with savory dishes like grilled chicken or even the smoky flavors of crispy garlic chicken.
Store leftovers covered tightly in the refrigerator. It’s best eaten within 2 days because the fresh berries and whipped cream are happiest then. For longer storage, you can freeze the cake layers (without frosting) wrapped tightly in plastic wrap and foil for up to 2 months. Thaw overnight in the fridge before assembling.
When reheating, avoid microwave heating as it can melt the whipped cream and make the berries soggy. Instead, let the cake come to room temperature naturally for about 30 minutes before serving.
Nutritional Information & Benefits
This Old-Glory Flag Cake offers a classic balance of carbs, fats, and protein, making it a treat best enjoyed in moderation. Each serving contains approximately:
| Nutrient | Amount per Serving |
|---|---|
| Calories | 320 kcal |
| Fat | 18g |
| Carbohydrates | 35g |
| Protein | 4g |
| Sugar | 22g |
The fresh strawberries and blueberries add a boost of antioxidants and vitamins, while the vanilla and butter provide comforting flavor notes. For those with dairy sensitivities, swapping to plant-based milk and coconut whipped cream can make this dessert approachable.
As someone who enjoys this cake as a special holiday treat, I find it strikes a nice balance—satisfying without being over the top. It’s a reminder that homemade desserts can be both simple and meaningful.
Conclusion
This Classic Homemade Old-Glory Flag Cake is more than just a dessert; it’s a little tradition that brings color, flavor, and a touch of nostalgia to your 4th of July celebrations. I love how it’s approachable for bakers of all levels and still impressive enough to serve to guests.
Feel free to make it your own, whether that’s swapping berries, trying a different frosting, or even making cupcakes instead. The important part is gathering around the table and enjoying something made with a bit of care and a lot of heart.
If you give this recipe a try, I’d love to hear how it turns out—drop a comment or share your own twists. Here’s to sweet moments and memorable celebrations—happy baking and have a fantastic Independence Day!
Frequently Asked Questions (FAQs)
Can I make this cake ahead of time?
Yes! You can bake the cake layers a day or two in advance, wrap them tightly, and refrigerate. Assemble and frost the cake just before serving for the freshest results.
What if I don’t have gel food coloring?
You can use liquid food coloring, but it may thin out the batter slightly and result in less vibrant colors. Use sparingly and add more color gradually.
Can I use frozen berries for decoration?
Absolutely. Just thaw them gently and drain excess moisture to avoid a soggy cake.
Is there a vegan version of this cake?
While this recipe isn’t vegan as written, you can substitute plant-based milk, vegan butter, and a vegan whipped topping. You’ll also need an egg replacer like flax eggs or commercial egg replacer.
How do I keep the whipped cream from melting on a hot day?
Chill your mixing bowls and beaters before whipping cream, and keep the cake refrigerated until serving. If it’s very warm, serve in smaller portions and keep leftovers in the fridge.
Pin This Recipe!
Classic Homemade Old-Glory Flag Cake Easy 4th of July Dessert Recipe
A festive and easy-to-make layered cake featuring red, white, and blue stripes, perfect for Independence Day celebrations. This moist vanilla cake with whipped cream and fresh berries is a nostalgic crowd-pleaser.
- Prep Time: 25 minutes
- Cook Time: 25-30 minutes
- Total Time: 1 hour 20 minutes
- Yield: 8 servings 1x
- Category: Dessert
- Cuisine: American
Ingredients
- 2 ½ cups (312g) all-purpose flour
- 2 ½ tsp baking powder
- ½ tsp salt
- 1 cup (226g) unsalted butter, softened
- 1 ¾ cups (350g) granulated sugar
- 4 large eggs, room temperature
- 1 tbsp pure vanilla extract
- 1 cup (240ml) whole milk, room temperature
- Red gel food coloring
- Blue gel food coloring
- 2 cups (480ml) heavy whipping cream, chilled
- ¼ cup (30g) powdered sugar
- 1 tsp vanilla extract
- Fresh strawberries, sliced
- Fresh blueberries
Instructions
- Preheat your oven to 350°F (175°C). Grease and flour two 9-inch round cake pans or line them with parchment paper.
- In a medium bowl, whisk together flour, baking powder, and salt. Set aside.
- Using an electric mixer, beat softened butter and sugar on medium speed until light and fluffy, about 4-5 minutes.
- Add eggs one at a time, beating well after each addition. Stir in vanilla extract.
- With mixer on low, add dry ingredients in three parts, alternating with milk. Begin and end with flour mixture. Mix each addition just until combined.
- Divide batter evenly into three bowls. Leave one plain, add red gel food coloring to one, and blue gel food coloring to the last. Stir gently to blend colors.
- In each cake pan, layer the colored batters carefully to create stripes: red on one side, white in the middle, blue on the other side.
- Bake at 350°F (175°C) for 25-30 minutes or until a toothpick inserted in the center comes out clean. Rotate pans halfway through baking.
- Let cakes cool in pans for 10 minutes, then turn out onto wire racks to cool completely.
- Chill mixing bowl and beaters. Beat heavy whipping cream with powdered sugar and vanilla extract until stiff peaks form.
- Place one cake layer on serving plate. Spread whipped cream, add sliced strawberries for red stripes, and a layer of plain cake or whipped cream for white stripes. Top with second cake layer and repeat. Decorate top left corner with fresh blueberries.
- Refrigerate cake for at least 30 minutes before serving.
Notes
Use gel food coloring for vibrant colors without thinning the batter. Chill mixing bowls and beaters before whipping cream for best results. If batter is too runny after coloring, chill for 10 minutes before layering. For gluten-free, substitute all-purpose flour with gluten-free blend. For dairy-free, use almond milk and coconut whipped cream.
Nutrition
- Serving Size: 1 slice (1/8 of cake
- Calories: 320
- Sugar: 22
- Fat: 18
- Carbohydrates: 35
- Protein: 4
Keywords: 4th of July, patriotic cake, flag cake, vanilla cake, whipped cream, berries, easy dessert, summer dessert