Love this? Save it for later!
Share the inspiration with your friends
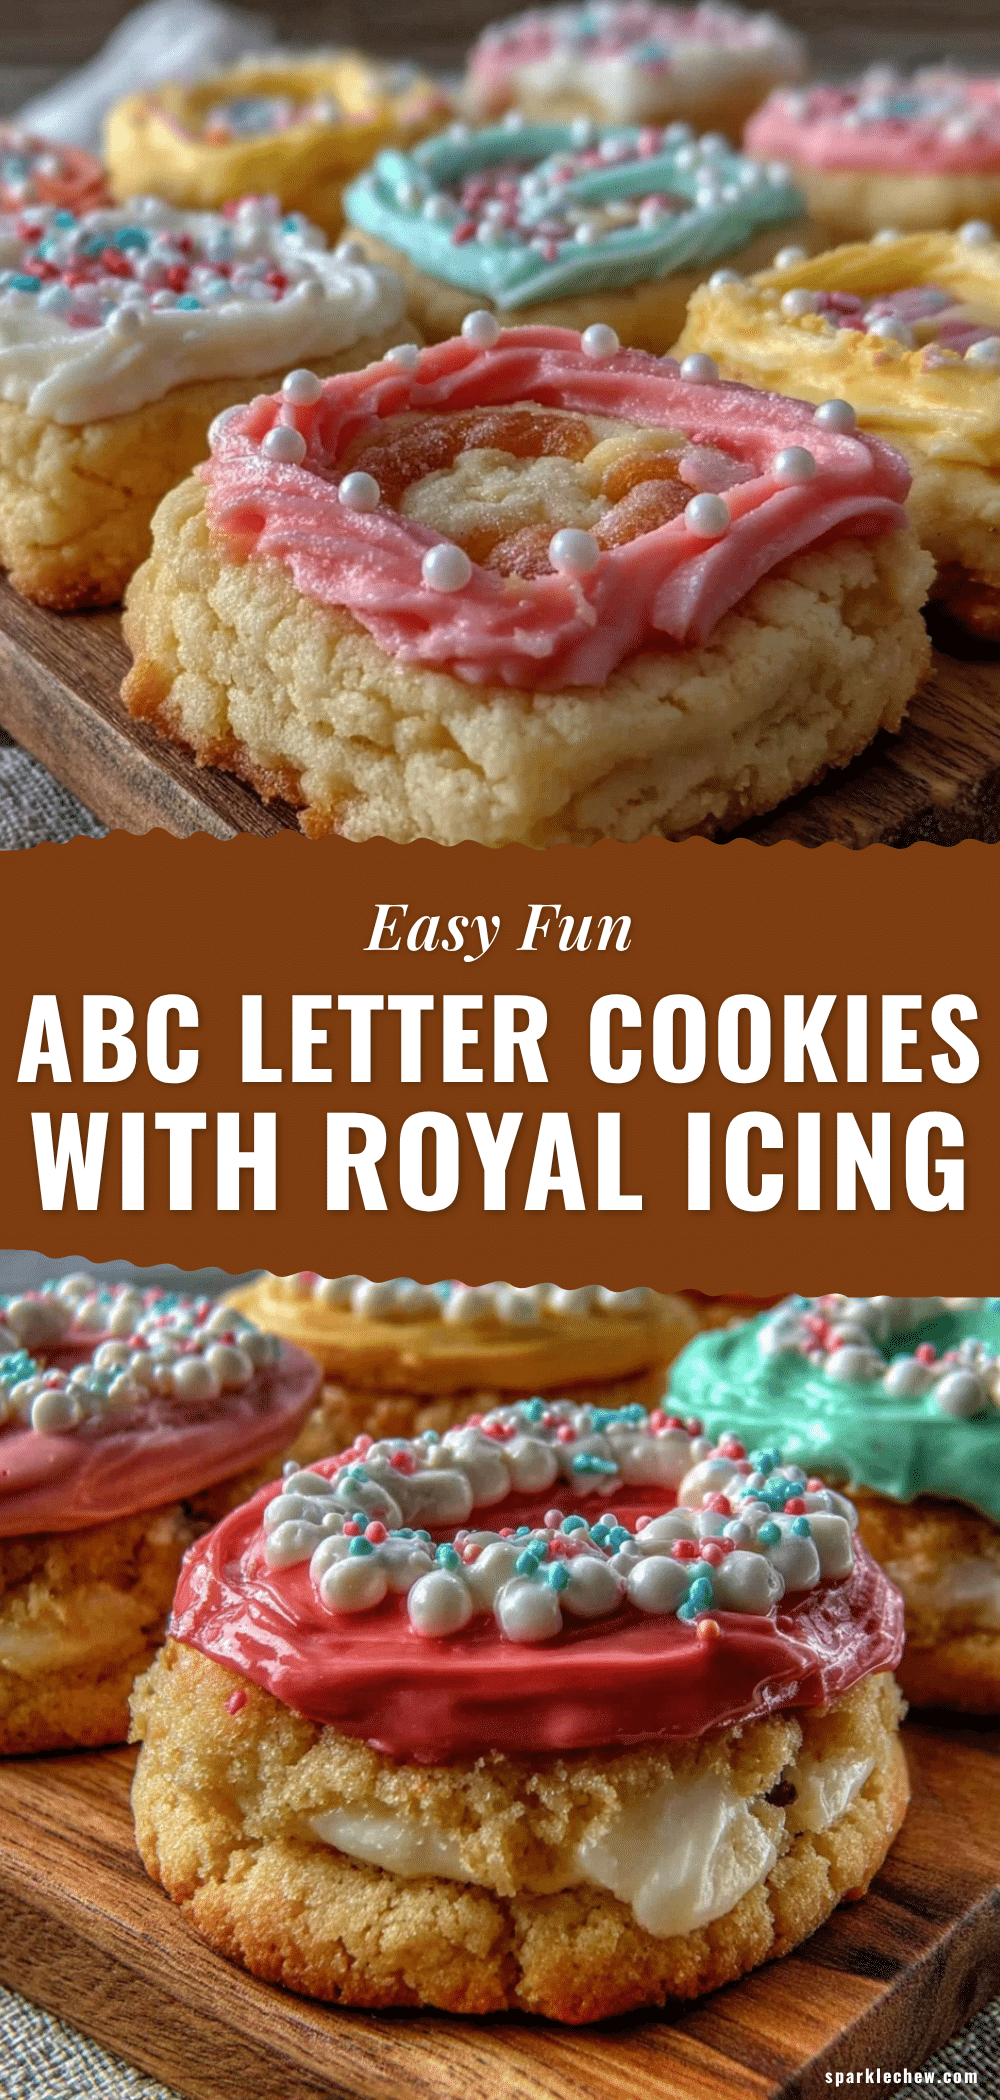
“You won’t believe where I got this idea,” my quiet neighbor said one sunny Saturday morning as I was watering my plants. Honestly, I didn’t expect a baking lesson from Tom, the guy who usually talks more about his fishing trips than flour and sugar. But there I was, leaning on the fence, listening as he described how he makes these fun, easy ABC letter cookies with royal icing for his niece. Tom said he found the recipe scribbled on a napkin at a local café—of all places! The note was from the café’s barista, who apparently bakes on the side and loves mixing simple baking with a bit of educational fun for kids.
I mean, who would’ve thought that an accountant-turned-avid baker like Tom would have such a neat little recipe up his sleeve? The way he talked about the crisp edges of the cookies and the smooth, glossy royal icing that makes each letter pop was enough to get me curious. Maybe you’ve been there too—wanting a playful baking project that’s not too intimidating but still impressive enough to wow little ones or even grown-up guests.
So, I gave it a shot myself, with a slightly cracked mixing bowl and a distracted cat jumping on the counter (classic kitchen chaos). Let me tell you, these Easy ABC Letter Cookies with Royal Icing turned out to be a delightful surprise. They’re simple, sweet, and fun. And that’s why I keep making them whenever I need a lighthearted baking fix or a creative gift idea. Let me share this gem with you—Tom’s accidental treasure from a napkin, now a staple in my kitchen.
Why You’ll Love This Recipe
This Easy ABC Letter Cookies recipe with royal icing is honestly one of those gems that just works, every single time. I’ve baked it dozens of times (with a few hiccups here and there), and it always brings smiles around the table. Here’s why you’ll want to have this recipe bookmarked:
- Quick & Easy: The dough comes together in under 20 minutes, making it perfect for busy afternoons or spontaneous baking sessions.
- Simple Ingredients: You don’t need any fancy or hard-to-find items—just pantry staples like butter, sugar, flour, and a few basics for the royal icing.
- Great for Learning & Play: Especially fun for kids learning their letters or anyone who enjoys a bit of playful creativity.
- Crowd-Pleaser: These cookies get rave reviews whether at birthday parties, school events, or casual tea times.
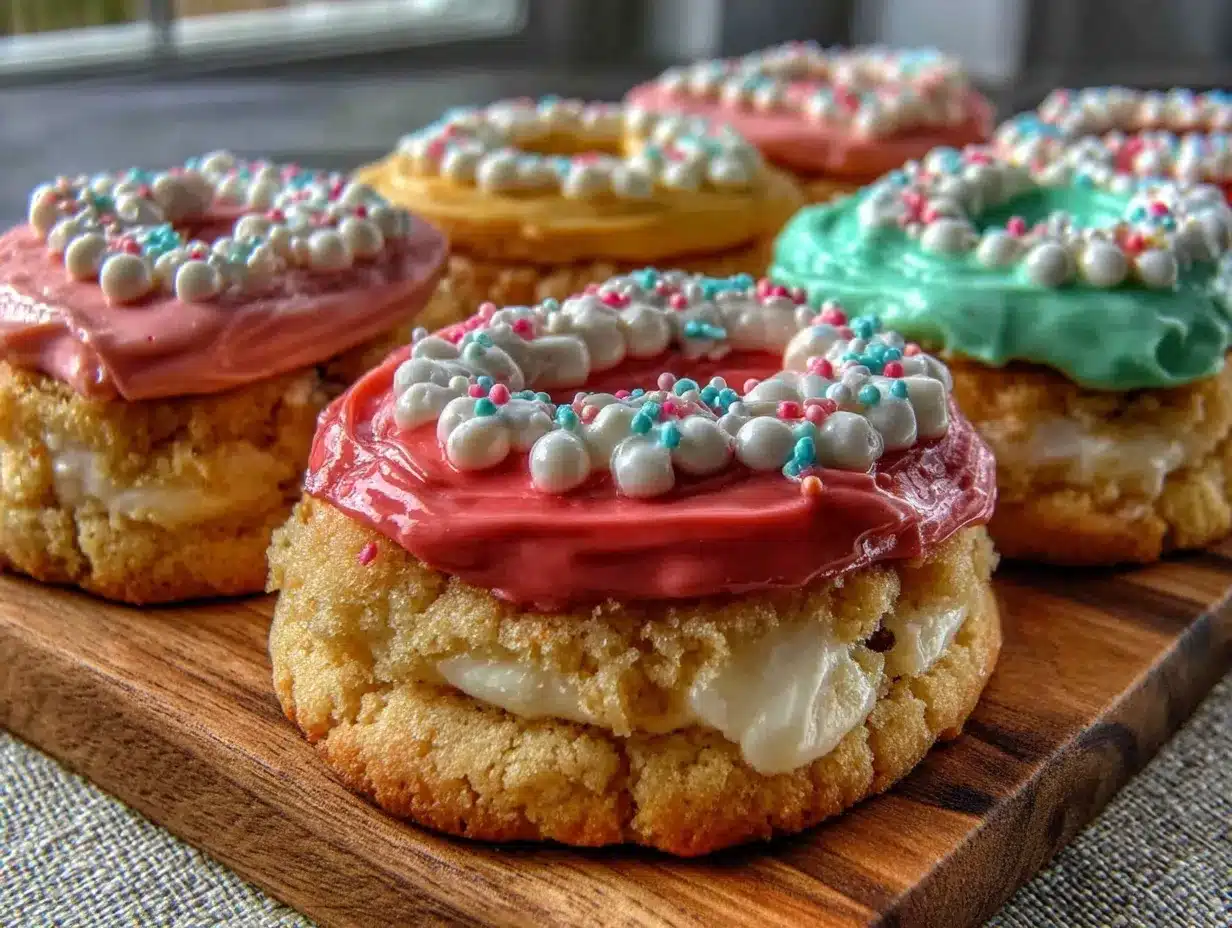
- Unbelievably Delicious: The buttery, crisp cookie paired with smooth, sweet royal icing is a classic combo that never gets old.
What makes this recipe stand out is the balance between ease and that little wow factor you get when each cookie is iced perfectly. The royal icing technique is straightforward but yields those shiny, professional-looking results—trust me, it’s not as scary as it sounds. Plus, you can customize the colors and letters to suit any occasion. Whether you’re baking with kids or just want a fun project that’s not too fussy, this recipe hits the spot every time.
What Ingredients You Will Need
This recipe uses simple, wholesome ingredients to deliver bold flavor and satisfying texture without the fuss. Most are pantry staples, and if you’re missing something, there are easy swaps to keep you rolling.
- For the cookie dough:
- 1 cup (227g) unsalted butter, softened (I prefer Land O Lakes for best flavor)
- 1 cup (200g) granulated sugar
- 1 large egg, room temperature
- 1 teaspoon pure vanilla extract
- 2 ½ cups (312g) all-purpose flour (King Arthur works great here)
- ½ teaspoon baking powder
- ¼ teaspoon salt
- For the royal icing:
- 3 cups (360g) powdered sugar, sifted
- 2 large egg whites or 4 tablespoons meringue powder + 5 tablespoons water (for a safer, no-raw-egg option)
- ½ teaspoon vanilla or lemon extract (optional, but adds nice flavor)
- Food coloring gels (gel colors work best for vibrant hues; I like AmeriColor)
If you need to make this gluten-free, swapping the all-purpose flour for a 1-to-1 gluten-free baking flour blend works well. For dairy-free, use a vegan butter substitute, and the icing can be made with aquafaba instead of egg whites, though that takes a bit more practice.
Equipment Needed
Here’s what you’ll want ready before mixing up those Easy ABC Letter Cookies with royal icing:
- Mixing bowls (I usually use a medium glass bowl for dough and a smaller one for icing)
- Electric hand mixer or stand mixer (makes creaming butter and sugar much easier)
- Rolling pin (a 12-inch wooden rolling pin is my go-to for even rolling)
- Alphabet cookie cutters set (find sets with clear, clean edges for best shape)
- Baking sheets lined with parchment paper or silicone mats
- Cooling rack (important to cool cookies completely before icing)
- Piping bags with small round tips or squeeze bottles for icing application
If you don’t have cookie cutters, you can carefully cut letters freehand with a sharp knife, but it’s a bit trickier. For budget-friendly options, silicone mats are reusable and prevent sticking better than parchment. Cleaning royal icing tools right after use helps avoid hardened messes that are tough to scrub off later.
Preparation Method
- Make the cookie dough: In a large bowl, cream together 1 cup softened butter and 1 cup granulated sugar using an electric mixer until light and fluffy, about 3-4 minutes. This step is crucial for tender cookies.
- Add wet ingredients: Beat in 1 large egg and 1 teaspoon vanilla extract until fully incorporated.
- Combine dry ingredients: In a separate bowl, whisk together 2 ½ cups all-purpose flour, ½ teaspoon baking powder, and ¼ teaspoon salt.
- Mix dry and wet: Gradually add the flour mixture to the butter mixture, mixing on low speed until just combined. Be careful not to overmix; the dough should be soft but not sticky.
- Chill the dough: Wrap the dough in plastic wrap and refrigerate for at least 1 hour. Chilling helps the dough firm up, making it easier to roll and cut.
- Preheat oven: Set your oven to 350°F (175°C) and line baking sheets with parchment paper.
- Roll and cut: On a lightly floured surface, roll the chilled dough to about ¼-inch (6mm) thickness. Use your alphabet cookie cutters to cut out letters, and place them about 1 inch (2.5 cm) apart on the baking sheets.
- Bake: Bake for 8-10 minutes or until edges are just starting to turn golden. Keep a close eye—overbaking toughens the cookies.
- Cool completely: Transfer cookies to a wire rack to cool fully before icing. If you start icing warm cookies, the royal icing will melt and lose its shape.
- Prepare royal icing: In a clean bowl, beat 3 cups sifted powdered sugar with 2 egg whites (or meringue powder mix). Add ½ teaspoon vanilla or lemon extract if desired. Beat until stiff peaks form, about 5-7 minutes.
- Color the icing: Divide the icing into small bowls and tint with gel food coloring as you like.
- Decorate: Transfer icing to piping bags fitted with small round tips or use squeeze bottles. Pipe outlines and fill in each letter as you wish. Let the icing dry for several hours or overnight for a firm finish.
Pro tip: If your icing gets too thick, thin with a few drops of water; too runny, add more powdered sugar. And honestly, don’t stress if your first few letters aren’t perfect—they get better with practice!
Cooking Tips & Techniques
Getting those Easy ABC Letter Cookies just right takes a little know-how, but nothing too intimidating:
- Chill dough thoroughly: This prevents spreading and helps keep those crisp letter edges sharp.
- Roll evenly: Uneven dough means some letters bake faster and brown more, which can throw off your batch.
- Don’t overbake: The cookies should be just firm to the touch when removed from the oven; they’ll harden more as they cool.
- Royal icing consistency: For outlining letters, use thicker icing; for flooding inside, thin it slightly. Learning this balance is key to neat decorations.
- Drying time: Let icing dry fully between colors or layers to avoid smudging or mixing hues unintentionally.
- Practice piping: Try piping on parchment before decorating cookies to get comfortable with pressure and control.
- Common mistake: Using powdered sugar that’s lumpy or not sifting it can cause your icing to be grainy. Sift well!
- Personal lesson: I once forgot to cool cookies completely before icing, and the royal icing melted right off—don’t do that!
- Multitasking: While dough chills, prep your icing ingredients and colors to save time.
Variations & Adaptations
Making Easy ABC Letter Cookies your own is part of the fun. Here are a few ways to switch things up:
- Flavor twists: Add lemon or almond extract to the dough for a subtle change. You can also mix in a tablespoon of cocoa powder for chocolate letter cookies.
- Dietary swaps: Use almond flour for a gluten-free option, and replace butter with coconut oil or vegan margarine for dairy-free baking.
- Decorating alternatives: Instead of royal icing, try melted chocolate or colored sugar sprinkles for a different look and texture.
- Seasonal themes: Customize icing colors for holidays—reds and greens for Christmas, pastels for Easter, or orange and black for Halloween.
- Personal favorite: I once iced a full cookie alphabet in rainbow colors for a child’s birthday party—it was a hit and made learning letters extra exciting!
- Cooking method: If you want a softer cookie, reduce baking time by a minute or two, but keep a close eye so they don’t undercook.
Serving & Storage Suggestions
These Easy ABC Letter Cookies with royal icing are best served at room temperature, allowing the icing to be firm but not hard. Present them on a colorful platter or arrange them to spell out names or messages—that always gets a smile!
Pairing them with a simple glass of milk, tea, or even a fun fruit punch makes for a lovely snack or party treat. They also make charming edible gifts wrapped in cellophane with a ribbon.
For storage, keep cookies in an airtight container at room temperature for up to 3 days. If you want to keep them longer, store in the fridge for up to a week or freeze uniced cookies wrapped tightly for up to 3 months.
When reheating, avoid microwave as it can soften the icing too much. Instead, bring cookies to room temperature if refrigerated and enjoy. Over time, the flavors meld, and the texture becomes even more tender—if they last that long!
Nutritional Information & Benefits
Each cookie roughly contains:
| Nutrition | Per Cookie (approx.) |
|---|---|
| Calories | 90-110 |
| Fat | 5g |
| Carbohydrates | 12g |
| Sugar | 7g |
| Protein | 1g |
These cookies offer a little energy boost with their buttery base and sweet icing—perfect for a treat, but obviously best enjoyed in moderation. Using real butter adds some vitamin A, and the egg whites in the icing provide a bit of protein. If you’re mindful of allergens, note these contain gluten, dairy, and eggs, but substitutions are possible.
Personally, I appreciate having a simple, homemade cookie recipe that feels both festive and nourishing compared to store-bought options filled with preservatives. It’s just nice to know what’s in there and share something made with care.
Conclusion
Easy ABC Letter Cookies with royal icing are a wonderful way to bring a little joy and creativity into your kitchen. Whether you’re baking with kids, preparing for a party, or simply craving a fun project, this recipe balances simplicity with a playful twist that’s hard to beat. You can customize the colors and letters to suit any occasion or personal style, making each batch uniquely yours.
I love this recipe because it’s approachable but still yields cookies that look and taste like you put in a lot more effort than you actually did. Plus, the memories made while piping those tiny letters? Priceless. I’d love to hear how you make these cookies your own—drop a comment or share your decorating adventures. Happy baking!
FAQs
Can I make the cookie dough ahead of time?
Yes! You can make the dough up to 2 days in advance and keep it wrapped tightly in the fridge. Just let it soften a bit before rolling out.
Is royal icing safe to eat raw?
Traditional royal icing uses raw egg whites, which carry some risk. Using pasteurized egg whites or meringue powder is a safer alternative, especially for kids.
How do I fix runny or thick royal icing?
Add a few drops of water if it’s too thick, or more powdered sugar if it’s too runny. Adjust gradually to get the right consistency for piping or flooding.
Can I use store-bought cookie cutters for the alphabet?
Definitely! Choose cutters with clean edges in a size that works well for your cookies—usually around 2 to 3 inches tall is ideal.
What’s the best way to store decorated cookies?
Keep them in an airtight container at room temperature for up to 3 days. For longer storage, refrigerate or freeze uniced cookies and decorate after thawing.
Pin This Recipe!
Easy ABC Letter Cookies Recipe with Royal Icing for Perfect Fun Baking

These Easy ABC Letter Cookies with royal icing are simple, sweet, and fun, perfect for playful baking projects with kids or creative gifts. The buttery, crisp cookies paired with smooth, glossy royal icing make a delightful treat.
- Prep Time: 20 minutes
- Cook Time: 10 minutes
- Total Time: 1 hour 30 minutes
- Yield: About 24 cookies 1x
- Category: Dessert
- Cuisine: American
Ingredients
- 1 cup (227g) unsalted butter, softened
- 1 cup (200g) granulated sugar
- 1 large egg, room temperature
- 1 teaspoon pure vanilla extract
- 2 ½ cups (312g) all-purpose flour
- ½ teaspoon baking powder
- ¼ teaspoon salt
- 3 cups (360g) powdered sugar, sifted
- 2 large egg whites or 4 tablespoons meringue powder + 5 tablespoons water
- ½ teaspoon vanilla or lemon extract (optional)
- Food coloring gels
Instructions
- In a large bowl, cream together 1 cup softened butter and 1 cup granulated sugar using an electric mixer until light and fluffy, about 3-4 minutes.
- Beat in 1 large egg and 1 teaspoon vanilla extract until fully incorporated.
- In a separate bowl, whisk together 2 ½ cups all-purpose flour, ½ teaspoon baking powder, and ¼ teaspoon salt.
- Gradually add the flour mixture to the butter mixture, mixing on low speed until just combined. Do not overmix.
- Wrap the dough in plastic wrap and refrigerate for at least 1 hour.
- Preheat oven to 350°F (175°C) and line baking sheets with parchment paper.
- On a lightly floured surface, roll the chilled dough to about ¼-inch (6mm) thickness.
- Use alphabet cookie cutters to cut out letters and place them about 1 inch apart on baking sheets.
- Bake for 8-10 minutes or until edges just start to turn golden. Remove and cool completely on a wire rack.
- Prepare royal icing by beating 3 cups sifted powdered sugar with 2 egg whites (or meringue powder mix) and ½ teaspoon vanilla or lemon extract until stiff peaks form, about 5-7 minutes.
- Divide icing into small bowls and tint with gel food coloring as desired.
- Transfer icing to piping bags fitted with small round tips or use squeeze bottles. Pipe outlines and fill in each letter.
- Let icing dry for several hours or overnight for a firm finish.
Notes
Chill dough thoroughly to prevent spreading and keep crisp edges. Roll dough evenly for uniform baking. Do not overbake cookies; they firm up as they cool. Adjust royal icing consistency by adding water if too thick or powdered sugar if too runny. Let icing dry fully between layers to avoid smudging. Practice piping on parchment paper before decorating cookies. Sift powdered sugar well to avoid grainy icing. Cool cookies completely before icing to prevent melting.
Nutrition
- Serving Size: 1 cookie
- Calories: 100
- Sugar: 7
- Fat: 5
- Carbohydrates: 12
- Protein: 1
Keywords: ABC cookies, letter cookies, royal icing, kids baking, fun baking, alphabet cookies, easy cookies, cookie decorating