Love this? Save it for later!
Share the inspiration with your friends
My husband claimed he hated green bean casserole for fifteen years. Fifteen years. He’d make this face—you know the one—whenever it showed up on a holiday table. That gloppy, canned-soup situation with the sad, soggy fried onions on top. Honestly, I couldn’t blame him. I wasn’t exactly a fan either. But then came last Thanksgiving. I was testing this make-ahead version with crispy shallots, mostly as a backup dish for a friend’s potluck. I set it on the counter to cool and walked away for maybe ten minutes. When I came back, there he was, standing at the counter with a fork, going in for a third bite. “What is this?” he asked, trying to play it cool. I just smiled. That was the moment I knew I had something special.
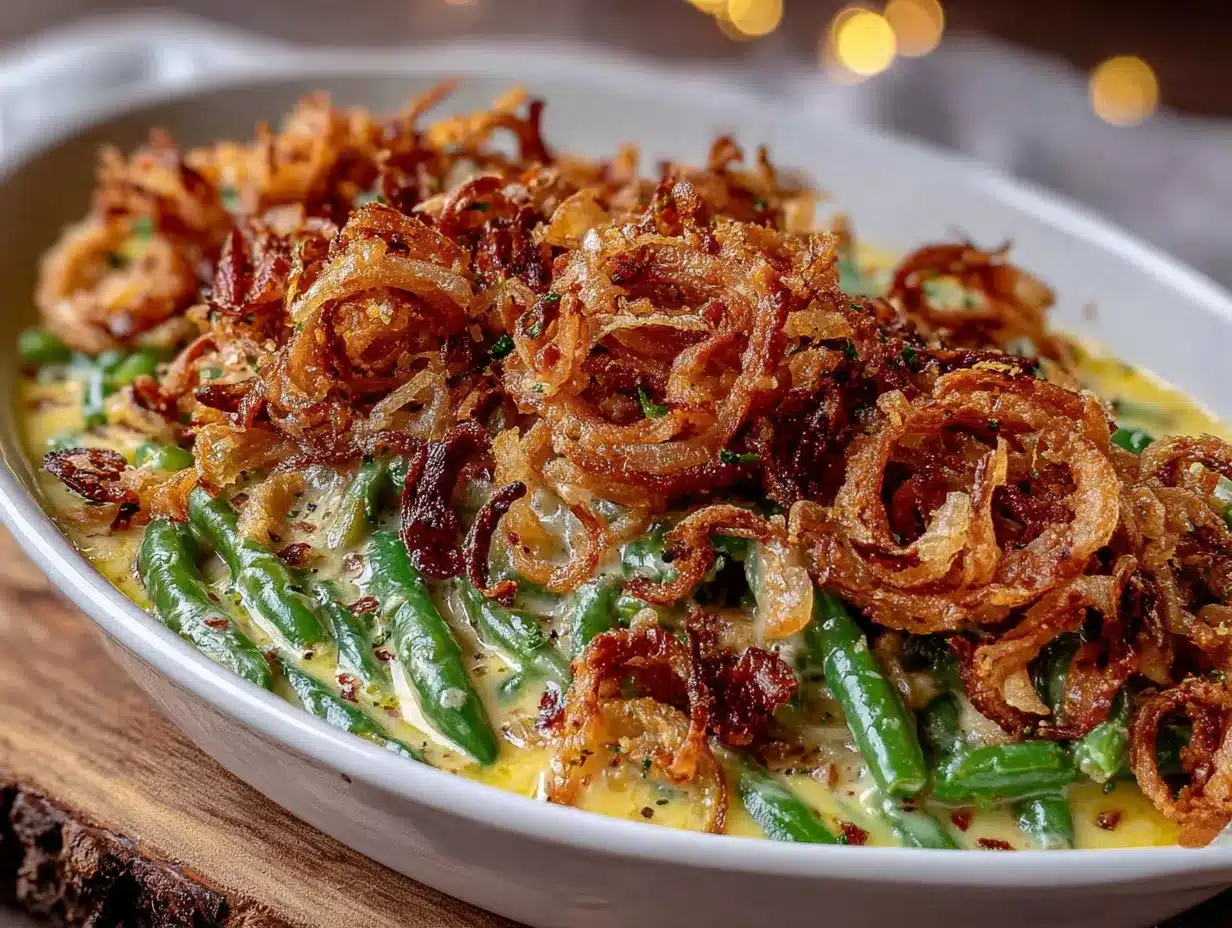
This wasn’t supposed to be a family-favorite recipe. It was supposed to be an experiment—a way to prove you could have the creamy, comforting green bean casserole you crave without opening a single can of soup. I wanted something that tasted like it took hours, but could actually be made two days ahead of time. Something that would make people close their eyes on the first bite. And honestly? It worked better than I ever imagined. The fresh green beans stay crisp-tender, the homemade mushroom sauce is rich without being heavy, and those crispy shallots? Let me tell you, they’re a game-changer. They stay crunchy even after the casserole sits in the fridge overnight.
Maybe you’ve been there—stuck with a green bean casserole that turns into a watery mess halfway through dinner, or worse, one that everyone politely pushes around their plate. That’s exactly why I kept tweaking this recipe until it was bulletproof. It reheats beautifully, feeds a crowd on a sensible budget, and somehow manages to please both the picky eaters and the food snobs at your table. Three winters ago, I brought it to a neighbor’s potluck and watched a grown man scrape the last bits of crispy shallot off the baking dish. That’s when I knew this one was staying in the rotation for good.
Why You’ll Love This Recipe
This isn’t just another green bean casserole—it’s the one that will make you forget every sad, canned version you’ve ever had. I’ve tested this recipe more times than I care to admit, and every single time, it delivers the same creamy, crunchy, comforting magic. Here’s why it deserves a permanent spot in your recipe box:
- Make-Ahead Magic: Assemble this casserole up to two days in advance and just pop it in the oven when you’re ready. Perfect for busy holiday mornings or hectic weeknights when you need dinner to be effortless.
- Real Ingredients, Real Flavor: No canned cream of mushroom soup here. The homemade sauce uses fresh mushrooms, heavy cream, and a touch of white wine for depth you just can’t fake. But don’t worry—every ingredient is easy to find and budget-friendly.
- Crispy Shallots That Stay Crispy: This is the secret weapon. Homemade fried shallots stay crunchy even after being refrigerated and reheated. No more sad, soggy topping the next day.
- Crowd-Pleaser Approved: My kids devour this. My husband who “hated” green bean casserole asks for it year-round. Even my mother-in-law, who is notoriously picky about holiday sides, asked for the recipe. That’s a win in my book.
- Budget-Friendly Feeds a Crowd: This recipe uses simple, affordable ingredients and stretches beautifully. One batch easily serves 8-10 people, making it perfect for family dinners, potlucks, or holiday gatherings without breaking the bank.
What makes this recipe different from the rest? It’s the technique. Blanching the green beans keeps them bright and crisp. Using a roux-based mushroom sauce ensures it thickens perfectly without being gluey. And those crispy shallots? They’re fried in small batches for maximum crunch. I’ve spent years perfecting each step so you don’t have to. This isn’t just another version of green bean casserole—it’s the one that will make you close your eyes after the first bite. It’s comfort food reimagined: faster, make-ahead friendly, but with the same soul-soothing satisfaction you crave.
What Ingredients You Will Need
This recipe uses simple, wholesome ingredients to deliver bold flavor and satisfying texture without the fuss. Most are pantry staples or easy to find at any grocery store. Here’s everything you’ll need, broken down by component:
For the Green Beans
- 2 pounds fresh green beans, trimmed and cut into 2-inch pieces (look for bright, firm beans without blemishes—fresh makes a huge difference here)
- 1 teaspoon salt (for the blanching water)
- Ice water bath (to stop the cooking and lock in that vibrant green color)
For the Creamy Mushroom Sauce
- 4 tablespoons unsalted butter (I prefer Kerrygold for its rich flavor, but any good quality butter works)
- 1 pound cremini mushrooms, thinly sliced (baby bellas work perfectly—they have more flavor than white button mushrooms)
- 1 medium yellow onion, finely diced (about 1 cup)
- 4 cloves garlic, minced (fresh, not jarred—trust me on this)
- 1/4 cup all-purpose flour (for the roux; use a gluten-free blend if needed)
- 2 cups heavy cream (you can substitute half-and-half for a lighter version, but the sauce won’t be as rich)
- 1 cup whole milk (adds creaminess without being too heavy)
- 1/2 cup dry white wine (like Sauvignon Blanc or Pinot Grigio—use chicken broth if you prefer not to cook with wine)
- 1 teaspoon salt
- 1/2 teaspoon black pepper
- 1/4 teaspoon ground nutmeg (this tiny amount makes a huge difference in depth of flavor)
- 1/2 cup grated Parmesan cheese (optional but highly recommended—adds a savory umami boost)
For the Crispy Shallots
- 4 large shallots, thinly sliced into rings (about 1 1/2 cups)
- 1/2 cup all-purpose flour
- 1 teaspoon salt
- 1/2 teaspoon black pepper
- 1 cup vegetable oil (for frying—use a neutral oil like canola or grapeseed)
Substitution Guidance
If you’re feeding a crowd with dietary needs, here are some swaps I’ve tested: Use gluten-free all-purpose flour in both the sauce and the shallots for a gluten-free version. Swap the heavy cream and milk for full-fat canned coconut milk for a dairy-free option (the sauce will be slightly thinner but still delicious). For a lower-fat version, use half-and-half instead of heavy cream and skip the Parmesan. I’ve tried all of these variations in my own kitchen, and while the original is my favorite, every single one has been a hit at family dinners.
Equipment Needed
You don’t need any fancy equipment to pull off this recipe, which is exactly how I like it. Here’s what you’ll need:
- Large pot for blanching the green beans (at least 6 quarts—you need plenty of water to keep the beans bright green)
- Large skillet or sauté pan for making the mushroom sauce (a 12-inch pan works perfectly)
- 9×13-inch baking dish (ceramic or glass works best for even heating)
- Small saucepan for frying the shallots (or use the same skillet you used for the sauce, just clean it out first)
- Slotted spoon or spider strainer for removing the crispy shallots from the oil
- Paper towels for draining the shallots
- Sharp knife and cutting board for prepping the vegetables
- Measuring cups and spoons
- Whisk for making the roux smooth
If you don’t have a 9×13-inch dish, you can use two 8×8-inch dishes or even a large cast-iron skillet. I’ve made this in a disposable aluminum pan for potlucks before, and it works just fine. For the shallots, you can also bake them at 375°F for 15-20 minutes tossed in oil and flour for a hands-off approach—they won’t be quite as crispy, but they’re still delicious. My favorite budget-friendly tip: use a deep stainless steel pot for frying the shallots instead of buying a dedicated fryer. It’s one less thing to store in your already-cramped kitchen cabinets.
Preparation Method
Step 1: Blanch the Green Beans
Fill a large pot with water and add 1 teaspoon of salt. Bring it to a rolling boil over high heat. While you wait, fill a large bowl with ice water and set it nearby. Drop the trimmed green beans into the boiling water and cook for exactly 3 minutes. They should turn bright green and become just tender but still have a nice snap. Immediately transfer them to the ice water bath using a slotted spoon or strainer. Let them sit for 2-3 minutes until completely cool, then drain well and pat dry with a clean kitchen towel. This step is non-negotiable—it locks in the color and texture so your casserole doesn’t turn into mush later.
Step 2: Make the Crispy Shallots
While the beans are cooling, start on the shallots. Thinly slice 4 large shallots into rings—try to keep them uniform in thickness so they fry evenly. In a shallow bowl, whisk together 1/2 cup all-purpose flour, 1 teaspoon salt, and 1/2 teaspoon black pepper. Toss the shallot rings in the flour mixture until they’re well coated, shaking off any excess. Heat 1 cup of vegetable oil in a small saucepan over medium heat until it shimmers (about 350°F if you’re using a thermometer). Working in small batches, fry the shallots for 2-3 minutes, stirring occasionally, until they’re golden brown and crispy. Use a slotted spoon to transfer them to a paper towel-lined plate to drain. Season with a pinch of salt while they’re still warm. Set aside—try not to eat them all before the casserole is assembled.
Step 3: Sauté the Mushrooms and Onions
In a large skillet, melt 4 tablespoons of butter over medium-high heat. Add the sliced cremini mushrooms and cook for 5-7 minutes, stirring occasionally, until they release their liquid and start to brown. Don’t crowd the pan—if your skillet is small, cook the mushrooms in two batches. Add the diced onion and cook for another 3-4 minutes until softened and translucent. Add the minced garlic and cook for 30 seconds until fragrant. The smell at this point is absolutely intoxicating—this is where the magic starts.
Step 4: Build the Cream Sauce
Sprinkle the 1/4 cup of flour over the mushroom mixture and stir constantly for 1-2 minutes until the flour is fully incorporated and starts to turn golden. This is your roux, and it’s the foundation of the sauce. Slowly pour in the white wine, scraping up any browned bits from the bottom of the pan. Let it cook for 1 minute. Gradually add the heavy cream and milk, whisking continuously to prevent lumps. Bring the sauce to a gentle simmer and cook for 3-4 minutes until it thickens enough to coat the back of a spoon. Stir in the salt, pepper, nutmeg, and Parmesan cheese if using. Taste and adjust seasoning—this is your moment to get it right.
Step 5: Assemble the Casserole
Preheat your oven to 375°F (190°C). In a large bowl, combine the blanched green beans with the mushroom sauce. Gently fold everything together until the beans are evenly coated. Transfer the mixture to a greased 9×13-inch baking dish and spread it into an even layer. At this point, you can cover the dish with foil and refrigerate for up to 2 days. If you’re baking it right away, top with the crispy shallots and bake for 20-25 minutes until bubbly and hot. If you’re making it ahead, wait to add the shallots until just before baking—trust me on this.
Step 6: Bake and Serve
When you’re ready to bake, remove the casserole from the fridge and let it sit at room temperature for 20 minutes while the oven preheats. Top evenly with the crispy shallots. Bake uncovered for 25-30 minutes until the sauce is bubbly around the edges and the shallots are deeply golden. Let it rest for 5 minutes before serving—this helps the sauce set up so it doesn’t run all over the plate. The first time I made this, I was too impatient and ended up with a puddle on everyone’s plate. Learn from my mistake.
Cooking Tips & Techniques
After making this green bean casserole more times than I can count, I’ve learned a few things that make all the difference. Here are my best tips for getting it perfect every time:
Don’t skip the ice bath. I know it’s an extra step, but it’s what keeps the green beans bright green and crisp-tender instead of turning into mushy, olive-colored sadness. If you’re short on time, you can run the beans under cold water for a few minutes instead, but the ice bath works better.
Watch your heat when making the roux. The first time I made this, I got distracted and let the flour brown too much. The sauce ended up with a slightly bitter flavor that I couldn’t fix. Keep the heat at medium and stir constantly—you want the flour to turn a pale golden color, not brown.
Fry the shallots in small batches. If you overcrowd the pan, the temperature drops and the shallots will absorb oil instead of getting crispy. I learned this the hard way when I ended up with oily, limp shallots that nobody wanted to eat. Small batches, patience, and hot oil are your friends.
Season as you go. Don’t wait until the end to add salt and pepper. Season the mushroom mixture, season the sauce, and season the shallots. Building flavor in layers is what makes this casserole taste like it simmered all day when it actually came together in under an hour.
Let it rest before serving. I know it’s hard to wait when the kitchen smells this good, but letting the casserole sit for 5-10 minutes after baking allows the sauce to thicken and set. If you serve it immediately, it will be runny and the layers won’t hold together. Patience pays off here.
Double the shallots. Seriously. Make extra. They’re the first thing to disappear, and having a backup stash to sprinkle on top right before serving will make you look like a hero. I always make a double batch and keep the extra in an airtight container for snacking.
Variations & Adaptations
One of the things I love most about this recipe is how adaptable it is. Here are some variations I’ve tried and loved:
Classic Fried Onion Topping: If you’re a traditionalist, swap the crispy shallots for store-bought fried onions. It’s not quite as good, but it’s faster and still delicious. Just sprinkle them on top during the last 10 minutes of baking so they don’t burn.
Bacon and Gruyère Upgrade: Cook 6 strips of bacon until crispy, crumble them, and stir half into the sauce. Top the casserole with 1 cup of shredded Gruyère cheese before adding the shallots. This version is dangerously good and always gets devoured first at potlucks.
Dairy-Free Version: Use full-fat canned coconut milk instead of heavy cream and milk. Swap the butter for vegan butter or olive oil. Omit the Parmesan or use a dairy-free alternative. The sauce will be slightly thinner, but the flavor is still fantastic. I made this for a friend with dairy allergies and she asked for the recipe immediately.
Add Protein: Turn this side dish into a main course by adding 2 cups of shredded rotisserie chicken or cooked Italian sausage. Stir it into the sauce along with the green beans before baking. It’s a great way to use up leftovers and makes for an easy weeknight dinner.
Seasonal Twist: In the summer, swap half the green beans for fresh asparagus or zucchini. In the fall, add 1 cup of roasted butternut squash cubes. The creamy mushroom sauce pairs beautifully with almost any vegetable, so feel free to experiment with what’s in season.
Spicy Kick: Add 1/4 teaspoon of red pepper flakes to the mushroom sauce along with the garlic. It adds a subtle warmth that doesn’t overwhelm the dish but keeps things interesting. My husband, who usually avoids spicy food, actually loves this version.
Serving & Storage Suggestions
This green bean casserole is incredibly versatile when it comes to serving. Here’s how to make the most of it:
Serving Temperature: Serve it hot straight from the oven. The sauce should be bubbly and the shallots should be deeply golden. Let it rest for 5 minutes before bringing it to the table—this gives the sauce time to set so it doesn’t run all over the plate.
Presentation: I like to transfer the casserole to a serving platter and sprinkle a few extra crispy shallots on top for visual appeal. A sprinkle of fresh thyme or parsley adds a nice pop of green. If you’re serving it for a holiday, consider using a decorative baking dish that can go straight from oven to table.
Complementary Dishes: This casserole is the perfect side for roasted turkey, baked ham, or even a simple roast chicken. It also pairs beautifully with mashed potatoes, dinner rolls, and cranberry sauce. For a lighter meal, serve it alongside a simple green salad with vinaigrette.
Storage: Leftovers can be stored in an airtight container in the refrigerator for up to 4 days. The shallots will soften slightly, but the flavor will still be fantastic. To reheat, place the casserole in a 350°F oven for 10-15 minutes until warmed through. You can also microwave individual portions for 1-2 minutes, though the texture won’t be quite as good.
Freezing: This casserole freezes beautifully. Assemble it completely (without the crispy shallots), wrap tightly in plastic wrap and foil, and freeze for up to 3 months. To serve, thaw overnight in the refrigerator, top with fresh crispy shallots, and bake as directed. I always keep one in the freezer for unexpected guests or busy weeknights.
Flavor Development: Here’s a secret—this casserole actually tastes better the next day. The flavors meld together overnight, and the sauce thickens beautifully. If you’re making it for a holiday, I highly recommend making it a day ahead. Just wait to add the shallots until right before baking.
Nutritional Information & Benefits
While I wouldn’t call this a health food, it’s certainly better for you than the canned-soup version. Here’s the nutritional breakdown per serving (based on 8 servings):
- Calories: 320
- Total Fat: 22g
- Saturated Fat: 12g
- Cholesterol: 55mg
- Sodium: 580mg
- Total Carbohydrates: 24g
- Dietary Fiber: 4g
- Sugars: 7g
- Protein: 8g
Health Benefits of Key Ingredients: Green beans are packed with vitamins A, C, and K, plus fiber and folate. Mushrooms are one of the few natural food sources of vitamin D and are rich in antioxidants. Shallots contain quercetin, a powerful anti-inflammatory compound. Even the heavy cream provides calcium and vitamin D, though I recommend enjoying this dish in moderation as part of a balanced diet.
Dietary Considerations: This recipe is vegetarian as written. To make it gluten-free, use a gluten-free all-purpose flour blend in both the sauce and the shallots. For a lower-calorie version, substitute half-and-half for the heavy cream and skip the Parmesan. The recipe is naturally nut-free and egg-free.
Potential Allergens: This recipe contains dairy (butter, cream, milk, Parmesan) and gluten (flour). It is free from eggs, nuts, and soy. Always check your ingredient labels to be safe.
Conclusion
This make-ahead green bean casserole with crispy shallots has become a staple in my kitchen, and I have a feeling it will become one in yours too. It’s the kind of recipe that makes you look like you spent hours in the kitchen when really, most of the work happens ahead of time. The creamy mushroom sauce, the crisp-tender green beans, and those impossibly crunchy shallots—it all comes together to create something truly special.
What I love most about this recipe is how it brings people together. I’ve watched my husband go from hating green bean casserole to asking for it for his birthday dinner. I’ve seen kids who swore they didn’t like vegetables go back for seconds. I’ve brought it to potlucks where the dish came back empty and people asked for the recipe before I even got my coat off. That’s the power of a really good side dish.
I encourage you to make this your own. Add bacon if that’s your thing. Swap in different mushrooms. Double the shallots (seriously, do it). The beauty of this recipe is that it’s forgiving and adaptable, just like the best family recipes always are. If you try it, I’d love to hear how it turned out. Drop a comment below and let me know what variations you tried, or tag me in your photos. Happy cooking, friends—you’ve got this.
Frequently Asked Questions
Can I use frozen green beans instead of fresh?
You can, but I don’t recommend it. Frozen green beans have a much softer texture after cooking and can make the casserole watery. If you’re in a pinch, thaw the frozen beans completely and pat them very dry before using. But for the best texture and flavor, fresh green beans are absolutely worth the extra few minutes of prep.
How far ahead can I make this casserole?
You can assemble the entire casserole (minus the crispy shallots) up to 2 days in advance. Just cover it tightly with foil and refrigerate. When you’re ready to bake, let it sit at room temperature for 20 minutes while the oven preheats, then top with shallots and bake as directed. The flavors actually get better as they meld together overnight.
Can I make the crispy shallots ahead of time?
Yes, but they’re best within 24 hours of frying. Store them in an airtight container at room temperature for up to 3 days. If they start to lose their crunch, you can re-crisp them in a 300°F oven for 5 minutes. I usually make them the day before and keep them in a jar on the counter—they rarely last that long anyway.
Can I freeze the leftovers?
Absolutely. Freeze the fully baked casserole (without the crispy shallots) in an airtight container for up to 3 months. Thaw overnight in the refrigerator, then reheat in a 350°F oven until bubbly. Make a fresh batch of crispy shallots to top it before serving. The texture won’t be quite as perfect as the first time, but it’s still delicious and incredibly convenient.
What can I substitute for the white wine?
If you prefer not to cook with wine, substitute an equal amount of chicken or vegetable broth. Add a splash of lemon juice or a teaspoon of white wine vinegar at the end to mimic the acidity that the wine provides. The flavor will be slightly different but still delicious. I’ve also used dry sherry in a pinch, and it worked beautifully.
PrintEasy Make-Ahead Green Bean Casserole with Crispy Shallots

This make-ahead green bean casserole features fresh green beans, a creamy homemade mushroom sauce, and crispy fried shallots. It can be assembled up to two days in advance and is a crowd-pleasing side dish perfect for holidays or potlucks.
- Prep Time: 30 minutes
- Cook Time: 30 minutes
- Total Time: 1 hour
- Yield: 8 servings 1x
- Category: Side Dish
- Cuisine: American
Ingredients
- 2 pounds fresh green beans, trimmed and cut into 2-inch pieces
- 1 teaspoon salt (for blanching water)
- Ice water bath
- 4 tablespoons unsalted butter
- 1 pound cremini mushrooms, thinly sliced
- 1 medium yellow onion, finely diced (about 1 cup)
- 4 cloves garlic, minced
- 1/4 cup all-purpose flour
- 2 cups heavy cream
- 1 cup whole milk
- 1/2 cup dry white wine (such as Sauvignon Blanc or Pinot Grigio)
- 1 teaspoon salt
- 1/2 teaspoon black pepper
- 1/4 teaspoon ground nutmeg
- 1/2 cup grated Parmesan cheese (optional)
- 4 large shallots, thinly sliced into rings (about 1 1/2 cups)
- 1/2 cup all-purpose flour (for shallots)
- 1 teaspoon salt (for shallots)
- 1/2 teaspoon black pepper (for shallots)
- 1 cup vegetable oil (for frying shallots)
Instructions
- Blanch the green beans: Fill a large pot with water and add 1 teaspoon salt. Bring to a rolling boil. Fill a large bowl with ice water. Drop the trimmed green beans into the boiling water and cook for exactly 3 minutes. Immediately transfer to the ice water bath using a slotted spoon. Let sit for 2-3 minutes until completely cool, then drain well and pat dry.
- Make the crispy shallots: Thinly slice 4 large shallots into rings. In a shallow bowl, whisk together 1/2 cup all-purpose flour, 1 teaspoon salt, and 1/2 teaspoon black pepper. Toss the shallot rings in the flour mixture until well coated, shaking off excess. Heat 1 cup vegetable oil in a small saucepan over medium heat until shimmering (about 350°F). Working in small batches, fry the shallots for 2-3 minutes until golden brown and crispy. Transfer to a paper towel-lined plate to drain. Season w…
- Sauté the mushrooms and onions: In a large skillet, melt 4 tablespoons butter over medium-high heat. Add the sliced cremini mushrooms and cook for 5-7 minutes until they release their liquid and start to brown. Add the diced onion and cook for 3-4 minutes until softened. Add the minced garlic and cook for 30 seconds until fragrant.
- Build the cream sauce: Sprinkle 1/4 cup flour over the mushroom mixture and stir constantly for 1-2 minutes until the flour is incorporated and starts to turn golden. Slowly pour in the white wine, scraping up any browned bits. Cook for 1 minute. Gradually add the heavy cream and milk, whisking continuously. Bring to a gentle simmer and cook for 3-4 minutes until thickened. Stir in 1 teaspoon salt, 1/2 teaspoon black pepper, 1/4 teaspoon nutmeg, and 1/2 cup Parmesan cheese (if using). Taste and …
- Assemble the casserole: Preheat oven to 375°F (190°C). In a large bowl, combine the blanched green beans with the mushroom sauce. Gently fold until the beans are evenly coated. Transfer to a greased 9×13-inch baking dish and spread into an even layer. If baking immediately, top with the crispy shallots. If making ahead, cover and refrigerate for up to 2 days, adding shallots just before baking.
- Bake and serve: If refrigerated, let the casserole sit at room temperature for 20 minutes while the oven preheats. Top evenly with the crispy shallots. Bake uncovered for 25-30 minutes until bubbly and the shallots are deeply golden. Let rest for 5 minutes before serving.
Notes
For best results, don’t skip the ice bath for the green beans—it keeps them bright and crisp. Fry shallots in small batches to ensure they get crispy. The casserole can be assembled up to 2 days ahead; add shallots just before baking. Let the casserole rest for 5 minutes after baking to allow the sauce to set. Double the shallots for extra crunch.
Nutrition
- Serving Size: 1 serving (1/8 of re
- Calories: 320
- Sugar: 7
- Sodium: 580
- Fat: 22
- Saturated Fat: 12
- Carbohydrates: 24
- Fiber: 4
- Protein: 8
Keywords: green bean casserole, make-ahead, crispy shallots, holiday side dish, Thanksgiving, vegetarian, mushroom sauce