Love this? Save it for later!
Share the inspiration with your friends
The neighborhood block party was in three hours and I’d completely forgotten. I mean, I’d remembered that it was Saturday, but the part where I was supposed to bring a dessert for twelve people? That part had slipped my mind entirely. I stood in my kitchen, staring into the pantry like it might magically produce a layered, bakery-worthy confection. Everyone else would be bringing their signature dishes—the neighbor across the street is known for her mile-high lemon meringue pie, and the guy next door grills a mean brisket that takes him two days. I had a sleeve of graham crackers, a half-empty bag of marshmallows, and a bar of chocolate I’d been saving for a rainy day. Not exactly potluck gold.
Honestly, I almost just grabbed a bag of chips from the cupboard and called it a day. But then I remembered this trick I’d seen somewhere—a no-bake icebox cake that uses layers of cookies and cream. I figured, why not try it with what I had? I mean, s’mores are basically just graham crackers, chocolate, and marshmallows, right? So I crushed the graham crackers, melted the chocolate with some butter I found, and started layering. It was a little messy, and I definitely got marshmallow fluff on my shirt, but twenty minutes later I had this beautiful, rustic cake sitting in my freezer. I felt like a magician, honestly.
I walked it over to the block party, feeling a little sheepish next to the brisket and the mile-high pie. I set it on the dessert table, and within ten minutes, it was gone. People were coming up to me, asking for the recipe, saying it was the best thing there. The brisket guy even asked for a second slice! That’s when I knew I’d stumbled onto something special. This Easy No-Bake S’mores Icebox Cake isn’t just a last-minute save—it’s the dessert I now make on purpose. It’s the kind of recipe that makes you look like a hero with almost zero effort, and honestly, isn’t that what we all need on a busy weeknight?
Why You’ll Love This Recipe
Let me tell you, after making this cake for every potluck, birthday, and “I-need-dessert-now” emergency for the past year, I’ve got a pretty good handle on why it works so well. It’s not just about the taste—though the combination of crunchy graham, rich chocolate, and gooey marshmallow is basically perfection. It’s about how easy it is. I’ve tested this with different brands of chocolate (I personally love Ghirardelli for its smooth melt) and different types of marshmallows, and it always turns out amazing. Here’s why this recipe is a total winner:
- Quick & Easy: This comes together in about 15 minutes of active time. The rest is just letting the fridge do its magic. Perfect for those nights when you’re tired and just want something sweet without a huge production.
- Simple Ingredients: You probably have most of these in your pantry right now. Graham crackers, chocolate, marshmallows, butter—that’s it. No fancy grocery store trips required.
- Perfect for Weeknights: Because it’s no-bake, you don’t have to heat up the kitchen. It’s a cool, refreshing dessert that’s ready when you are, making it ideal for busy weeknights or last-minute cravings.
- Crowd-Pleaser: I’ve served this to kids, adults, and even my picky aunt who “doesn’t do sweets.” Everyone loves it. It’s nostalgic, familiar, and just feels like comfort.
- Unbelievably Delicious: The texture is what gets me every time. The graham crackers soften into a cake-like layer, the chocolate firms up into a fudge-like filling, and the marshmallows get all fluffy and light. It’s next-level comfort food.
What makes this recipe different from all the other s’mores desserts out there? It’s the technique. Instead of just throwing everything together, we’re building layers that set into a perfect slice. The chocolate layer is key—it’s not just melted chocolate; it’s a rich, creamy ganache that holds everything together. This isn’t just another version of a s’mores dessert; it’s the best version. It’s the one you’ll come back to again and again, the one that makes you close your eyes after the first bite. It’s comfort food reimagined—faster, easier, but with the same soul-soothing satisfaction.
What Ingredients You Will Need
This recipe uses simple, wholesome ingredients to deliver that classic s’mores flavor without any fuss. Most of these are pantry staples, so you can whip this up anytime the craving hits. Here’s what you’ll need, along with a few tips I’ve learned from making this countless times.
- Graham Crackers (about 2 sleeves or 18 full sheets): These form the base of our cake. I like to use the classic honey-flavored ones, but you can use cinnamon or chocolate if you want a twist. Make sure they’re not too crumbly—you want whole sheets for layering. If you only have crumbs, you can still make it, but the texture will be different.
- Semi-Sweet Chocolate (12 ounces, about 2 cups of chips): This is the heart of the chocolate layer. I recommend a good-quality brand like Ghirardelli or Guittard for the smoothest melt. You can use dark chocolate if you prefer a less sweet dessert, or milk chocolate if you want it extra rich. Just avoid chocolate chips with a lot of stabilizers, as they don’t melt as smoothly.
- Unsalted Butter (1/2 cup, 1 stick): This gets melted with the chocolate to create a silky ganache. It adds richness and helps the chocolate layer set up firmly. If you only have salted butter, just reduce the salt in the recipe by a pinch.
- Marshmallows (1 bag, about 10 ounces, or 4 cups of mini marshmallows): You can use either mini or regular marshmallows. I prefer mini ones because they distribute more evenly, but regular ones work fine—just cut them in half if you want a more uniform layer. For a fun twist, you can use toasted marshmallows from a bag, but the regular ones soften beautifully in the fridge.
- Heavy Cream (1/4 cup): This is optional but highly recommended. Adding a splash of heavy cream to the chocolate mixture makes the ganache extra creamy and helps it set into a fudge-like texture. If you don’t have heavy cream, you can use whole milk, but the texture will be slightly less rich.
- Vanilla Extract (1 teaspoon): A little vanilla enhances the chocolate flavor and adds warmth. Use pure vanilla extract if you have it—it makes a difference.
- Pinch of Salt: Don’t skip this! A tiny bit of salt balances the sweetness and makes the chocolate taste even more chocolatey. I use flaky sea salt for a little crunch.
One thing I’ve learned: the quality of your chocolate really matters here. Since it’s a no-bake recipe, the chocolate isn’t being masked by other flavors. You want it to be the star. I’ve tried this with cheap chocolate chips before, and the result was grainy and waxy. Stick with a good brand, and you’ll be rewarded with a silky, rich layer that tastes like a million bucks.
Equipment Needed
You don’t need a lot of fancy tools for this recipe, which is part of its beauty. Here’s what you’ll need to have on hand:
- 8×8-inch Baking Dish or Loaf Pan: This is the perfect size for a single batch. You can also use a 9×5-inch loaf pan for a taller cake. If you want to double the recipe, use a 9×13-inch dish.
- Parchment Paper: This is your best friend for easy removal. Cut a strip to fit the bottom and up the sides of your dish, leaving a little overhang to use as handles.
- Medium Microwave-Safe Bowl: For melting the chocolate and butter. You can also use a double boiler if you prefer, but the microwave is faster and has fewer dishes.
- Rubber Spatula: For stirring the chocolate mixture and spreading the layers. A heat-resistant one is best.
- Measuring Cups and Spoons: For the cream, vanilla, and salt. I like using a liquid measuring cup for the cream.
- Cutting Board and Knife (optional): If you’re using regular marshmallows, you’ll need a knife to cut them in half. A pair of kitchen shears also works great for this.
- Refrigerator or Freezer: This is the most important piece of equipment! The cake needs time to set. Two hours in the freezer or four hours in the fridge will do the trick.
I’ve made this cake in a pinch using a small casserole dish and even a loaf pan, and it works every time. The key is to make sure your dish is lined with parchment so you can lift the whole cake out for clean slices. If you don’t have parchment, you can grease the dish with butter, but it’s a bit trickier to get the first slice out. Trust me on the parchment—it’s worth the extra step.
Preparation Method
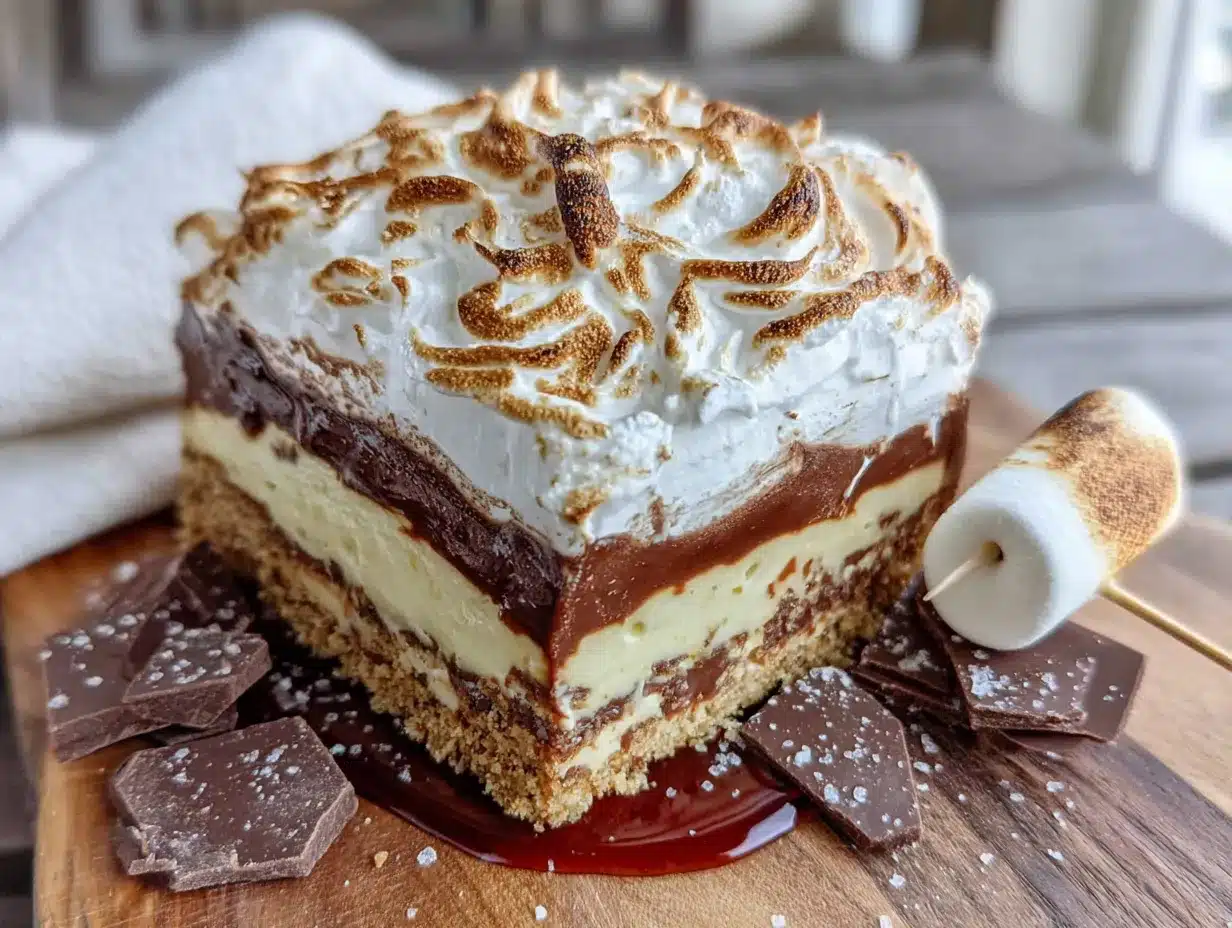
Okay, let’s get to the fun part. This is so simple, you’ll wonder why you ever bothered with a traditional cake. Here’s how to make it, step by step.
- Prep Your Pan: Line your 8×8-inch baking dish with a piece of parchment paper, leaving some overhang on two opposite sides. This will act as handles to lift the cake out later. Set it aside.
- Make the Chocolate Layer: In a medium microwave-safe bowl, combine the 12 ounces of semi-sweet chocolate chips and 1/2 cup of unsalted butter. Microwave in 30-second intervals, stirring between each, until the mixture is smooth and fully melted. This usually takes about 1-2 minutes total. Be careful not to overheat it, or the chocolate can seize up. Once smooth, stir in the 1/4 cup of heavy cream, 1 teaspoon of vanilla extract, and a pinch of salt. Set aside to cool slightly while you prepare the graham crackers.
- Layer the Graham Crackers: Place a single layer of graham crackers on the bottom of your prepared pan. You’ll need to break some of them to fit—it doesn’t have to be perfect! The goal is to cover the bottom as much as possible. I usually use about 4-5 full sheets, broken into pieces. Don’t worry about gaps; the chocolate will fill them in.
- Add the First Chocolate Layer: Pour about one-third of the chocolate mixture over the graham crackers. Use your spatula to spread it evenly, making sure it gets into all the cracks and corners. The chocolate should be warm enough to spread easily, but not hot.
- Add the Marshmallows: Sprinkle about one-third of your marshmallows (about 1 1/3 cups if using mini) over the chocolate layer. Press them down gently so they stick to the chocolate. If you’re using regular marshmallows, cut them in half first for a more even layer.
- Repeat the Layers: Place another layer of graham crackers on top of the marshmallows. Pour another third of the chocolate over the crackers and spread it evenly. Top with another third of the marshmallows. Repeat this process one more time, ending with a layer of marshmallows on top. You should have three layers of graham crackers, three layers of chocolate, and three layers of marshmallows.
- Finish and Chill: Once you’ve built all your layers, cover the pan with plastic wrap or aluminum foil. Place it in the refrigerator for at least 4 hours, or in the freezer for 2 hours. The cake needs this time to set and for the graham crackers to soften into a cake-like texture. Don’t rush this step—it’s the key to perfect slices.
- Serve: When you’re ready to serve, lift the cake out of the pan using the parchment overhang. Place it on a cutting board and slice it into squares with a sharp knife. For clean cuts, wipe the knife between slices. Serve cold or at room temperature—both are delicious!
One thing I’ve learned the hard way: if your chocolate mixture is too thick to spread, it might have gotten too cold. Just pop it back in the microwave for 10 seconds and stir until it’s spreadable again. Also, don’t worry if your layers aren’t perfect—this is a rustic cake, and the imperfections are part of its charm. The first time I made this, I had marshmallows sticking out every which way, and it still tasted amazing.
Cooking Tips & Techniques
I’ve made this cake more times than I can count, and I’ve picked up a few tricks along the way. Here are some tips to help you get the best results every time.
Don’t Overheat the Chocolate: This is the most common mistake. Chocolate can go from smooth to grainy in seconds if you overheat it. Always microwave in short bursts and stir well between each. If you see any lumps, stop microwaving and stir vigorously—the residual heat is usually enough to smooth it out.
Use Room Temperature Ingredients: For the smoothest chocolate layer, make sure your butter and cream are at room temperature before you start. Cold cream can cause the chocolate to seize up, leaving you with a lumpy mess. I learned this the hard way when I was rushing one night and ended up with a grainy chocolate layer. It still tasted good, but it wasn’t as pretty.
Press the Graham Crackers Gently: You want the crackers to soften in the fridge, not break into tiny pieces. When you’re layering them, press them down just enough to make contact with the chocolate, but don’t crush them. They’ll absorb moisture from the chocolate and marshmallows as they chill, becoming soft and cake-like.
Let It Set Completely: This is the hardest part—waiting! But it’s crucial. If you cut into the cake too soon, it will be a messy, gooey disaster. The graham crackers need time to soften, and the chocolate needs to firm up. I usually make this the night before I need it, so it has plenty of time to set. If you’re in a hurry, the freezer works in about 2 hours, but the texture is slightly better from the fridge.
Clean Your Knife Between Cuts: For picture-perfect slices, wipe your knife clean with a damp paper towel between each cut. The marshmallow and chocolate can get sticky, and a clean knife gives you those crisp edges that look so professional.
Toast the Marshmallows (Optional): For an extra special touch, you can toast the top layer of marshmallows with a kitchen torch before serving. It gives the cake that campfire s’mores vibe and adds a lovely smoky flavor. Just be careful not to burn them—a light golden brown is perfect.
Variations & Adaptations
This recipe is incredibly versatile, and I’ve tried several variations over the years. Here are some of my favorites, along with tips for making it work for different diets and occasions.
Peanut Butter S’mores Cake: For a salty-sweet twist, spread a thin layer of creamy peanut butter on the graham crackers before adding the chocolate. The peanut butter adds a rich, nutty flavor that pairs beautifully with the chocolate and marshmallow. I like to use a natural peanut butter for a less sweet option. Just make sure it’s spreadable—if it’s too thick, microwave it for 10 seconds first.
Vegan S’mores Cake: This is surprisingly easy to make vegan. Use a dairy-free chocolate (like Enjoy Life or Hu), vegan butter (like Miyoko’s), and coconut cream instead of heavy cream. For the marshmallows, look for vegan marshmallows—Dandies is a great brand that melts and sets just like regular ones. The graham crackers are usually vegan, but check the label to be sure. I’ve made this version for a vegan friend, and she said it was the best dessert she’d had in months.
Gluten-Free S’mores Cake: Simply swap the regular graham crackers for a gluten-free version. Most stores carry them now, and they work perfectly in this recipe. The texture is slightly different—they soften a bit more—but the result is still delicious. I’ve used Schär’s gluten-free graham crackers with great success.
Mint Chocolate S’mores Cake: For a refreshing twist, add 1/2 teaspoon of peppermint extract to the chocolate mixture. You can also use mint-flavored chocolate chips instead of semi-sweet. Top the finished cake with a few crushed candy canes or mint cookies for a festive look. This version is amazing during the holidays.
Berry S’mores Cake: Layer fresh or frozen raspberries, strawberries, or blueberries between the chocolate and marshmallow layers. The tartness of the berries cuts through the sweetness beautifully. I love using raspberries—they add a bright pop of color and flavor that feels a little more grown-up. Just make sure to pat the berries dry if you’re using frozen ones, so they don’t make the cake watery.
Serving & Storage Suggestions
This cake is best served cold, straight from the fridge. The texture is firm but creamy, and the flavors are perfectly balanced. Here are some of my favorite ways to serve and store it.
Serving Temperature: I prefer this cake chilled, but some people like to let it sit at room temperature for 10 minutes before serving to soften slightly. If you’ve stored it in the freezer, let it thaw in the fridge for about 30 minutes before cutting. The slices will be cleaner if the cake is cold.
Presentation: For a pretty presentation, dust the top with a little cocoa powder or powdered sugar before serving. You can also drizzle some melted chocolate or caramel over the top, or add a few fresh berries for a pop of color. If you’re feeling fancy, serve each slice with a dollop of whipped cream and a cherry on top.
Complementary Dishes: This cake is rich, so it pairs well with a light beverage. A cold glass of milk is the classic choice, but a cup of coffee or a mug of hot chocolate also works beautifully. For a more grown-up pairing, try it with a glass of red wine or a dark beer—the bitterness balances the sweetness.
Storage: This cake keeps well in the refrigerator for up to 5 days. Just cover it tightly with plastic wrap or store it in an airtight container. The flavors actually get better as they meld together, so day two is often even better than day one. You can also freeze the cake for up to 3 months. Wrap it tightly in plastic wrap and then in aluminum foil. To serve, thaw it in the refrigerator overnight.
Reheating (if you want): I don’t usually recommend reheating this cake, as it’s meant to be served cold. But if you want a warm, gooey s’mores experience, you can microwave a slice for about 10-15 seconds. Just be careful not to overheat it, or the marshmallows will melt into a puddle.
One thing I love about this cake is how the flavors develop over time. The graham crackers soften into a tender, cake-like layer, and the chocolate and marshmallow meld together into a fudge-like filling. It’s even better the next day, so don’t be afraid to make it ahead.
Nutritional Information & Benefits
Let’s be honest—this is a dessert, and it’s meant to be indulgent. But that doesn’t mean it can’t have some redeeming qualities. Here’s a quick look at the nutritional profile, along with a few notes on the benefits of the ingredients.
Estimated Nutritional Values (per serving, based on 9 servings):
| Nutrient | Amount |
|---|---|
| Calories | 380-420 |
| Fat | 22g |
| Saturated Fat | 13g |
| Carbohydrates | 45g |
| Sugar | 30g |
| Fiber | 3g |
| Protein | 4g |
| Sodium | 200mg |
Health Benefits: Dark chocolate is rich in antioxidants and can be good for heart health in moderation. It also contains iron, magnesium, and zinc. The graham crackers provide some whole grains and fiber, especially if you choose a whole-wheat variety. Marshmallows are mostly sugar, so they don’t offer much in the way of nutrition, but they do make you happy—and that counts for something!
Dietary Considerations: This recipe is vegetarian. For a vegan version, see the variations section. It is not gluten-free as written, but can easily be made with gluten-free graham crackers. It contains dairy (butter, cream, chocolate) but can be made dairy-free with substitutions. It is nut-free as written, but check your chocolate brand for potential cross-contamination if you have allergies.
Potential Allergens: This recipe contains dairy, gluten, and soy (often in chocolate). Always check your ingredient labels if you have specific allergies.
From a wellness perspective, I believe in balance. This cake is a treat, and it’s okay to enjoy it without guilt. I love that it’s made with real, recognizable ingredients—no artificial flavors or preservatives. It’s a dessert you can feel good about sharing with your family, even if it’s not exactly a health food.
Conclusion
So there you have it—my go-to Easy No-Bake S’mores Icebox Cake. It’s the dessert that saved me from potluck panic, and now it’s the one I turn to whenever I need a quick, crowd-pleasing treat. It’s proof that you don’t need a lot of time or fancy ingredients to make something truly special. With just a few pantry staples and about 15 minutes of work, you can create a dessert that tastes like you spent hours on it.
I love this recipe because it’s so forgiving. You can customize it with your favorite add-ins, make it ahead of time, and it always turns out amazing. It’s the kind of recipe that feels like a secret weapon—one you’ll pull out for last-minute guests, holiday potlucks, or just because you deserve something sweet on a Tuesday night.
Now I want to hear from you! Have you tried this cake? What variations did you make? Did you add peanut butter, berries, or something else entirely? Drop a comment below and let me know how it turned out. And if you loved it, please share this recipe with a friend who needs a little dessert magic in their life. Happy no-baking, everyone!
Frequently Asked Questions
Can I use milk chocolate instead of semi-sweet?
Absolutely! Milk chocolate will make the cake sweeter and creamier. Just keep in mind that it has a lower cocoa content, so the chocolate layer might be a bit softer. I’d recommend using a high-quality milk chocolate for the best texture.
Do I have to use heavy cream?
No, you can substitute it with whole milk or even a non-dairy milk like oat or almond. The texture will be slightly less rich, but it will still work. If you’re using a non-dairy milk, make sure it’s unsweetened to avoid making the cake too sweet.
Can I make this in a different size pan?
Yes! You can use a 9×13-inch pan for a thinner cake, but you’ll need to double the recipe. For a taller cake, use a 9×5-inch loaf pan. Just adjust the layering to fit your pan, and keep an eye on the chilling time—a thicker cake might need a little longer to set.
How do I get clean slices?
The key is to chill the cake completely—at least 4 hours in the fridge or 2 hours in the freezer. Use a sharp knife and wipe it clean between each cut with a damp paper towel. For the cleanest slices, you can even run the knife under hot water before cutting.
Can I toast the marshmallows on top?
Definitely! Toasting the top layer of marshmallows adds a wonderful smoky flavor and a beautiful golden color. You can use a kitchen torch or place the cake under the broiler for 1-2 minutes. Just watch it closely so the marshmallows don’t burn. Let it cool for a few minutes before serving.
Pin This Recipe!
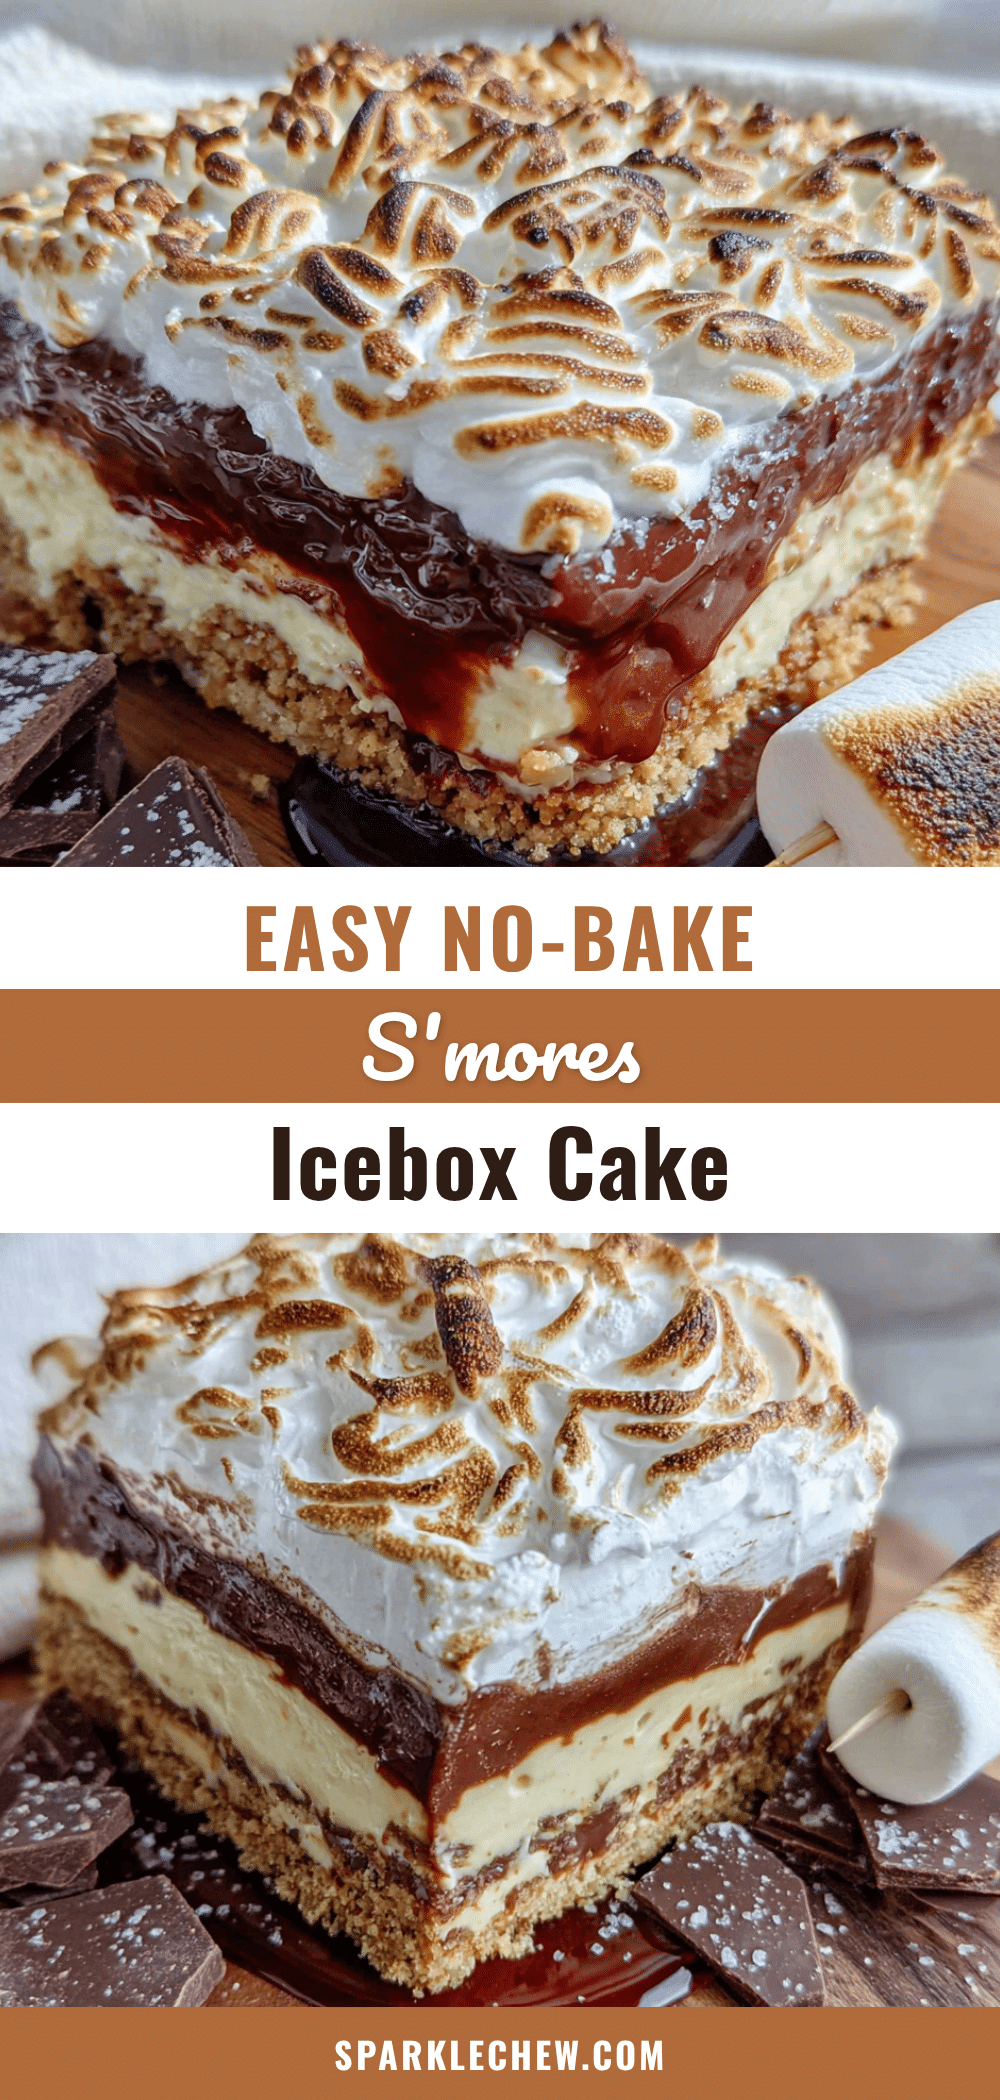
Easy No-Bake S’mores Icebox Cake: Best 5-Minute Dessert
A quick and easy no-bake dessert made with layers of graham crackers, rich chocolate ganache, and fluffy marshmallows. Perfect for last-minute gatherings or a simple weeknight treat.
- Prep Time: 15 minutes
- Cook Time: 0 minutes
- Total Time: 4 hours 15 minutes (includes chilling)
- Yield: 9 servings 1x
- Category: Dessert
- Cuisine: American
Ingredients
- 18 full sheets graham crackers (about 2 sleeves)
- 12 ounces semi-sweet chocolate chips (about 2 cups)
- 1/2 cup unsalted butter (1 stick)
- 1 bag marshmallows (about 10 ounces, or 4 cups mini marshmallows)
- 1/4 cup heavy cream
- 1 teaspoon vanilla extract
- Pinch of salt
Instructions
- Line an 8×8-inch baking dish with parchment paper, leaving overhang on two opposite sides.
- In a medium microwave-safe bowl, combine chocolate chips and butter. Microwave in 30-second intervals, stirring between each, until smooth and fully melted (about 1-2 minutes).
- Stir in heavy cream, vanilla extract, and salt. Set aside to cool slightly.
- Place a single layer of graham crackers on the bottom of the prepared pan, breaking pieces to fit as needed.
- Pour about one-third of the chocolate mixture over the graham crackers and spread evenly.
- Sprinkle about one-third of the marshmallows over the chocolate layer and press down gently.
- Repeat layers: graham crackers, chocolate, marshmallows, two more times, ending with marshmallows on top.
- Cover the pan with plastic wrap or foil and refrigerate for at least 4 hours, or freeze for 2 hours, until set.
- Lift the cake out using the parchment overhang, slice into squares, and serve cold or at room temperature.
Notes
For best results, use high-quality chocolate. The cake can be stored in the refrigerator for up to 5 days or frozen for up to 3 months. For clean slices, chill completely and wipe the knife between cuts.
Nutrition
- Serving Size: 1 square (1/9 of cak
- Calories: 400
- Sugar: 30
- Sodium: 200
- Fat: 22
- Saturated Fat: 13
- Carbohydrates: 45
- Fiber: 3
- Protein: 4
Keywords: no-bake, s'mores, icebox cake, easy dessert, graham crackers, chocolate, marshmallows