Love this? Save it for later!
Share the inspiration with your friends
This was supposed to be a proper wrap, you know? The kind you see in those perfectly styled lunchbox photos online—tight, uniform, with every layer showing like a cross-section of a happy meal. I had the big tortillas ready, the turkey laid out, the cheese sliced thin. I was going to roll it up tight, slice it clean, and feel like a lunch-packing genius. Instead, I grabbed the wrong bag of tortillas from the fridge—the small ones, the taco-sized ones that are basically useless for anything but, well, tacos. I was already running late on a Tuesday morning, the coffee was getting cold, and I just stood there holding this tiny tortilla like it had personally betrayed me.
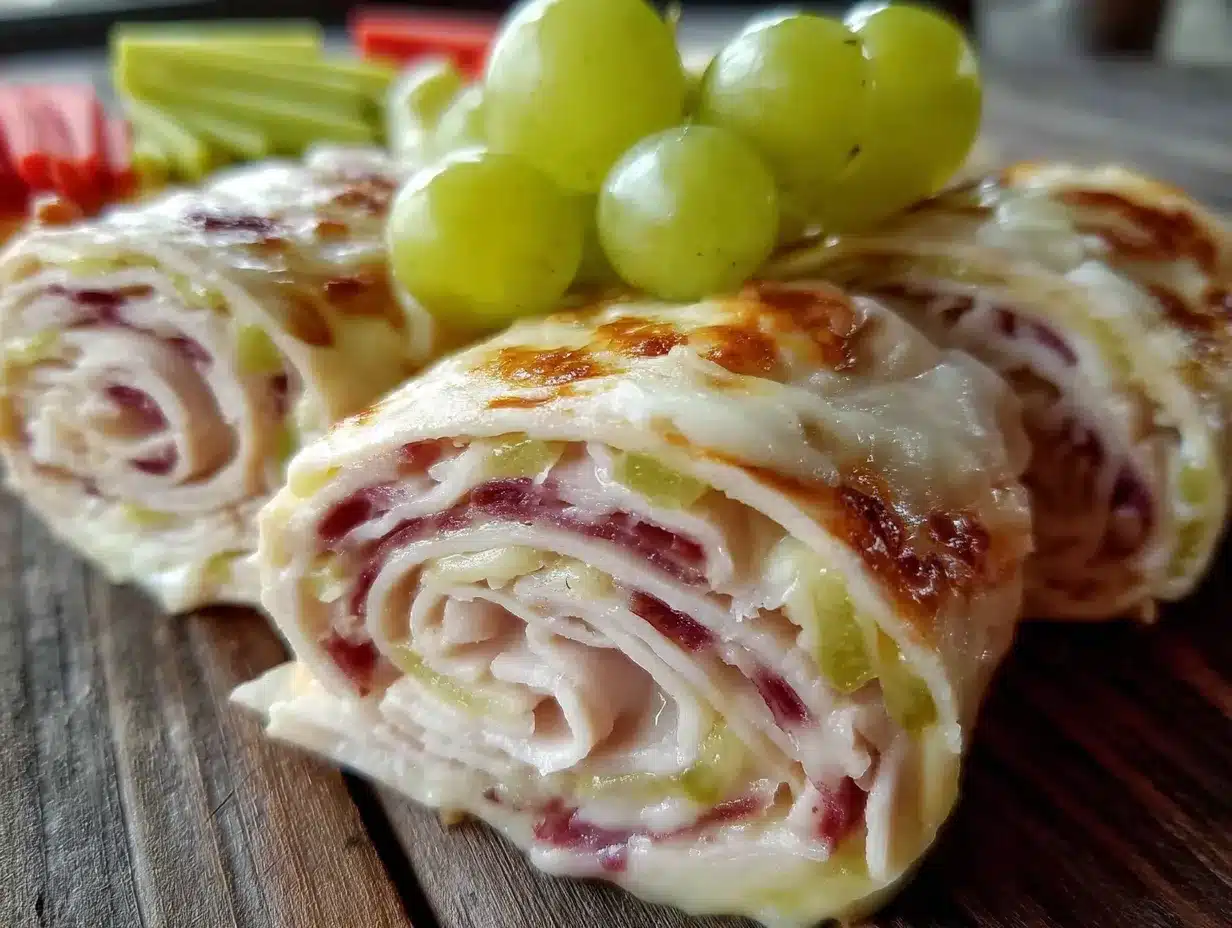
Honestly, I almost just threw some crackers in the lunchbox and called it a day. But then I thought—what if I just rolled it anyway? What if I layered everything on this little tortilla, rolled it tight, and cut it into little rounds? I mean, the kids don’t really care about the shape, right? They care about what tastes good. So I piled on the turkey, added a smear of cream cheese because that’s what was open, and rolled it up. When I sliced it, these perfect little pinwheels appeared—like little spirals of happy. My daughter came into the kitchen, grabbed one off the cutting board, and said, “Whoa, Mom, these are so cute!”
That was three months ago, and I haven’t made a full-sized wrap since. These easy turkey and cheese pinwheel roll-ups have become our go-to lunchbox staple. They’re faster, they’re cuter, and honestly, they hold up way better than a full wrap that always seems to get soggy by noon. Maybe you’ve been there—staring at a failed lunch plan, wondering if you should just give up and buy pre-packaged stuff. Don’t. This little accident turned into something I actually look forward to making. And the best part? They take about five minutes to throw together. Let me show you how.
Why You’ll Love These Turkey and Cheese Pinwheel Roll-Ups
I’ve tested a lot of lunchbox recipes over the years—some were hits, some ended up in the trash after school. These pinwheels? They’re the ones my kids actually ask for by name. Here’s why they work so well:
- Quick & Easy: These come together in under 10 minutes. Seriously, you can make a whole batch before your coffee finishes brewing.
- Simple Ingredients: You probably already have everything in your fridge. No fancy grocery trips or specialty items needed.
- Perfect for Lunchboxes: They hold up beautifully in a lunchbox—no sogginess, no falling apart, just perfect little spirals that stay intact until lunchtime.
- Crowd-Pleaser: My kids love them, their friends always ask for extras, and honestly, I’ve been known to sneak a few for my own lunch.
- Endlessly Customizable: Swap the fillings, change the spread, use different meats—this is more of a method than a rigid recipe, which means you can adapt it to whatever you have on hand.
What makes these different from every other pinwheel recipe out there? It’s the cream cheese layer. Most recipes use mayo or mustard, which can make the tortillas soggy by lunchtime. Cream cheese acts as a barrier—it keeps the moisture from the turkey and any veggies from seeping into the tortilla. Plus, it adds this creamy tang that ties everything together. I learned that trick after a few soggy disasters, and honestly, it was a game-changer.
These aren’t just good for a lunchbox recipe—they’re the kind of thing that makes you feel like you’ve got your act together. You know that feeling when you open a lunchbox and see something that looks like it came from a cafe? Yeah, that’s what these do. And the best part? You didn’t have to wake up at dawn to make it happen.
What Ingredients You Will Need
This recipe uses simple, everyday ingredients that you probably already have in your kitchen. The beauty of these pinwheels is that they’re flexible—you can swap things in and out based on what’s in your fridge. Here’s what I typically use:
For the Base
- Large flour tortillas (10-inch size works best) – I prefer Mission or Guerrero brands for their flexibility. They roll without cracking, which is crucial for clean pinwheels.
- 8 oz cream cheese, softened to room temperature – This is the secret weapon. It creates a spreadable barrier that keeps everything in place and prevents sogginess. I use Philadelphia, but any brand works.
- 1/2 pound deli-sliced turkey breast – Look for oven-roasted or smoked turkey for the best flavor. I get mine sliced thin from the deli counter—pre-packaged works too, but the texture is better fresh-sliced.
- 4-6 slices provolone or Swiss cheese – Provolone is mild and melts nicely, while Swiss adds a nutty flavor. Both work great.
For Extra Flavor (Optional but Recommended)
- 1/4 cup mayonnaise – Mix this with the cream cheese for extra creaminess and a tangy kick. (Adds richness and helps the spread go further.)
- 1 tablespoon Dijon mustard – A little goes a long way. It cuts through the richness and adds a nice sharpness. (I use Grey Poupon—it’s worth the extra few cents.)
- 1/2 cup fresh spinach leaves – Adds color, crunch, and a boost of nutrients. Pat them dry before adding to prevent sogginess.
- 1/4 cup shredded carrots – For a little sweetness and extra crunch. (My kids don’t even notice they’re eating vegetables.)
- Salt and black pepper – Just a pinch to season the cream cheese mixture.
Substitution Notes
If you’re dairy-free, use a dairy-free cream cheese alternative—I’ve had good luck with Kite Hill. For a lower-carb option, use large lettuce leaves instead of tortillas (though they won’t hold up as well in a lunchbox). You can swap the turkey for ham, roast beef, or even rotisserie chicken. And if you don’t have provolone, cheddar or mozzarella slices work beautifully. The key is just having a soft, sliceable cheese that will roll without breaking.
Equipment Needed
The beauty of this recipe is that you don’t need much. Here’s what I use:
- A sharp chef’s knife – A good knife makes all the difference. A dull one will squish your pinwheels instead of slicing cleanly through them. I use my trusty 8-inch Wusthof, but any sharp knife works.
- A cutting board – Preferably a large one so you have room to roll. Wood or plastic both work fine.
- A rubber spatula – For spreading the cream cheese mixture evenly. A butter knife works in a pinch, but a spatula gives you a smoother, more even layer.
- Plastic wrap – This is optional but helpful. Wrapping the rolled tortillas tightly before chilling helps them hold their shape and makes slicing much cleaner.
- A baking sheet or large plate – For chilling the rolls in the fridge. Make sure it’s flat so the rolls don’t get squished on one side.
- Toothpicks – If you’re packing these for a lunchbox, a toothpick through each pinwheel keeps them from unrolling. Just remind the kids to take them out before eating!
If you don’t have plastic wrap, you can skip the chilling step and just slice them immediately—they’ll be a little less tight, but still delicious. And if you’re making these for a party, a serrated knife can give you cleaner cuts through any crunchy veggies you might add.
Preparation Method
Let me walk you through this step by step. I’ve made these so many times that I could do it in my sleep, but I’ll share all the little tricks I’ve learned along the way.
- Soften the cream cheese. Take the cream cheese out of the fridge about 20 minutes before you start. You want it at room temperature so it spreads smoothly. If you forgot to take it out (which happens to me all the time), pop it in the microwave for 10-15 seconds. Just don’t overdo it—you want it soft, not melted.
- Mix the spread. In a small bowl, combine the softened cream cheese with the mayonnaise and Dijon mustard (if using). Add a pinch of salt and pepper. Stir until smooth and well combined. Taste it—adjust the seasoning if needed. I like mine with a little extra mustard for tang.
- Prep your tortillas. Lay one tortilla flat on your cutting board. If your tortillas are cold from the fridge, let them sit at room temperature for a few minutes. Cold tortillas crack when you roll them—learned that the hard way.
- Spread the cream cheese mixture. Using your rubber spatula, spread a thin, even layer of the cream cheese mixture over the entire surface of the tortilla. Go all the way to the edges—this helps everything stick together. Don’t use too much, or it will ooze out when you roll. About 2-3 tablespoons per tortilla is perfect.
- Layer the turkey. Place the turkey slices evenly over the cream cheese layer. Overlap them slightly so there are no gaps. If your turkey is thick-sliced, you might only need 3-4 slices per tortilla. Thin-sliced? Use 5-6. The goal is an even layer, not a mountain of meat.
- Add the cheese. Lay the cheese slices over the turkey. Again, overlap slightly. If you’re using provolone, one slice per tortilla is usually enough. Swiss lovers might want two.
- Add any extras. If you’re adding spinach, carrots, or other veggies, sprinkle them evenly over the cheese. Don’t overload it—you still need to be able to roll it. A thin layer is plenty.
- Roll it up tight. Starting from the edge closest to you, begin rolling the tortilla away from you. Keep it tight but not so tight that the filling squishes out the sides. Use your fingers to tuck in any filling that tries to escape. Roll all the way to the end, then place the roll seam-side down.
- Wrap and chill. Wrap the rolled tortilla tightly in plastic wrap. Twist the ends like a candy wrapper to keep it snug. Place it on a baking sheet or plate and refrigerate for at least 30 minutes. This step is crucial—chilling helps the cream cheese firm up, which makes slicing much cleaner. If you’re in a hurry, 15 minutes in the freezer works too.
- Slice into pinwheels. Unwrap the chilled roll and place it on your cutting board. Using a sharp knife, slice the roll into 1/2-inch to 3/4-inch rounds. Use a gentle sawing motion rather than pressing straight down—this prevents squishing. You should get about 8-10 pinwheels per tortilla.
- Secure with toothpicks (optional). If you’re packing these for lunchboxes, stick a toothpick through each pinwheel to keep them from unrolling. Just make sure to remind the kids to remove them before eating.
Your pinwheels should look like little spirals with all the layers visible. The edges should be clean, and the filling should stay put. If some filling oozes out, just push it back in with your fingers.
Cooking Tips & Techniques
After making these probably a hundred times, I’ve collected a few tips that make the process smoother and the results better. Here’s what I’ve learned:
Don’t skip the chilling step. I know, I know—you’re in a hurry, and waiting 30 minutes feels like forever. But trust me on this one. Chilling firms up the cream cheese, which acts like glue holding everything together. If you slice them warm, you’ll get messy, squished pinwheels that fall apart. Chilled? Clean cuts every time. I learned this the hard way when I tried to rush through it for a school party—let’s just say the pinwheels looked more like sad little blobs.
Use room-temperature tortillas. Cold tortillas crack when you roll them. It’s that simple. Let them sit on the counter for 10 minutes before you start. If you’re really pressed for time, warm them in the microwave for 10 seconds—just enough to make them pliable, not hot.
Spread the cream cheese to the very edges. This is a small detail that makes a big difference. When you spread the cream cheese all the way to the edges, it acts as a seal when you roll. The end of the roll will stick to itself, and you won’t need toothpicks to keep it closed (though I still use them for lunchboxes, just to be safe).
Don’t overstuff. It’s tempting to pile on the fillings, especially when you’re trying to make a hearty lunch. But overstuffed tortillas are impossible to roll tightly, and they’ll burst open when you slice them. Aim for a thin, even layer of everything. If you want more filling, use a larger tortilla or make two rolls instead of one.
Use a sharp knife. This might be the most important tip. A dull knife will squish your pinwheels, pushing the filling out and leaving you with a mess. A sharp knife slices cleanly through all the layers. I use a serrated knife for extra-crunchy fillings (like when I add bell peppers), but a straight-edged chef’s knife works for most combinations.
Make ahead for better flavor. These actually taste better the next day. The flavors meld together overnight, and the cream cheese sets up perfectly. I often make a batch on Sunday evening, slice them Monday morning, and pack them for the week. They stay fresh in the fridge for up to 3 days.
Variations & Adaptations
One of the best things about this recipe is how flexible it is. I’ve tried dozens of variations over the months, and here are some of my favorites:
Dietary Adaptations
Gluten-Free: Use gluten-free tortillas. I’ve had good luck with the Mission gluten-free variety—they’re pliable and don’t crack. Just be extra gentle when rolling, as gluten-free tortillas can be a bit more fragile.
Low-Carb/Keto: Swap the tortillas for large lettuce leaves (romaine or butter lettuce work best). Spread the cream cheese mixture on the lettuce, add your fillings, and roll tightly. These won’t hold up as well in a lunchbox, so I’d recommend eating them fresh or packing them with a paper towel to absorb moisture.
Dairy-Free: Use dairy-free cream cheese (Kite Hill is my go-to) and dairy-free cheese slices. The texture will be slightly different, but the flavor is still great.
Flavor Variations
Italian-Inspired: Swap the turkey for salami or prosciutto, use provolone cheese, and add a thin layer of pesto to the cream cheese mixture. So good.
Veggie-Packed: Skip the meat entirely and load up on roasted red peppers, cucumber strips, shredded lettuce, and avocado. The cream cheese holds everything together beautifully.
Spicy Southwest: Add a tablespoon of salsa to the cream cheese mixture, use pepper jack cheese, and add some sliced jalapeños (if you’re brave). My husband loves these.
Breakfast Style: Use ham instead of turkey, add scrambled eggs (cooled), and use cheddar cheese. These are perfect for a grab-and-go breakfast.
Method Variations
If you don’t have time to chill the rolls, you can slice them immediately—they’ll just be a little looser. Or, if you’re making these for a party, try cutting them on a bias for a fancier presentation. I once made a batch for a baby shower and arranged them in a spiral pattern on a platter—they looked like a work of art.
Serving & Storage Suggestions
These pinwheels are versatile enough for just about any occasion. Here’s how I serve and store them:
Serving Temperature: I prefer them cold straight from the fridge—the cream cheese is firm, the flavors are bright, and they hold their shape beautifully. But they’re also delicious at room temperature if you’re packing them for a lunchbox. Just don’t leave them out for more than 2 hours (1 hour if it’s hot outside).
Presentation: For lunchboxes, I arrange them in a small container with a toothpick through each one. Sometimes I add a few grapes or baby carrots on the side for color. For parties, I arrange them on a platter in concentric circles, with a small bowl of marinara or ranch dressing in the center for dipping.
Complementary Dishes: These pair beautifully with a simple side salad, some fresh fruit, or a cup of tomato soup. For a full lunch spread, add some crunchy veggie sticks and a small treat—my kids love when I pack them with apple slices and a tiny container of peanut butter for dipping.
Storage: Store leftover pinwheels in an airtight container in the refrigerator for up to 3 days. Place a paper towel at the bottom of the container to absorb any excess moisture—this keeps them from getting soggy. If you’re meal-prepping for the week, I recommend storing the rolls whole (unsliced) and slicing them each morning. They stay fresher that way.
Freezing: You can freeze these! Wrap each whole roll tightly in plastic wrap, then place them in a freezer bag. They’ll keep for up to 2 months. Thaw overnight in the refrigerator, then slice and serve. The texture of the cream cheese will be slightly different after freezing, but the flavor is still great.
Flavor Development: Here’s something interesting—these actually taste better on day two. The flavors meld together overnight, and the cream cheese sets up perfectly. So don’t feel like you have to serve them the same day you make them. In fact, I prefer them the next day.
Nutritional Information & Benefits
Let’s talk about what’s actually in these little spirals of goodness. Per serving (about 4 pinwheels, based on one large tortilla with turkey, provolone, and cream cheese):
- Calories: Approximately 320-380 calories
- Protein: 22-26 grams (hello, turkey!)
- Fat: 18-22 grams (mostly from cheese and cream cheese)
- Carbohydrates: 18-22 grams (from the tortilla)
- Fiber: 1-2 grams
- Sugar: 2-3 grams (naturally occurring)
Health Benefits: Turkey is a lean protein source that keeps you full and satisfied. It’s rich in B vitamins, selenium, and zinc. The cream cheese adds calcium and vitamin A, while the optional spinach brings iron, vitamin K, and antioxidants. If you add carrots, you’re getting a boost of beta-carotene for eye health.
Dietary Considerations: This recipe can be made gluten-free (with GF tortillas), dairy-free (with DF cream cheese and cheese), and low-carb (with lettuce wraps). It’s naturally nut-free, egg-free, and soy-free (check your tortilla labels to be sure). If you’re watching sodium, look for low-sodium turkey and reduced-sodium cheese.
My Take: Look, I’m not a nutritionist—I’m just a mom who wants to feed her kids something that tastes good and doesn’t make me feel guilty. These pinwheels hit that sweet spot. They’re not “health food,” but they’re a balanced meal with protein, carbs, and fat. And honestly, the fact that my kids eat them without complaining is a win in my book.
Conclusion
So there you have it—the little accident that turned into our family’s favorite lunchbox staple. These easy turkey and cheese pinwheel roll-ups are proof that sometimes the best recipes come from the most unexpected moments. A wrong-sized tortilla, a rushed morning, and a little bit of creativity turned into something I actually look forward to making.
What I love most about these pinwheels is how forgiving they are. You don’t need to be a perfect cook or have every ingredient measured just right. You just need a tortilla, some spread, some meat and cheese, and a willingness to roll with it (pun intended). They’re the kind of recipe that makes you feel like you’ve got your act together, even on the craziest mornings.
I’d love to hear how yours turn out! Did you try a different filling combination? Did your kids love them as much as mine do? Drop a comment below and let me know—I’m always looking for new ideas to try. And if you’re feeling generous, share this recipe with a friend who’s tired of the same old lunchbox routine. Trust me, they’ll thank you.
Happy rolling, friends. You’ve got this.
Frequently Asked Questions
Can I make these pinwheels the night before?
Absolutely! In fact, I recommend it. Make the rolls, wrap them tightly in plastic wrap, and refrigerate overnight. Slice them in the morning before packing. They actually taste better the next day because the flavors have time to meld together.
How do I keep the pinwheels from getting soggy in a lunchbox?
The cream cheese is your secret weapon here. It creates a barrier that prevents moisture from the turkey and veggies from seeping into the tortilla. Also, make sure to pat any veggies (like spinach or bell peppers) dry before adding them. And always pack them in an airtight container with a paper towel at the bottom to absorb any excess moisture.
Can I use different types of meat or cheese?
Yes, yes, yes! That’s the beauty of this recipe. Try ham and cheddar, roast beef and Swiss, or even salami and provolone. For a vegetarian option, skip the meat and load up on roasted veggies and avocado. The possibilities are endless.
How long do these pinwheels stay fresh in the fridge?
Stored in an airtight container, they’ll stay fresh for up to 3 days. If you’re meal-prepping for the week, I recommend storing the rolls whole (unsliced) and slicing them each morning. They stay fresher that way. You can also freeze them for up to 2 months—just thaw overnight in the fridge before slicing.
My pinwheels keep falling apart when I slice them. What am I doing wrong?
Two things to check: First, make sure you’re chilling the rolls for at least 30 minutes before slicing. The cream cheese needs to firm up to hold everything together. Second, use a sharp knife. A dull knife will squish the pinwheels instead of slicing cleanly through them. Use a gentle sawing motion rather than pressing straight down.
Pin This Recipe!

Easy Turkey and Cheese Pinwheel Roll-Ups: Perfect Lunchbox Idea

These easy turkey and cheese pinwheel roll-ups are a quick, cute, and lunchbox-friendly twist on a classic wrap. Made with simple ingredients like cream cheese, turkey, and provolone, they hold up beautifully without getting soggy.
- Prep Time: 10 minutes
- Cook Time: 0 minutes
- Total Time: 40 minutes (includes 30 minutes chilling)
- Yield: 4 servings 1x
- Category: Lunch
- Cuisine: American
Ingredients
- 4 large flour tortillas (10-inch)
- 8 oz cream cheese, softened
- 1/2 pound deli-sliced turkey breast
- 4–6 slices provolone or Swiss cheese
- 1/4 cup mayonnaise (optional)
- 1 tablespoon Dijon mustard (optional)
- 1/2 cup fresh spinach leaves (optional)
- 1/4 cup shredded carrots (optional)
- Salt and black pepper to taste
Instructions
- Soften the cream cheese by letting it sit at room temperature for 20 minutes, or microwave for 10-15 seconds.
- In a small bowl, combine the softened cream cheese with mayonnaise and Dijon mustard (if using). Add a pinch of salt and pepper. Stir until smooth.
- Lay one tortilla flat on a cutting board. If cold, let it sit at room temperature for a few minutes.
- Spread a thin, even layer of the cream cheese mixture over the entire surface of the tortilla, going all the way to the edges.
- Place turkey slices evenly over the cream cheese layer, overlapping slightly.
- Lay cheese slices over the turkey, overlapping slightly.
- If using, sprinkle spinach and shredded carrots evenly over the cheese.
- Starting from the edge closest to you, roll the tortilla tightly away from you, tucking in any filling that escapes. Place seam-side down.
- Wrap the rolled tortilla tightly in plastic wrap, twisting the ends like a candy wrapper. Refrigerate for at least 30 minutes (or 15 minutes in the freezer).
- Unwrap the chilled roll and place on a cutting board. Using a sharp knife, slice into 1/2-inch to 3/4-inch rounds using a gentle sawing motion.
- Optional: Secure each pinwheel with a toothpick for lunchboxes.
Notes
Chilling the rolls is crucial for clean slices. Use room-temperature tortillas to prevent cracking. Spread cream cheese to the edges to seal the roll. These taste even better the next day. Store in an airtight container in the fridge for up to 3 days. Freeze whole rolls for up to 2 months.
Nutrition
- Serving Size: 4 pinwheels
- Calories: 350
- Sugar: 2.5
- Sodium: 800
- Fat: 20
- Saturated Fat: 10
- Carbohydrates: 20
- Fiber: 1.5
- Protein: 24
Keywords: turkey pinwheels, cheese pinwheels, lunchbox ideas, easy lunch, turkey and cheese roll-ups, kid-friendly lunch


