Love this? Save it for later!
Share the inspiration with your friends
“You know, I wasn’t exactly aiming to bake a cherry pie that Sunday afternoon,” I confessed to my friend over the phone last week. The truth is, I was halfway through making a blueberry crumble when I realized I forgot the blueberries at the store. Honestly, it felt like a kitchen disaster in the making. But hey, I had a bag of frozen cherries in the freezer staring at me, and I thought, why not give this cherry pie recipe a whirl?
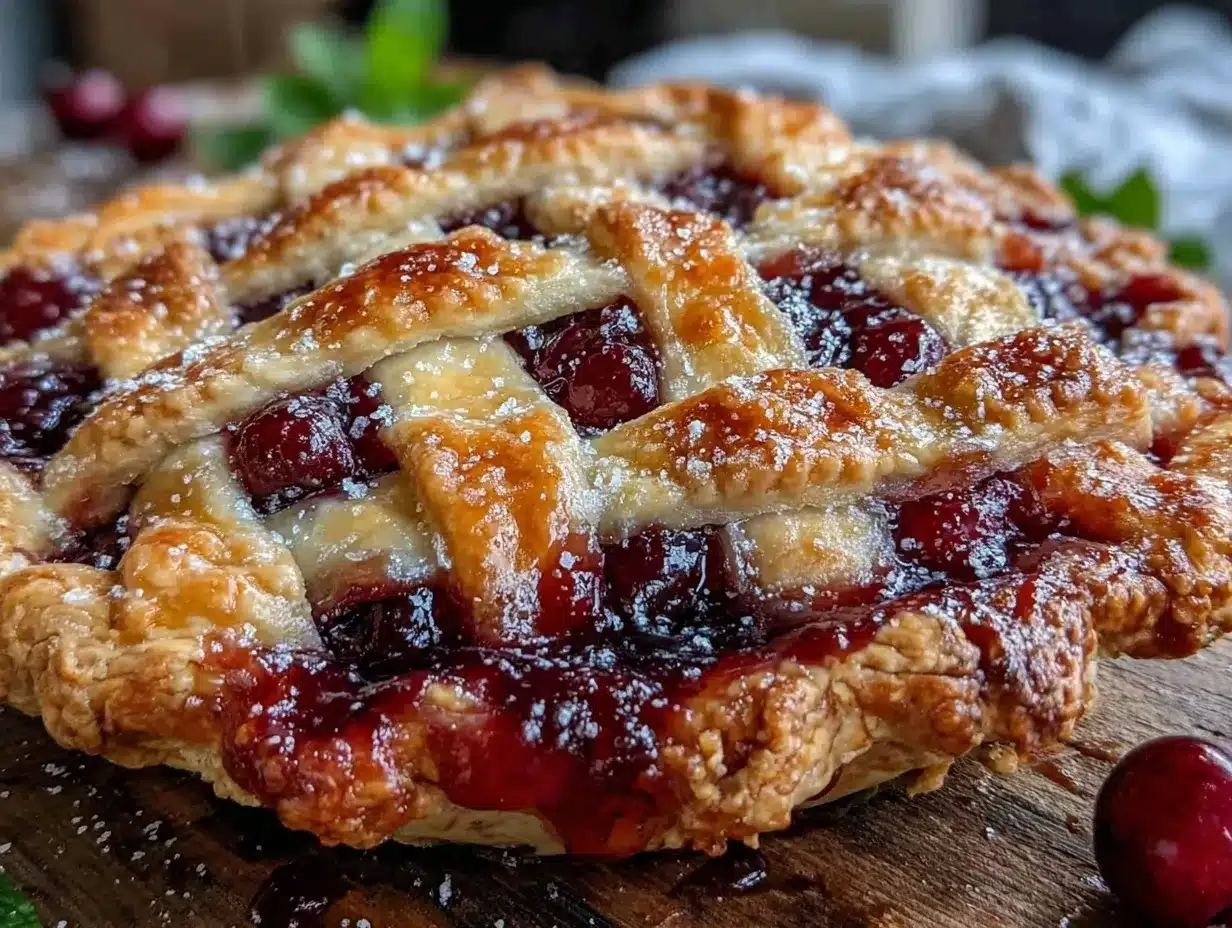
The way the dough felt as I rolled it out—soft, cool, and just a bit sticky—reminded me of those quiet Saturday mornings when my grandma used to let me sneak a peek at her secret pie crust technique. And let me tell you, that classic lattice top (which I almost skipped because I was running late) turned out to be the star of the show. The golden, flaky crust wove over the ruby-red cherry filling like a warm hug.
Maybe you’ve been there too: mid-cooking mess-ups turning into your best kitchen wins. This perfect flaky cherry pie with a classic lattice top has stuck with me ever since that accidental baking day. It’s one of those recipes that feels like comfort and celebration all rolled into one slice. So, let me tell you how this easy, homemade cherry pie became my go-to for impressing guests or just treating myself after a long day.
Why You’ll Love This Recipe
This perfect flaky cherry pie recipe isn’t just another sweet treat—it’s a reliable crowd-pleaser that’s been tested and loved in my kitchen countless times. Whether you’re baking for a holiday or a simple weekend dessert, this pie hits every note just right.
- Quick & Easy: The pie comes together in under 90 minutes, including prep and bake time—ideal for weeknight baking or last-minute dessert plans.
- Simple Ingredients: No need to hunt down specialty items. This recipe uses pantry staples and frozen or fresh cherries that you probably already have on hand.
- Perfect for Gatherings: Cherry pie with a classic lattice top is a timeless choice that fits everything from family dinners to potlucks.
- Crowd-Pleaser: Kids and adults alike rave about the flaky crust combined with that luscious cherry filling.
- Unbelievably Delicious: The flaky crust balances perfectly with the tart, juicy cherries, giving you a texture and flavor combo that’s pure comfort food.
What makes this cherry pie stand out is the crust technique—cold butter chunks folded just right into the dough, creating those signature flaky layers you want in every bite. Plus, the lattice top isn’t just decorative; it lets the filling bubble and caramelize beautifully while you bake. Honestly, it’s the kind of pie that makes you close your eyes on the first bite and smile.
If you’re looking for a recipe that’s both classic and forgiving (because, let’s face it, not every pie crust turns out perfect on the first try), this is it. You’ll find yourself reaching for this cherry pie recipe again and again, whether it’s a special occasion or a simple weekend indulgence.
What Ingredients You Will Need
This recipe uses simple, wholesome ingredients to bring out bold cherry flavor and that flaky crust without fuss. Most are pantry staples, and you can easily swap a few to suit your preferences or dietary needs.
- For the crust:
- 2 ½ cups (315g) all-purpose flour (I prefer King Arthur for consistent results)
- 1 teaspoon salt
- 1 tablespoon granulated sugar (adds just a hint of sweetness)
- 1 cup (226g) unsalted butter, cold and cut into cubes (use a good-quality butter like Kerrygold for richness)
- 6-8 tablespoons ice water (start with 6, add more if needed)
- For the cherry filling:
- 4 cups (600g) fresh or frozen pitted tart cherries (frozen works great and is available year-round)
- 1 cup (200g) granulated sugar
- ¼ cup (32g) cornstarch (for thickening)
- 1 tablespoon fresh lemon juice (brightens the filling)
- 1 teaspoon vanilla extract (adds depth of flavor)
- ¼ teaspoon almond extract (optional, but highly recommended for that classic cherry pie flair)
- Pinch of salt
- For finishing touches:
- 1 egg, beaten (for egg wash to give crust a golden shine)
- 1 tablespoon coarse sugar (optional, for sprinkling on top)
Substitution tips: If you want a gluten-free crust, swap the flour for a gluten-free blend that measures cup-for-cup. For a dairy-free version, use a plant-based butter substitute that’s solid and cold. And if you don’t have almond extract, vanilla alone works fine—though the almond really brings that nostalgic cherry pie vibe.
Equipment Needed
- 9-inch (23cm) pie dish (glass or ceramic works best to get even baking)
- Mixing bowls (medium and large sizes for dough and filling)
- Pastry cutter or two knives (to cut the butter into the flour—if you don’t have one, use your fingers but keep the butter cold)
- Rolling pin (essential for rolling out the dough evenly)
- Pastry brush (for applying the egg wash—if you don’t have one, a clean paintbrush or paper towel dabbed with egg works)
- Sharp knife or pizza cutter (for slicing dough strips for the lattice top)
- Measuring cups and spoons (accuracy really helps with pie crust success)
I once tried making this pie with a tiny tart pan—it was charming but the filling bubbled over more easily. So, I recommend sticking with a standard 9-inch dish for best results. If you’re on a budget, a metal pie pan from the grocery store does the job just fine. Just watch your bake times as metal heats differently than glass or ceramic.
Preparation Method
- Make the dough: In a large bowl, whisk together 2 ½ cups all-purpose flour, 1 teaspoon salt, and 1 tablespoon sugar. Add the cold, cubed butter. Using a pastry cutter or two knives, cut the butter into the flour until the mixture resembles coarse crumbs with some pea-sized pieces remaining. (This chunkiness is what creates flakiness.)
- Add ice water gradually: Pour 6 tablespoons of ice water over the flour mixture, stirring gently with a fork. If the dough doesn’t come together when squeezed, add more water one tablespoon at a time. Stop as soon as the dough holds when pressed. (Tip: Keep your hands cold and don’t overwork the dough or it’ll get tough.)
- Divide and chill: Shape the dough into two discs about 1-inch thick, wrap each in plastic wrap, and refrigerate for at least 1 hour. This resting time helps relax the gluten and keeps the butter cold for perfect flakiness.
- Prepare the filling: In a large bowl, combine 4 cups pitted cherries, 1 cup sugar, ¼ cup cornstarch, 1 tablespoon lemon juice, 1 teaspoon vanilla extract, ¼ teaspoon almond extract, and a pinch of salt. Toss gently to coat the cherries evenly and set aside.
- Roll out the bottom crust: Lightly flour your work surface and rolling pin. Roll one dough disc into a 12-inch circle, about 1/8 inch thick. Carefully transfer it to the pie dish by rolling it onto the rolling pin and unrolling it over the dish. Trim any excess dough hanging over the edge.
- Add the filling: Pour the cherry filling into the crust, spreading evenly. (If you want to prevent a soggy bottom, you can sprinkle a tablespoon of ground almonds or breadcrumbs on the crust before adding the filling.)
- Create the lattice top: Roll out the second dough disc into a similar-sized circle. Using a sharp knife or pizza cutter, cut the dough into ½-inch wide strips. Lay 5 strips horizontally over the filling with about ½ inch apart. Fold back every other strip halfway, then place one strip vertically. Unfold the folded strips over the vertical strip. Repeat with the remaining strips, weaving the lattice pattern.
- Seal and trim edges: Trim any excess dough and press the edges together to seal. Crimp edges with your fingers or a fork for a decorative touch.
- Apply egg wash: Brush the lattice and edges with beaten egg. Sprinkle with coarse sugar if desired for extra sparkle and crunch.
- Bake the pie: Place the pie on a baking sheet to catch any drips. Bake in a preheated oven at 375°F (190°C) for 50-60 minutes, or until the crust is golden and the filling is bubbling. If the edges brown too quickly, cover them with foil halfway through baking.
- Cool before serving: Let the pie cool for at least 2 hours to allow the filling to set properly. (This is the hardest part—I always want to dig in immediately!)
Cooking Tips & Techniques
Making a perfect flaky cherry pie crust isn’t as intimidating as it sounds, but a few tricks can make all the difference.
- Keep everything cold: From the butter to the water, cold ingredients are key. Warm butter melts into the dough and ruins flakiness. I even chill my mixing bowl in the fridge before starting on hot days.
- Don’t overwork the dough: Mix just until it comes together. Over-kneading develops gluten, making the crust tough instead of tender.
- Use cornstarch as a thickener: It’s perfect for fruit pies because it creates a glossy, clear filling that isn’t gummy. Tapioca starch is a fine alternative but can be a bit more gelatinous.
- Lattice top technique: The lattice lets steam escape and adding it late to the process means you can watch the filling bubble through—it’s oddly satisfying.
- Prevent soggy bottoms: Pre-baking the bottom crust for 5 minutes or sprinkling ground nuts/breadcrumbs before filling helps absorb extra juices.
- Watch your oven temperature: Starting at 375°F (190°C) gives a nice golden crust without burning. Use foil shields if edges brown too fast.
- Let it cool completely: Patience is tough here, but cutting too soon means juice spills everywhere. Waiting lets the filling thicken perfectly.
Honestly, the first time I tried this recipe I forgot the egg wash and the crust looked pale and dull. Once I added it on the next batch? Game-changer. It’s those little details that make the difference between “meh” and “wow.”
Variations & Adaptations
Cherry pie is wonderfully versatile, and you can easily tweak this recipe to match your taste or dietary needs.
- Dietary variation: For a vegan version, swap butter for cold coconut oil and use a flaxseed “egg” (1 tablespoon flaxseed meal + 3 tablespoons water) for the egg wash.
- Seasonal twist: In summer, try mixing fresh cherries with blueberries or blackberries for a mixed berry pie. It adds more complexity and a pop of color.
- Flavor boost: Add a teaspoon of cinnamon or a pinch of ground ginger to the cherry filling for a warm spice note that’s surprisingly comforting.
- Gluten-free option: Use a gluten-free all-purpose flour blend that measures cup-for-cup with regular flour. Some blends bake best with an added teaspoon of xanthan gum for structure.
- Alternative crust: Use a crumb crust made from crushed graham crackers and melted butter for a quicker, no-roll option that pairs wonderfully with the tart cherries.
One personal favorite variation is adding a handful of chopped toasted almonds on top of the filling before the lattice goes on. It adds a lovely crunch and nutty flavor that’s unexpected but delightful.
Serving & Storage Suggestions
This cherry pie is best served at room temperature or slightly warmed. Honestly, the way the crust softens just enough while the filling stays juicy is the perfect balance.
Serve with a scoop of vanilla ice cream or a dollop of freshly whipped cream for that classic combo. If you’re feeling adventurous, a drizzle of almond or cherry liqueur over the slice adds an adult twist.
To store leftovers, cover the pie loosely with foil or plastic wrap and keep it in the refrigerator for up to 4 days. The crust stays flaky but might soften a bit—still delicious!
For longer storage, you can freeze the whole pie (unbaked or baked). Wrap tightly in plastic wrap and foil, then freeze for up to 3 months. Thaw overnight in the fridge before baking or reheating.
Reheat slices gently in a 350°F (175°C) oven for about 10 minutes to refresh the crust crispness without drying out the filling.
Flavors tend to deepen after a day, so if you can wait, the pie tastes even better the next day. I’ve caught myself sneaking a slice cold straight from the fridge too many times to count!
Nutritional Information & Benefits
This cherry pie packs a sweet punch but also offers some nutritional benefits thanks to its simple ingredients. Each slice (1/8th of the pie) contains approximately:
| Calories | 320 |
|---|---|
| Fat | 16g (mostly from butter) |
| Carbohydrates | 42g |
| Fiber | 2g |
| Sugar | 24g |
| Protein | 3g |
Cherries themselves are high in antioxidants and vitamin C, which can help with inflammation and immune support. Using real butter adds richness and fat that helps with nutrient absorption and satiety.
If you’re watching sugar intake, you can reduce the sugar in the filling slightly or swap it with a natural sweetener like maple syrup, but keep in mind it affects the texture and sweetness.
This pie can be enjoyed as an occasional treat that brings a little homemade joy without complicated ingredients or preservatives.
Conclusion
This perfect flaky cherry pie with a classic lattice top is one of those recipes that feels like a warm kitchen hug. It’s simple enough for a home baker but impressive enough to share at any gathering. Trust me, once you try making the crust the way I described and see that golden lattice weave over bubbling cherries, you’ll understand why it’s stuck around as a favorite in my recipe box.
Feel free to customize it to your taste—swap spices, try different crusts, or add nuts. The beauty is in its adaptability and the joy it brings with every slice.
So, why not give this recipe a go? I’d love to hear how your pie turns out or what personal twists you add. Baking is better when shared, after all!
Happy baking, and may your kitchen be filled with the smell of buttery crust and sweet cherries.
FAQs
How do I prevent my cherry pie crust from getting soggy?
Sprinkling a tablespoon of ground almonds or breadcrumbs on the bottom crust before adding the filling helps absorb excess moisture. Also, chilling the dough well and pre-baking the bottom crust for 5 minutes can reduce sogginess.
Can I use fresh cherries instead of frozen for the filling?
Absolutely! Fresh cherries work beautifully when in season. Just make sure to pit them well and adjust sugar slightly depending on their sweetness.
What if I don’t have cornstarch for thickening?
You can substitute with tapioca starch or arrowroot powder in the same amount. Keep in mind tapioca may give a slightly different, more gelatinous texture.
How do I store leftover cherry pie?
Store leftovers covered in the refrigerator for up to 4 days. You can also freeze the pie wrapped tightly for up to 3 months. Reheat slices gently in the oven to refresh the crust.
Is there a way to make the lattice top easier to handle?
Chill the rolled dough strips in the fridge for 10-15 minutes before weaving. This firms them up and makes weaving and transferring less tricky.
Pin This Recipe!

Perfect Flaky Cherry Pie Recipe with Classic Lattice Top Easy and Homemade
A classic cherry pie with a flaky, buttery crust and a luscious tart cherry filling, topped with a beautiful lattice crust. Perfect for gatherings or a comforting homemade treat.
- Prep Time: 20 minutes
- Cook Time: 55 minutes
- Total Time: 1 hour 15 minutes
- Yield: 8 servings 1x
- Category: Dessert
- Cuisine: American
Ingredients
- 2 ½ cups (315g) all-purpose flour
- 1 teaspoon salt
- 1 tablespoon granulated sugar
- 1 cup (226g) unsalted butter, cold and cut into cubes
- 6–8 tablespoons ice water
- 4 cups (600g) fresh or frozen pitted tart cherries
- 1 cup (200g) granulated sugar
- ¼ cup (32g) cornstarch
- 1 tablespoon fresh lemon juice
- 1 teaspoon vanilla extract
- ¼ teaspoon almond extract (optional)
- Pinch of salt
- 1 egg, beaten (for egg wash)
- 1 tablespoon coarse sugar (optional)
Instructions
- In a large bowl, whisk together 2 ½ cups all-purpose flour, 1 teaspoon salt, and 1 tablespoon sugar.
- Add the cold, cubed butter. Using a pastry cutter or two knives, cut the butter into the flour until the mixture resembles coarse crumbs with some pea-sized pieces remaining.
- Pour 6 tablespoons of ice water over the flour mixture, stirring gently with a fork. Add more water one tablespoon at a time if needed until the dough holds when pressed.
- Shape the dough into two discs about 1-inch thick, wrap each in plastic wrap, and refrigerate for at least 1 hour.
- In a large bowl, combine 4 cups pitted cherries, 1 cup sugar, ¼ cup cornstarch, 1 tablespoon lemon juice, 1 teaspoon vanilla extract, ¼ teaspoon almond extract, and a pinch of salt. Toss gently to coat.
- Lightly flour your work surface and rolling pin. Roll one dough disc into a 12-inch circle, about 1/8 inch thick. Transfer to a 9-inch pie dish and trim excess dough.
- Pour the cherry filling into the crust, spreading evenly. Optionally sprinkle a tablespoon of ground almonds or breadcrumbs on the crust before filling to prevent sogginess.
- Roll out the second dough disc into a 12-inch circle. Cut into ½-inch wide strips. Lay 5 strips horizontally over the filling with ½ inch spacing.
- Fold back every other strip halfway, place one strip vertically, then unfold the folded strips over the vertical strip. Repeat to weave the lattice top.
- Trim excess dough and press edges to seal. Crimp edges decoratively with fingers or fork.
- Brush the lattice and edges with beaten egg. Sprinkle with coarse sugar if desired.
- Place the pie on a baking sheet and bake at 375°F (190°C) for 50-60 minutes until crust is golden and filling bubbles. Cover edges with foil if browning too fast.
- Let the pie cool for at least 2 hours before serving to allow filling to set.
Notes
Keep all ingredients cold to ensure a flaky crust. Do not overwork the dough to avoid toughness. Use cornstarch for a glossy, clear filling. To prevent soggy crust, pre-bake bottom crust or sprinkle ground almonds/breadcrumbs before filling. Let pie cool completely before slicing. Cover edges with foil if browning too fast.
Nutrition
- Serving Size: 1 slice (1/8th of pi
- Calories: 320
- Sugar: 24
- Fat: 16
- Carbohydrates: 42
- Fiber: 2
- Protein: 3
Keywords: cherry pie, flaky crust, lattice top, homemade pie, classic dessert, easy cherry pie, tart cherry filling