Love this? Save it for later!
Share the inspiration with your friends
My neighbor asked why I couldn’t just skip the water bath. I started to explain why that wouldn’t work—then stopped. Honestly, I had no good reason except that’s how I’d always done it. She was making mini pumpkin cheesecakes for her book club and didn’t own a roasting pan big enough. So I shrugged, said “fine, let’s try it your way,” and braced for cracked tops. What came out of the oven was the creamiest, most perfectly set batch of mini cheesecakes I had ever seen. No cracks. No waterlogged crusts. Just silky pumpkin filling sitting on a crunchy gingersnap base that smelled like autumn in a bite. I stood there holding the muffin tin, genuinely stunned. I mean, I’ve been making cheesecake for years. I’ve written about it. I’ve taught classes on it. And here was a casual Tuesday experiment that completely upended everything I thought I knew. The gingersnap crust wasn’t even part of the original plan—she grabbed the wrong box at the store. But that happy accident? That’s the whole story now. These mini pumpkin cheesecakes with gingersnap crust have become my go-to fall dessert, and not just because they’re easier. They’re actually better. The spicy snap of the ginger against the creamy pumpkin filling creates this little flavor explosion that a standard graham cracker crust just can’t match. And because they’re mini, you get that perfect crust-to-filling ratio in every single bite. No sad forkfuls of just filling. Maybe you’ve been there—standing in your kitchen, second-guessing a shortcut, convinced the “proper” way is the only way. Let me tell you, sometimes the best recipes come from being wrong. And this one? It stayed with me because it taught me something I keep relearning: perfection doesn’t need to be complicated.
Why You’ll Love This Recipe
After testing this recipe more times than I care to admit—through burnt crusts, over-mixed filling, and one memorable incident involving a springform pan that refused to cooperate—I can say with confidence that this version is the one. I’ve been developing dessert recipes for over a decade, and these mini pumpkin cheesecakes represent everything I look for in a fall treat: bold flavor, reliable technique, and zero fuss.
- Quick & Easy: These mini cheesecakes come together in about 30 minutes of active prep time. No water bath, no complicated steps, no stress. Perfect for those weeknights when you need a dessert that feels special without the production.
- Simple Ingredients: You likely have most of these in your pantry right now. Canned pumpkin, cream cheese, eggs, sugar, and a box of gingersnaps. That’s it. No fancy extracts or obscure spices.
- Perfect for Fall Gatherings: Whether it’s Thanksgiving dessert, a Halloween party, or just a cozy Sunday afternoon, these individual cheesecakes feel festive without being fussy. They’re portion-controlled too, which makes serving a breeze.
- Crowd-Pleaser: I’ve served these to everyone from picky toddlers to my grandmother who “doesn’t like pumpkin.” They disappear every single time. The gingersnap crust wins over even the skeptics.
- Unbelievably Delicious: The texture is what gets people. It’s dense but silky, rich but not heavy. And that spicy-sweet crust? It’s the kind of combination that makes you close your eyes after the first bite.
What makes this recipe different from the dozens of others out there is the technique. By skipping the water bath and using a lower baking temperature, you get perfectly smooth tops without any cracking. Plus, the gingersnap crust adds a warmth that complements the pumpkin in a way that feels intentional, not accidental. This isn’t just another pumpkin cheesecake recipe—it’s the one I make for my own family, the one I bring to every Friendsgiving, the one that actually works every single time.
What Ingredients You Will Need
This recipe uses simple, wholesome ingredients that work together to create something genuinely greater than the sum of their parts. Most of these are pantry staples, especially if you do any fall baking, but I’ve included notes on what to look for and what you can swap if needed.
For the Gingersnap Crust
- 1 ½ cups gingersnap crumbs (about 24 cookies, crushed finely) — I prefer the Nabisco brand for their consistent crunch and bold ginger flavor. You can use a food processor or a rolling pin and a zip-top bag.
- ¼ cup granulated sugar — adds a touch of sweetness to balance the spice of the cookies.
- 5 tablespoons unsalted butter, melted — use salted butter if that’s what you have, just reduce the added salt elsewhere. The butter binds the crumbs and adds richness.
- Pinch of salt — only if using unsalted butter. It brightens all the flavors.
For the Pumpkin Cheesecake Filling
- 16 ounces cream cheese, softened to room temperature — this is non-negotiable. Cold cream cheese will give you lumpy filling. Let it sit on the counter for at least an hour, or microwave it in 10-second bursts if you’re in a hurry.
- ¾ cup granulated sugar — standard white sugar works best here. Brown sugar can make the filling too moist.
- 2 large eggs, room temperature — same logic as the cream cheese. Cold eggs can seize the batter.
- 1 cup pumpkin puree — not pumpkin pie filling. Look for Libby’s or any 100% pure pumpkin. I’ve tried homemade puree and it works, but canned is more consistent in moisture content.
- 1 teaspoon vanilla extract — pure vanilla extract if you have it, imitation works fine too.
- 1 teaspoon pumpkin pie spice — or make your own with ½ teaspoon cinnamon, ¼ teaspoon ginger, ¼ teaspoon nutmeg, and a pinch of cloves.
- ½ teaspoon ground cinnamon — for extra warmth.
- ¼ teaspoon salt — enhances the sweetness and balances the spices.
Optional Toppings
- Whipped cream — homemade or store-bought, for serving.
- Caramel sauce — a drizzle adds a lovely finishing touch.
- Extra crushed gingersnaps — for crunch on top.
Substitution Guidance: For a gluten-free version, use gluten-free gingersnaps. I’ve tested this with Kinnikinnick brand and it works perfectly. For dairy-free, use a dairy-free cream cheese alternative like Kite Hill and replace the butter with coconut oil (refined, so it doesn’t taste like coconut). The texture will be slightly less creamy, but still delicious. If you can’t find gingersnaps, graham crackers work, but you’ll lose that spicy kick—add ½ teaspoon of ground ginger and ¼ teaspoon of cloves to the crust to compensate.
Equipment Needed
You don’t need a fancy kitchen to make these mini pumpkin cheesecakes, but having the right tools makes everything smoother. Here’s what you’ll need:
- 12-cup standard muffin tin — this is the backbone of the recipe. Non-stick is helpful but not required. If you only have a 6-cup tin, just bake in batches.
- Paper muffin liners — I prefer foil liners because they peel off cleanly, but standard paper works too. Avoid the “pretty” decorative ones—they tend to stick.
- Mixing bowls — one large for the filling, one medium for the crust.
- Electric hand mixer or stand mixer — you can mix by hand with a wooden spoon, but it takes serious elbow grease to get the cream cheese smooth. A hand mixer is my go-to.
- Food processor or zip-top bag and rolling pin — for crushing the gingersnaps. I’ve done both methods and honestly, the bag-and-rolling-pin approach is oddly satisfying.
- Measuring cups and spoons — for accuracy. Eyeballing works for some recipes, but this one benefits from precision.
- Spatula — a silicone one for scraping every last bit of filling into the cups.
- Cooling rack — for letting the cheesecakes cool gradually. You can use a wire rack or just a clean towel on the counter.
Budget-Friendly Options: Don’t have a food processor? The bag-and-rolling-pin method costs nothing and works just as well. No hand mixer? A whisk and some determination will get you there—just make sure the cream cheese is truly soft. If you don’t have a cooling rack, a cutting board works fine, just let the cheesecakes cool in the pan a bit longer before transferring.
Preparation Method
This method is broken down into clear steps that I’ve refined over many batches. Follow them closely, and you’ll get perfect results every time. I’ve included sensory cues so you know exactly what you’re looking for at each stage.
- Preheat your oven to 325°F (163°C). Line a 12-cup muffin tin with paper liners. I like to lightly spray the liners with non-stick cooking spray—it’s not strictly necessary, but it makes peeling them off even easier later.
- Make the crust. Place the gingersnaps in a food processor and pulse until you have fine crumbs. You should have about 1 ½ cups. If you’re using the bag method, seal the cookies in a zip-top bag and crush them with a rolling pin until no large pieces remain. Transfer the crumbs to a medium bowl. Add the sugar and salt, then pour in the melted butter. Stir with a fork until the mixture looks like wet sand—every crumb should be coated. It should clump together when you squeeze a handful.
- Press the crust into the liners. Divide the crust mixture evenly among the 12 muffin cups. Use the bottom of a small glass or a shot glass to press the crumbs down firmly. You want a compact, even layer about ¼ inch thick. Don’t skip this step—loose crust will crumble when you try to eat it. Set the pan aside.
- Pre-bake the crust. Place the muffin tin in the oven and bake the crusts for 8 minutes. This step is crucial—it firms up the crust and prevents it from getting soggy when you add the filling. Remove from the oven and let the pan cool on a wire rack while you make the filling. Keep the oven on.
- Beat the cream cheese. In a large mixing bowl, beat the softened cream cheese with an electric mixer on medium speed until completely smooth. This takes about 2 minutes. Scrape down the sides and the bottom of the bowl with a spatula. There should be no lumps at all—if you see any, keep beating. Lumps now mean bumpy cheesecake later.
- Add the sugar. With the mixer on low, gradually add the sugar. Beat until combined, about 1 minute. Scrape the bowl again.
- Add the eggs one at a time. Crack the first egg into the bowl and beat on low just until the yolk disappears. Add the second egg and repeat. Over-mixing at this stage incorporates too much air, which can cause the cheesecakes to puff up and then crack as they cool. You want the mixture to be smooth but not fluffy.
- Add the pumpkin and flavorings. Add the pumpkin puree, vanilla extract, pumpkin pie spice, cinnamon, and salt. Mix on low until everything is combined and the filling is a uniform orange color. It should look thick and creamy, like a smooth pudding. Scrape the bowl one last time.
- Fill the cups. Divide the filling evenly among the 12 muffin cups, pouring it over the pre-baked crusts. Each cup should be filled almost to the top—the cheesecakes won’t rise much. Use a spoon or a small cookie scoop for even distribution.
- Bake the cheesecakes. Place the muffin tin in the oven and bake at 325°F (163°C) for 18-22 minutes. The edges should look set and slightly puffed, but the centers should still jiggle slightly when you gently shake the pan. This jiggle is your signal that they’re done—over-baking leads to dry, cracked cheesecake. The tops should look matte, not glossy.
- Cool gradually. Remove the pan from the oven and place it on a wire rack. Let the cheesecakes cool in the pan for 30 minutes. Then, transfer the pan to the refrigerator and chill for at least 4 hours, preferably overnight. This step is non-negotiable for the best texture. The filling needs time to set completely.
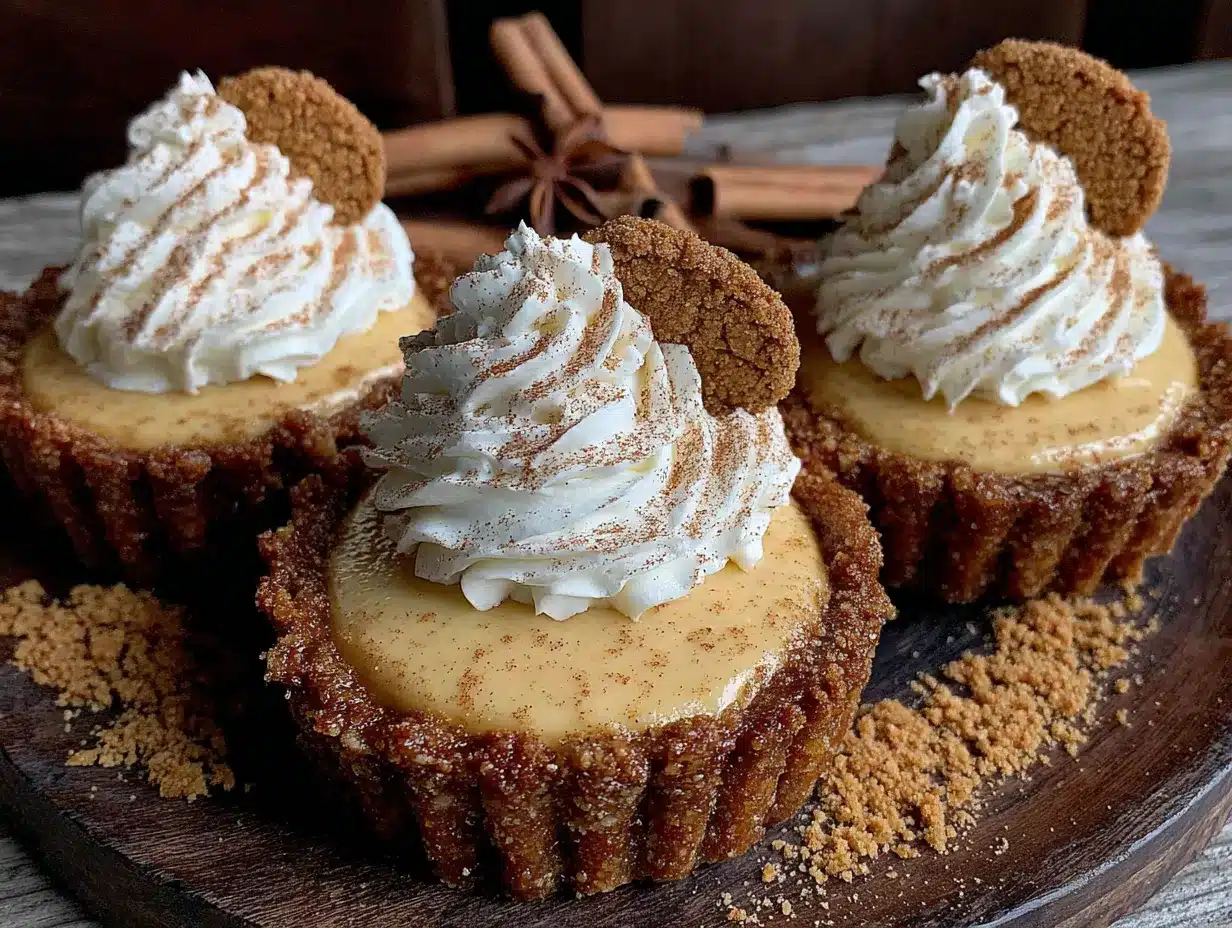
- Serve. When ready to serve, gently peel the paper liners away from the cheesecakes. They should come off cleanly. Top with whipped cream, a drizzle of caramel sauce, and a sprinkle of crushed gingersnaps if desired.
Troubleshooting Tip: If your cheesecakes crack despite following these steps, don’t panic. A dollop of whipped cream covers a multitude of sins. The most common cause of cracking is over-baking, so next time, pull them out when the centers are still jiggly.
Cooking Tips & Techniques
I’ve made every mistake in the book with these mini pumpkin cheesecakes, so you don’t have to. Here are the lessons I learned the hard way.
Room temperature ingredients matter. I cannot stress this enough. Cold cream cheese creates lumps that no amount of beating will fully smooth out. Cold eggs can cause the batter to separate, leaving you with a greasy texture. Set everything out on the counter an hour before you start. If you forget, you can soften cream cheese in the microwave in 10-second bursts, and place eggs in a bowl of warm water for 5 minutes.
Don’t over-mix the filling. This was my biggest struggle. I wanted it perfectly smooth, so I’d beat it for minutes on end. The result? Puffy tops that collapsed into craters. Mix just until each ingredient is incorporated. The batter should look creamy, not aerated.
Use a cookie scoop for even filling. I started using a 2-tablespoon cookie scoop to portion the filling, and it made a huge difference. Each cup gets the same amount, so they bake evenly. No more over-baked edges and under-baked centers.
Let them cool completely before chilling. I once rushed the process and put warm cheesecakes straight into the fridge. The condensation created a watery layer on top. Let them sit on the counter for 30 minutes first, then refrigerate uncovered for another 30 minutes before covering with plastic wrap. This prevents moisture from collecting on the surface.
Plan ahead. These cheesecakes taste better after a full 24 hours in the fridge. The flavors meld, the texture becomes creamier, and the crust softens just enough to be tender but still crisp. Make them a day ahead and you’ll thank yourself.
Variations & Adaptations
One of the best things about this recipe is how adaptable it is. I’ve tested several variations, and they all have their own charm.
Gluten-Free Version: Swap the regular gingersnaps for gluten-free ones. I’ve used the Pamela’s brand with great results. The texture is slightly more crumbly, but the flavor is spot on. Everything else in the recipe is naturally gluten-free, so this is an easy adaptation.
Dairy-Free Version: Use a dairy-free cream cheese alternative. I’ve tested this with Violife brand and it worked surprisingly well. Replace the butter in the crust with coconut oil. The filling will be a bit less thick, so you might need to bake them for an extra 2-3 minutes. Let them chill for a full 24 hours for the best set.
Spiced-Up Version: For those who love extra heat, add ¼ teaspoon of cayenne pepper to the filling along with the spices. It sounds strange, but the warmth of the cayenne plays beautifully with the ginger and pumpkin. I tried this on a whim for a Halloween party and it was a hit.
Chocolate Twist: Melt 4 ounces of semi-sweet chocolate and swirl it into the filling before baking. The chocolate-pumpkin combo is surprisingly good. I’d recommend reducing the sugar to ⅔ cup if you add chocolate, or it might be too sweet.
Mini Bites Version: Use a mini muffin tin instead. Bake for 12-14 minutes instead of 18-22. You’ll get about 24 mini cheesecakes—perfect for parties where people want just a tiny taste.
Serving & Storage Suggestions
These mini pumpkin cheesecakes are versatile when it comes to serving. Here’s how I handle them.
Serving Temperature: I prefer them straight from the fridge—cold and firm. But they’re also delicious at room temperature, especially if you’re serving them with warm caramel sauce. If you want to bring them to room temperature, let them sit on the counter for about 20 minutes before serving.
Presentation Tips: Arrange them on a platter with a dollop of whipped cream on each one. Drizzle caramel sauce over the top and sprinkle with crushed gingersnaps for texture. Fresh mint leaves add a nice pop of green. For Thanksgiving, I sometimes add a tiny sugared cranberry on top.
Complementary Dishes: These cheesecakes pair beautifully with a cup of hot apple cider or a spiced chai latte. For a dessert spread, serve them alongside pecan pie bars or apple crisp. They’re also lovely after a heavy meal because they’re light enough not to weigh you down.
Storage Instructions: Store the cheesecakes in an airtight container in the refrigerator for up to 5 days. Place them in a single layer with parchment paper between layers if you need to stack them. The crust will soften over time, but they’ll still be delicious.
Freezing Instructions: These freeze beautifully. Place the cooled cheesecakes on a baking sheet and freeze until solid, about 2 hours. Then transfer them to a freezer-safe container or zip-top bag. They’ll keep for up to 3 months. Thaw in the refrigerator overnight before serving. I’ve done this for holiday prep, and no one can tell they were frozen.
Reheating: I don’t recommend reheating these—they’re meant to be served cold. But if you want a warm dessert, you can microwave one for about 10 seconds. The filling will soften, but the crust might get a bit mushy.
Nutritional Information & Benefits
While these are definitely a treat, they’re not without some redeeming qualities. Here’s the estimated nutritional breakdown per mini cheesecake (without toppings):
| Nutrient | Amount per Serving |
|---|---|
| Calories | 285 |
| Total Fat | 18g |
| Saturated Fat | 10g |
| Cholesterol | 75mg |
| Sodium | 220mg |
| Total Carbohydrates | 27g |
| Dietary Fiber | 1g |
| Sugars | 19g |
| Protein | 5g |
| Vitamin A | 45% DV |
| Calcium | 6% DV |
Health Benefits: Pumpkin is rich in vitamin A, which supports eye health and immune function. It’s also a good source of fiber, which aids digestion. The cream cheese provides calcium for bone health, and the ginger in the crust has anti-inflammatory properties. That said, these are still a dessert—enjoy them in moderation as part of a balanced diet.
Dietary Considerations: This recipe is vegetarian. It contains gluten, dairy, and eggs. For gluten-free and dairy-free alternatives, see the Variations section above.
Conclusion
These mini pumpkin cheesecakes with gingersnap crust have become my fall dessert standard for a reason. They’re simple enough for a Tuesday night, impressive enough for a holiday table, and forgiving enough for a beginner baker. The combination of creamy pumpkin filling and spicy, crunchy crust is one of those happy accidents that I keep coming back to.
I hope you give them a try, and more than that, I hope you make them your own. Maybe you add a pinch of cardamom to the filling, or swap the caramel sauce for a drizzle of maple syrup. Maybe you serve them with a scoop of vanilla ice cream instead of whipped cream. The best recipes are the ones that leave room for your own touch.
If you make these, I’d love to hear about it. Drop a comment below and let me know how they turned out, or share a photo on Pinterest with the tag #minipumpkincheesecakes. Your version might just be the one that inspires someone else’s happy accident. Happy baking!
Frequently Asked Questions
Can I use fresh pumpkin instead of canned?
Yes, you can, but you’ll need to roast and puree it first. Make sure to drain any excess liquid from the puree—fresh pumpkin tends to be more watery than canned. I recommend spreading the puree on a paper towel-lined plate for about 10 minutes to remove extra moisture before using it in the recipe.
Why did my cheesecakes crack on top?
Cracking usually happens from over-baking or over-mixing. The centers should still jiggle slightly when you pull them out of the oven. Also, make sure you’re not beating the filling too much after adding the eggs—that incorporates air that expands and then collapses, causing cracks. If they do crack, a generous swirl of whipped cream hides it beautifully.
Can I make these in a regular 9-inch springform pan?
Absolutely. Press the crust into the bottom of a greased springform pan (you may need to increase the crust ingredients by about half). Pour the filling on top and bake at 325°F for 45-55 minutes, until the edges are set and the center still jiggles. The cooking time will be longer, but the recipe scales up well.
How far in advance can I make these?
You can make them up to 3 days ahead of time and store them in the refrigerator. They actually taste better after a day or two because the flavors have time to meld. You can also freeze them for up to 3 months—just thaw in the fridge overnight before serving.
Can I use a different type of cookie for the crust?
Yes, but it will change the flavor profile. Graham crackers work well, but you’ll lose the ginger-spice kick. I’d recommend adding ½ teaspoon of ground ginger and ¼ teaspoon of cloves to the crust mixture if you use graham crackers. Vanilla wafers or shortbread cookies also work, but they’re sweeter, so you might want to reduce the sugar slightly.
Pin This Recipe!
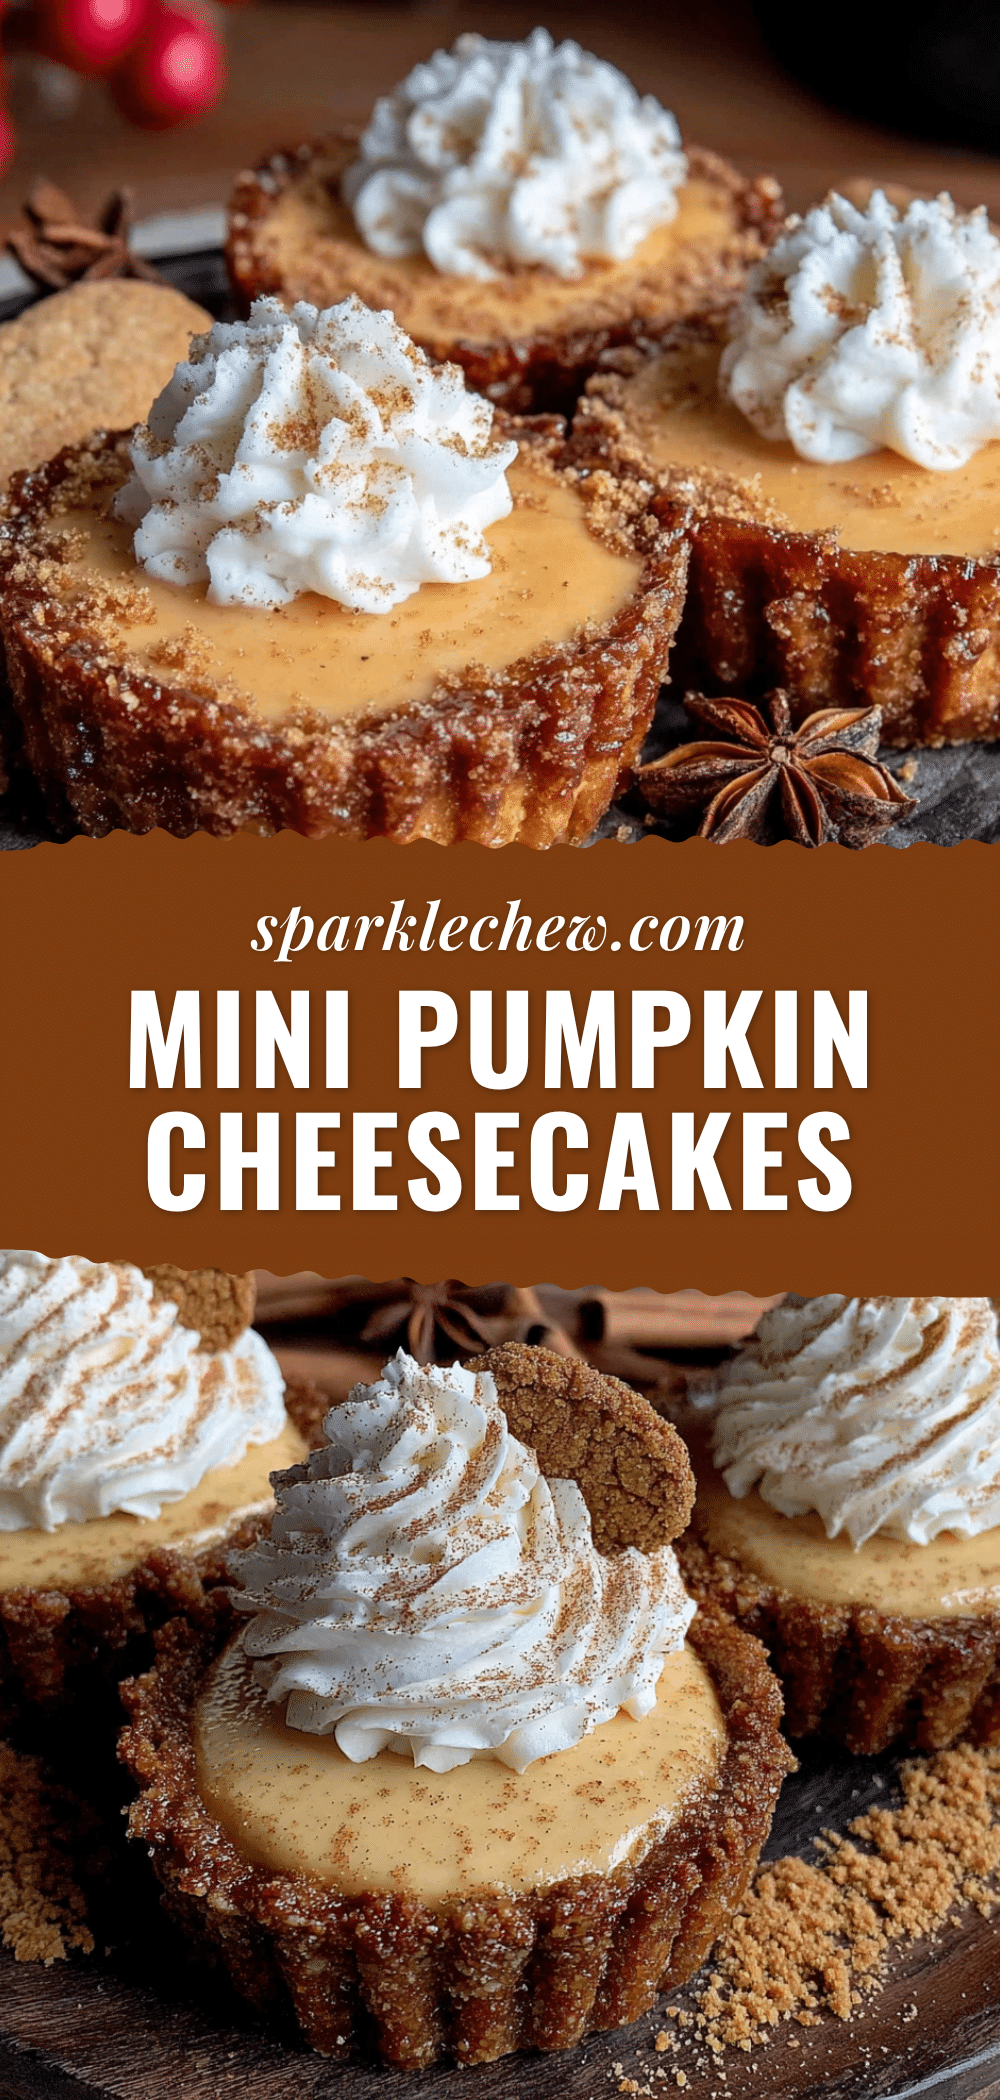
Perfect Mini Pumpkin Cheesecakes with Gingersnap Crust: Easy Fall Dessert
These mini pumpkin cheesecakes with a crunchy gingersnap crust are the ultimate easy fall dessert. No water bath needed, they come out perfectly creamy and crack-free every time.
- Prep Time: 30 minutes
- Cook Time: 18-22 minutes
- Total Time: 4 hours 50 minutes (includes chilling)
- Yield: 12 servings 1x
- Category: Dessert
- Cuisine: American
Ingredients
- 1 ½ cups gingersnap crumbs (about 24 cookies, crushed finely)
- ¼ cup granulated sugar
- 5 tablespoons unsalted butter, melted
- Pinch of salt (if using unsalted butter)
- 16 ounces cream cheese, softened to room temperature
- ¾ cup granulated sugar
- 2 large eggs, room temperature
- 1 cup pumpkin puree (not pumpkin pie filling)
- 1 teaspoon vanilla extract
- 1 teaspoon pumpkin pie spice
- ½ teaspoon ground cinnamon
- ¼ teaspoon salt
- Whipped cream (optional, for serving)
- Caramel sauce (optional, for serving)
- Extra crushed gingersnaps (optional, for topping)
Instructions
- Preheat your oven to 325°F (163°C). Line a 12-cup muffin tin with paper liners. Lightly spray the liners with non-stick cooking spray.
- Make the crust: Place the gingersnaps in a food processor and pulse until fine crumbs. Transfer to a medium bowl. Add ¼ cup sugar and a pinch of salt, then pour in the melted butter. Stir with a fork until the mixture looks like wet sand and clumps together when squeezed.
- Press the crust into the liners: Divide the crust mixture evenly among the 12 muffin cups. Use the bottom of a small glass to press the crumbs down firmly into an even layer about ¼ inch thick.
- Pre-bake the crust: Bake the crusts for 8 minutes. Remove from the oven and let the pan cool on a wire rack while you make the filling. Keep the oven on.
- Beat the cream cheese: In a large mixing bowl, beat the softened cream cheese with an electric mixer on medium speed until completely smooth, about 2 minutes. Scrape down the sides and bottom of the bowl.
- Add the sugar: With the mixer on low, gradually add ¾ cup sugar. Beat until combined, about 1 minute. Scrape the bowl again.
- Add the eggs one at a time: Crack the first egg into the bowl and beat on low just until the yolk disappears. Add the second egg and repeat. Do not over-mix.
- Add the pumpkin and flavorings: Add the pumpkin puree, vanilla extract, pumpkin pie spice, cinnamon, and ¼ teaspoon salt. Mix on low until everything is combined and the filling is a uniform orange color. Scrape the bowl one last time.
- Fill the cups: Divide the filling evenly among the 12 muffin cups, pouring it over the pre-baked crusts. Each cup should be filled almost to the top.
- Bake the cheesecakes: Bake at 325°F (163°C) for 18-22 minutes. The edges should look set and slightly puffed, but the centers should still jiggle slightly when you gently shake the pan.
- Cool gradually: Remove the pan from the oven and place it on a wire rack. Let the cheesecakes cool in the pan for 30 minutes. Then, transfer the pan to the refrigerator and chill for at least 4 hours, preferably overnight.
- Serve: When ready to serve, gently peel the paper liners away from the cheesecakes. Top with whipped cream, a drizzle of caramel sauce, and a sprinkle of crushed gingersnaps if desired.
Notes
Room temperature ingredients are crucial for a smooth filling. Do not over-mix the filling after adding eggs to avoid cracks. The cheesecakes taste even better after 24 hours in the fridge. For gluten-free, use gluten-free gingersnaps. For dairy-free, use dairy-free cream cheese and coconut oil instead of butter.
Nutrition
- Serving Size: 1 mini cheesecake
- Calories: 285
- Sugar: 19
- Sodium: 220
- Fat: 18
- Saturated Fat: 10
- Carbohydrates: 27
- Fiber: 1
- Protein: 5
Keywords: mini pumpkin cheesecakes, gingersnap crust, fall dessert, easy cheesecake recipe, no water bath cheesecake