Love this? Save it for later!
Share the inspiration with your friends
There used to be a tiny bakery tucked behind a vintage clothing shop in Portland called “The Mortician’s Daughter” that made these spooky witch finger cookies with almond nails. When they closed their doors three years ago, I actually felt a little pang of loss—which sounds ridiculous for a cookie, I know. After maybe seven tries—some too crumbly, others looking more like zombie toes than elegant witch fingers—I finally got it right.
The thing is, these aren’t just Halloween cookies you throw together for a party. They’re the kind that make people stop mid-conversation and stare. I brought a batch to my neighbor Carol’s annual fall gathering last October, and someone actually yelped when they reached for what they thought was a severed finger. Honestly, that reaction is the whole point. You get the shock value and a buttery, melt-in-your-mouth shortbread that tastes nothing like how it looks.
I remember standing in my tiny kitchen that first Halloween after the bakery closed, covered in flour, muttering to myself about getting the almond nail placement just right. The dough kept cracking in all the wrong places, and my “knuckles” looked more like warts. But somewhere around attempt number four, something clicked. The ratios balanced, the chilling time made sense, and suddenly I had a tray of cookies that actually looked like they belonged in a haunted house.
Maybe you’ve been there—chasing a recipe from a place that no longer exists, trying to capture a specific taste memory. These witch finger cookies with their almond nails are my way of keeping that little bakery’s spirit alive, one spooky batch at a time. They’re creepy, they’re delicious, and they’re honestly the most fun I’ve ever had baking.
Why You’ll Love This Recipe
These spooky witch finger cookies with almond nails aren’t just another Halloween treat—they’re the showstopper your dessert table needs. After testing this recipe about a dozen times (and learning what not to do the hard way), I can promise you a few things.
- Surprisingly Simple: Despite how detailed they look, the dough comes together in about 15 minutes. The real secret is patience with the chilling time.
- Pantry-Friendly Ingredients: Butter, sugar, flour, eggs, and almonds. That’s it. No weird food coloring or specialty extracts required.
- Guaranteed Conversation Starter: These get more reactions than any other cookie I’ve ever made. People take photos before they take bites.
- Actually Delicious: This isn’t just a “looks cool but tastes meh” situation. The shortbread is buttery, slightly sweet, and perfectly crumbly.
- Kid-Friendly Activity: My niece helped shape an entire batch last year, and hers were somehow the creepiest ones. Kids love the hands-on shaping process.
What makes these different from every other witch finger recipe out there? It’s the texture. Most versions use a sugar cookie base that spreads in the oven and loses all definition. This shortbread dough holds every knuckle crease and fingernail detail because the butter-to-flour ratio is dialed in specifically for shaping. I tested it with all-purpose flour, bread flour, and even a gluten-free blend—this version with standard AP flour gives the best balance of workability and structure.
These cookies are the kind that make you close your eyes after the first bite, despite the fact that you’re eating something that looks like a hand. They’re Halloween magic—spooky on the outside, comfort on the inside.
What Ingredients You Will Need
This recipe keeps things simple with basic baking staples. Each ingredient plays a specific role in creating that perfect shortbread texture that holds its shape while baking.
For the Cookie Dough
- Unsalted butter, softened (1 cup / 226g) – I prefer Kerrygold for the richness, but any good unsalted butter works. Let it sit out for about 45 minutes before starting.
- Powdered sugar (½ cup / 60g) – This gives the shortbread that delicate, melt-in-your-mouth texture. Granulated sugar would make them too crisp.
- Large egg (1, room temperature) – You’ll use the white for the dough and the yolk for the “blood” wash. Plan ahead.
- Vanilla extract (1 teaspoon) – Pure vanilla makes a difference here. The imitation stuff has an artificial edge that stands out in simple shortbread.
- Almond extract (½ teaspoon) – This is optional but adds a subtle nuttiness that ties everything together with the almond nails.
- All-purpose flour (2¼ cups / 280g) – Spoon and level your flour. Scooping directly from the bag packs it down and gives you dry, cracking dough.
- Salt (¼ teaspoon) – Balances the sweetness. Don’t skip it.
For Decoration
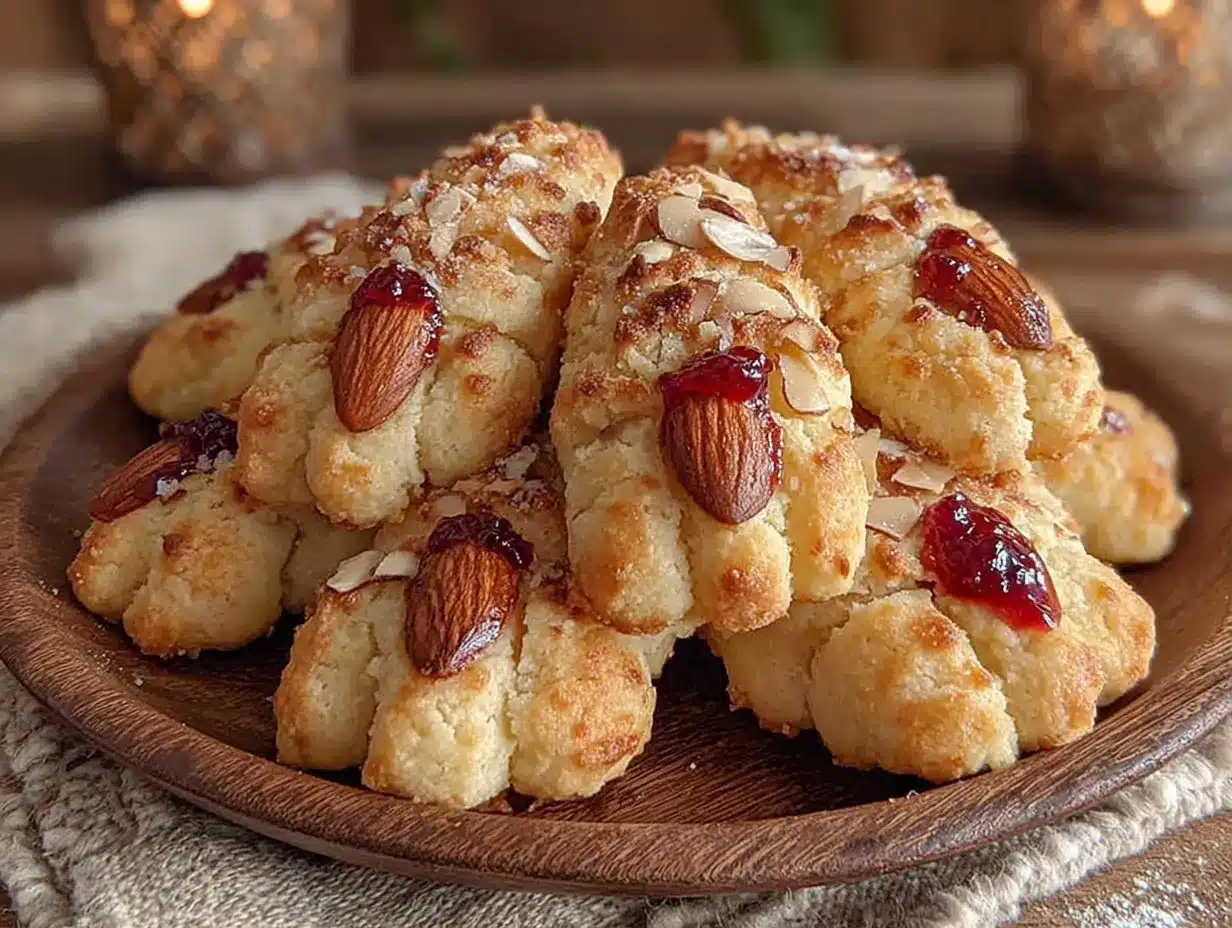
- Whole blanched almonds (about 30-36) – These become the fingernails. Look for ones that are relatively flat on one side so they sit nicely on the dough.
- Red gel food coloring – The gel kind gives that deep, bloody color without thinning out the egg wash. Liquid food coloring makes it too runny.
- Seedless raspberry jam (optional, 2 tablespoons) – Mixed with the red food coloring for a more realistic “blood” effect at the base of the nails.
Ingredient Tips from My Kitchen
I’ve made these with margarine in a pinch (don’t judge, it was a snow day and I was desperate), and they spread way too much. Stick with real butter. For the almonds, I’ve tried slivered almonds and even cashews—whole blanched almonds are the only ones that look convincingly like fingernails. If you can’t find blanched, regular raw almonds work too; just peel the skins off after a quick 30-second blanch in boiling water.
Equipment Needed
- Electric mixer (stand or hand-held) – You can cream the butter by hand, but your arm will hate you by the end.
- Baking sheets (2-3) – Light-colored metal sheets give the most even browning. Dark sheets can over-brown the bottoms.
- Parchment paper or silicone baking mats – Non-negotiable for easy removal and cleanup.
- Sharp knife or bench scraper – For cutting the dough into finger-sized pieces.
- Small offset spatula – Helps transfer the shaped cookies without distorting them.
- Pastry brush – For applying the egg wash. A silicone one works better than bristle for this.
- Toothpick or skewer – For creating knuckle creases and cuticle details.
- Wire cooling rack – Essential for keeping the cookies crisp, not soggy.
I use my grandmother’s old offset spatula for these cookies, and honestly, it makes the transfer so much easier than trying to lift them with your fingers. If you don’t have one, a thin metal spatula works fine. For the toothpick details, I’ve also used the back of a small paring knife—whatever gives you clean lines.
Preparation Method
- Cream the butter and sugar (3-4 minutes). In a large bowl, beat the softened butter and powdered sugar together until light and fluffy. Scrape down the sides halfway through. You want it pale and airy—this is what gives shortbread its tender crumb.
- Add the wet ingredients. Beat in the egg white (save the yolk for later), vanilla extract, and almond extract until just combined. Don’t overmix here, or your cookies will be tough.
- Mix in the dry ingredients. In a separate bowl, whisk together the flour and salt. Gradually add this to the butter mixture on low speed, mixing until a soft dough forms. It should come together cleanly and not feel sticky. If it feels too dry and crumbly, add a teaspoon of cold water. If it’s sticky, add a tablespoon more flour.
- Chill the dough (at least 1 hour). Divide the dough in half, flatten each into a disc, wrap tightly in plastic wrap, and refrigerate. This step is non-negotiable. Warm shortbread dough spreads into blobs, not fingers. I once skipped this and ended up with what looked like deformed sausages.
- Preheat and prep. Preheat your oven to 325°F (163°C). Line your baking sheets with parchment paper or silicone mats.
- Shape the fingers. Working with one disc at a time (keep the other chilled), pinch off a piece of dough about the size of a walnut. Roll it into a log about 3 inches long and ¾ inch thick. One end should be slightly tapered—this becomes the fingertip. Place it on the prepared baking sheet. Repeat with the remaining dough, spacing the fingers about 1 inch apart.
- Create the details. Using the back of a toothpick or a small skewer, press gentle lines across each finger to create 2-3 knuckle creases. Don’t press too deep—the lines should look natural, not like you scored them with a knife. Lightly press the tip of your finger into the top of each cookie to create a slight indentation where the almond nail will sit.
- Attach the almond nails. Gently press one blanched almond onto the indentation at the tip of each finger, pointy end facing outward. The almond should sit flush against the dough. Press firmly enough that it stays put during baking, but not so hard that the dough squishes out the sides.
- Make the “blood” wash. In a small bowl, whisk the reserved egg yolk with 1 teaspoon of water and several drops of red gel food coloring until you get a deep, bloody red. For extra realism, stir in the raspberry jam—it gives the wash a slightly thicker, more congealed look.
- Apply the wash. Using a small pastry brush, carefully paint the red mixture around the base of each almond nail and into the knuckle creases. Let a little drip down the sides for that truly gruesome effect. Don’t paint the almond itself—it should remain pale and nail-like.
- Bake (12-15 minutes). Bake the cookies until they’re set and just barely starting to turn golden on the bottoms. The tops should remain pale. Overbaking makes them too crunchy and loses that shortbread tenderness.
- Cool completely. Let the cookies rest on the baking sheet for 5 minutes, then transfer to a wire rack to cool completely. They firm up significantly as they cool, so don’t panic if they seem soft right out of the oven.
Cooking Tips & Techniques
I learned most of these the hard way, so you don’t have to. The first batch I ever made looked less like witch fingers and more like misshapen breadsticks with almonds glued on top. Here’s what actually works.
Keep the dough cold. This is the single most important tip. If your dough starts feeling soft or sticky while you’re shaping, pop it back in the fridge for 15 minutes. I keep a second baking sheet in the freezer and rotate my cookies onto it as I shape them. Cold dough holds every single detail.
Vary the finger shapes. Real fingers aren’t all identical. Make some longer, some shorter, some with a slight curve. I purposely make a few that look slightly broken or bent at the knuckle—it adds to the creepy factor. My sister once asked if I’d intentionally made one look like it had arthritis. Yes, yes I did.
Don’t skip the chilling after shaping. Once all your fingers are on the baking sheet with their almond nails attached, chill the whole tray for 10-15 minutes before baking. This sets the details and prevents spreading. I’ve tested this side by side—chilled fingers hold their shape perfectly; unchilled ones turn into pudgy little stubs.
Watch the bake time closely. These cookies go from perfect to overdone in about 60 seconds. Start checking at 12 minutes. The bottoms should be light golden, and the cookies should look dry on the surface but still pale. They continue cooking from residual heat after you pull them out.
Multitask strategically. While one batch bakes, keep the shaped but unbaked cookies in the fridge. This way, you’re always working with cold dough. I usually shape all the fingers first, then bake them in batches. It takes a little longer upfront but gives much better results.
Variations & Adaptations
Over the years, I’ve played around with this recipe more times than I care to admit. Here are the versions that actually worked.
Gluten-Free Version: Substitute the all-purpose flour with a 1:1 gluten-free baking flour blend that contains xanthan gum. I’ve used Bob’s Red Mill with good results. The dough will be slightly more delicate, so handle it gently and chill it well. The texture won’t be quite as tender as the original, but the creep factor remains intact.
Vegan Adaptation: Use vegan butter (I like Miyoko’s for baking) and replace the egg white with 2 tablespoons of aquafaba (the liquid from a can of chickpeas). For the wash, skip the egg yolk and use a mixture of maple syrup and red food coloring. The cookies won’t be quite as crisp, but they’ll still hold their shape and taste delicious.
Different “Nail” Options: If you don’t have blanched almonds, try whole raw cashews (they have a nice natural curve), pepitas for tiny witch nails, or even slivered almonds pressed in sideways for a more jagged look. I tried candy corn once—don’t do it. They melt into orange puddles.
Flavor Twists: Add 1 tablespoon of cocoa powder to the flour for chocolate witch fingers. Or swap the vanilla for peppermint extract for a creepy-cool mint version. My personal favorite is adding the zest of one orange to the dough—the citrus cuts through the butter and makes them taste almost like Italian wedding cookies.
Extra Spooky Presentation: After baking, brush a tiny bit of the red jam mixture around the “cuticle” area to look like fresh blood. I also like to press a few green pumpkin seeds into the dough before baking to look like warts. It’s disgusting. It’s perfect.
Serving & Storage Suggestions
These spooky witch finger cookies with almond nails are best served at room temperature, arranged on a dark platter or cake stand. I like to present them in a way that plays up the horror factor—scatter them on a black plate with a few fake spider webs, or arrange them in a “hand” formation reaching out of a serving bowl. The more dramatic the presentation, the better the reaction.
For a Halloween party, place them on a platter labeled “Witch’s Revenge” or “Severed Fingers.” Watch people’s faces as they reach for one. It never gets old.
Pairing Suggestions: These cookies pair beautifully with a hot cup of spiced apple cider, a pumpkin spice latte, or even a glass of cold milk (the classic contrast between creepy cookie and innocent milk is always fun). For an adult gathering, try them with a dark stout or a bourbon-spiked hot chocolate.
Storage Instructions: Store the cooled cookies in an airtight container at room temperature for up to 5 days. Layer them between sheets of parchment paper so the almond nails don’t get knocked off. Do NOT refrigerate them—the moisture in the fridge will make the shortbread lose its crisp texture.
Freezing Instructions: You can freeze the baked cookies for up to 3 months. Place them in a single layer on a baking sheet and freeze until solid, then transfer to a freezer-safe container with parchment between layers. Thaw at room temperature for about 30 minutes before serving. Alternatively, freeze the unbaked shaped cookies on a baking sheet, then transfer to a freezer bag. Bake directly from frozen, adding 2-3 minutes to the bake time.
Flavor Development: Honestly, these cookies taste even better on day two. The flavors meld together, and the shortbread gets that perfect crumbly texture. If you can resist eating them all on Halloween night, save a few for the next day. You won’t regret it.
Nutritional Information & Benefits
Let’s be real—these are Halloween treats, not health food. But here’s the breakdown if you’re curious. Per cookie (based on 36 cookies): approximately 110 calories, 7g fat, 11g carbohydrates, 1g protein, 5g sugar. The almond nails actually add a small amount of healthy fats and vitamin E, so there’s that.
The almonds provide about 3% of your daily magnesium per cookie, and the butter contains a small amount of vitamin A. Is that enough to call these “nutritious”? Definitely not. But if you’re looking for a slightly healthier option, you can reduce the sugar to ⅓ cup without affecting the texture too much.
Dietary Considerations: These cookies contain dairy, eggs, gluten, and tree nuts (almonds). For a nut-free version, replace the almond nails with dried apricot slices (cut into nail shapes) or skip the nails entirely and just paint the tips red. The cookies themselves are nut-free if you omit the almond extract.
My personal take? Halloween comes once a year. Make the full-fat, full-sugar version, enjoy every single bite, and don’t look back. Life’s too short to worry about calories in a cookie that looks like a severed finger.
Frequently Asked Questions
Can I make these cookies ahead of time?
Absolutely. You can prepare the dough up to 3 days in advance and keep it wrapped in the fridge. You can also shape the cookies, attach the almond nails, and refrigerate them on the baking sheet for up to 24 hours before baking. Just cover them loosely with plastic wrap so they don’t dry out.
Why did my witch finger cookies spread in the oven?
This usually happens for one of three reasons: the dough wasn’t chilled long enough, the butter was too soft when you mixed it, or your baking sheets were too warm. Make sure you chill the shaped cookies for at least 15 minutes before baking, and never place dough on a hot baking sheet. If your first batch spread, let the baking sheet cool completely before putting the next batch on it.
Can I use a different nut for the fingernails?
Yes! Whole cashews work great and have a nice natural curve. Pepitas (pumpkin seeds) give a smaller, more delicate nail look. I’ve also used sliced almonds stacked together for a more jagged effect. Just avoid anything that melts or burns easily, like candy corn or marshmallows.
How do I get the red color to look like real blood?
The secret is in the wash. Mix the egg yolk with just a few drops of water and a generous amount of red gel food coloring. Adding a tiny bit of seedless raspberry jam gives it that slightly thick, congealed look. Paint it around the base of the almond nail and let it drip naturally. Less is more—you want it to look like a cuticle, not a crime scene.
My cookies cracked while I was shaping them. What went wrong?
The dough was probably too cold or too dry. If it cracks when you try to roll it, let it sit at room temperature for 5-10 minutes to soften slightly. If it’s still cracking, your flour measurement might have been too generous. Next time, spoon the flour into your measuring cup and level it off instead of scooping directly from the bag.
Conclusion
These spooky witch finger cookies with almond nails are everything I love about Halloween baking—they’re fun, they’re creepy, and they taste genuinely amazing. Every time I make them, I think about that little bakery in Portland and the first time I bit into one of their cookies and realized Halloween treats could be both terrifying and delicious.
Don’t be afraid to make these your own. Add extra knuckle wrinkles, experiment with different nail shapes, or go heavier on the “blood” wash if that’s your style. The best part about this recipe is that imperfections make them look more realistic. A crooked finger here, a slightly cracked knuckle there—it all adds to the horror.
I’d love to hear how yours turn out. Drop a comment below with your best witch finger creations, or tag me in your photos if you share them online. Did you try a variation I haven’t thought of? Did someone scream when they saw them? Tell me everything. And if you’re looking for more Halloween baking inspiration, don’t miss my recipe for ghost meringues that disappear in your mouth, or these chocolate spider cookies that are almost too cute to eat.
Happy Halloween, and happy baking. May your fingers be creepy and your cookies be buttery.
Pin This Recipe!

Spooky Witch Finger Cookies with Almond Nails – Easy Halloween Treat

These spooky witch finger cookies with almond nails are buttery shortbread cookies that look like severed fingers, perfect for Halloween. They are surprisingly simple to make with pantry-friendly ingredients and are guaranteed to be a conversation starter.
- Prep Time: 15 minutes
- Cook Time: 12-15 minutes
- Total Time: 1 hour 30 minutes (including chilling)
- Yield: 30-36 cookies 1x
- Category: Dessert
- Cuisine: American
Ingredients
- 1 cup (226g) unsalted butter, softened
- ½ cup (60g) powdered sugar
- 1 large egg, room temperature (white for dough, yolk for wash)
- 1 teaspoon vanilla extract
- ½ teaspoon almond extract (optional)
- 2¼ cups (280g) all-purpose flour
- ¼ teaspoon salt
- 30–36 whole blanched almonds
- Red gel food coloring
- 2 tablespoons seedless raspberry jam (optional)
Instructions
- Cream the butter and sugar: In a large bowl, beat the softened butter and powdered sugar together until light and fluffy, about 3-4 minutes. Scrape down the sides halfway through.
- Add the wet ingredients: Beat in the egg white (reserve the yolk), vanilla extract, and almond extract until just combined. Do not overmix.
- Mix in the dry ingredients: In a separate bowl, whisk together the flour and salt. Gradually add to the butter mixture on low speed, mixing until a soft dough forms. If too dry, add 1 teaspoon cold water; if too sticky, add 1 tablespoon more flour.
- Chill the dough: Divide dough in half, flatten into discs, wrap tightly in plastic wrap, and refrigerate for at least 1 hour.
- Preheat and prep: Preheat oven to 325°F (163°C). Line baking sheets with parchment paper or silicone mats.
- Shape the fingers: Working with one disc at a time, pinch off a walnut-sized piece of dough. Roll into a log about 3 inches long and ¾ inch thick, tapering one end for the fingertip. Place on prepared baking sheet, spacing 1 inch apart.
- Create the details: Use the back of a toothpick or skewer to press gentle lines across each finger for 2-3 knuckle creases. Lightly press the tip of your finger into the top of each cookie to create an indentation for the almond nail.
- Attach the almond nails: Gently press one blanched almond onto the indentation at the tip of each finger, pointy end outward. Press firmly so it stays put during baking.
- Make the ‘blood’ wash: In a small bowl, whisk the reserved egg yolk with 1 teaspoon water and several drops of red gel food coloring until deep red. For extra realism, stir in the raspberry jam.
- Apply the wash: Using a small pastry brush, carefully paint the red mixture around the base of each almond nail and into the knuckle creases. Let a little drip down the sides. Do not paint the almond itself.
- Bake: Bake for 12-15 minutes until set and just barely golden on the bottoms. Tops should remain pale.
- Cool completely: Let cookies rest on baking sheet for 5 minutes, then transfer to a wire rack to cool completely.
Notes
Keep the dough cold for best results. Vary finger shapes for realism. Chill shaped cookies for 10-15 minutes before baking. Watch bake time closely; cookies go from perfect to overdone quickly. Store in an airtight container at room temperature for up to 5 days. Do not refrigerate. Freeze baked cookies for up to 3 months.
Nutrition
- Serving Size: 1 cookie
- Calories: 110
- Sugar: 5
- Sodium: 35
- Fat: 7
- Saturated Fat: 4
- Carbohydrates: 11
- Fiber: 0.5
- Protein: 1
Keywords: witch finger cookies, Halloween cookies, shortbread cookies, almond nails, spooky treats, easy Halloween recipe


