Love this? Save it for later!
Share the inspiration with your friends
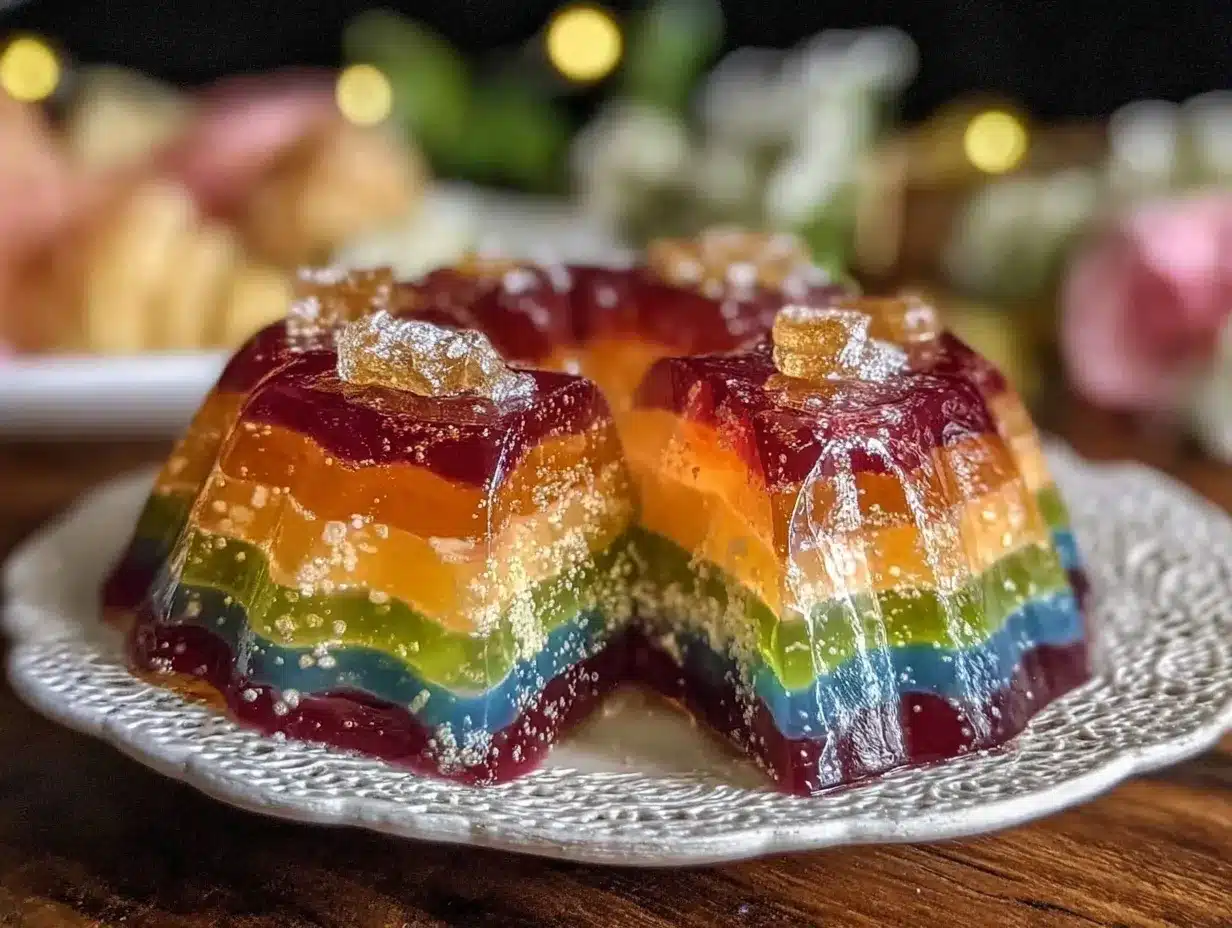
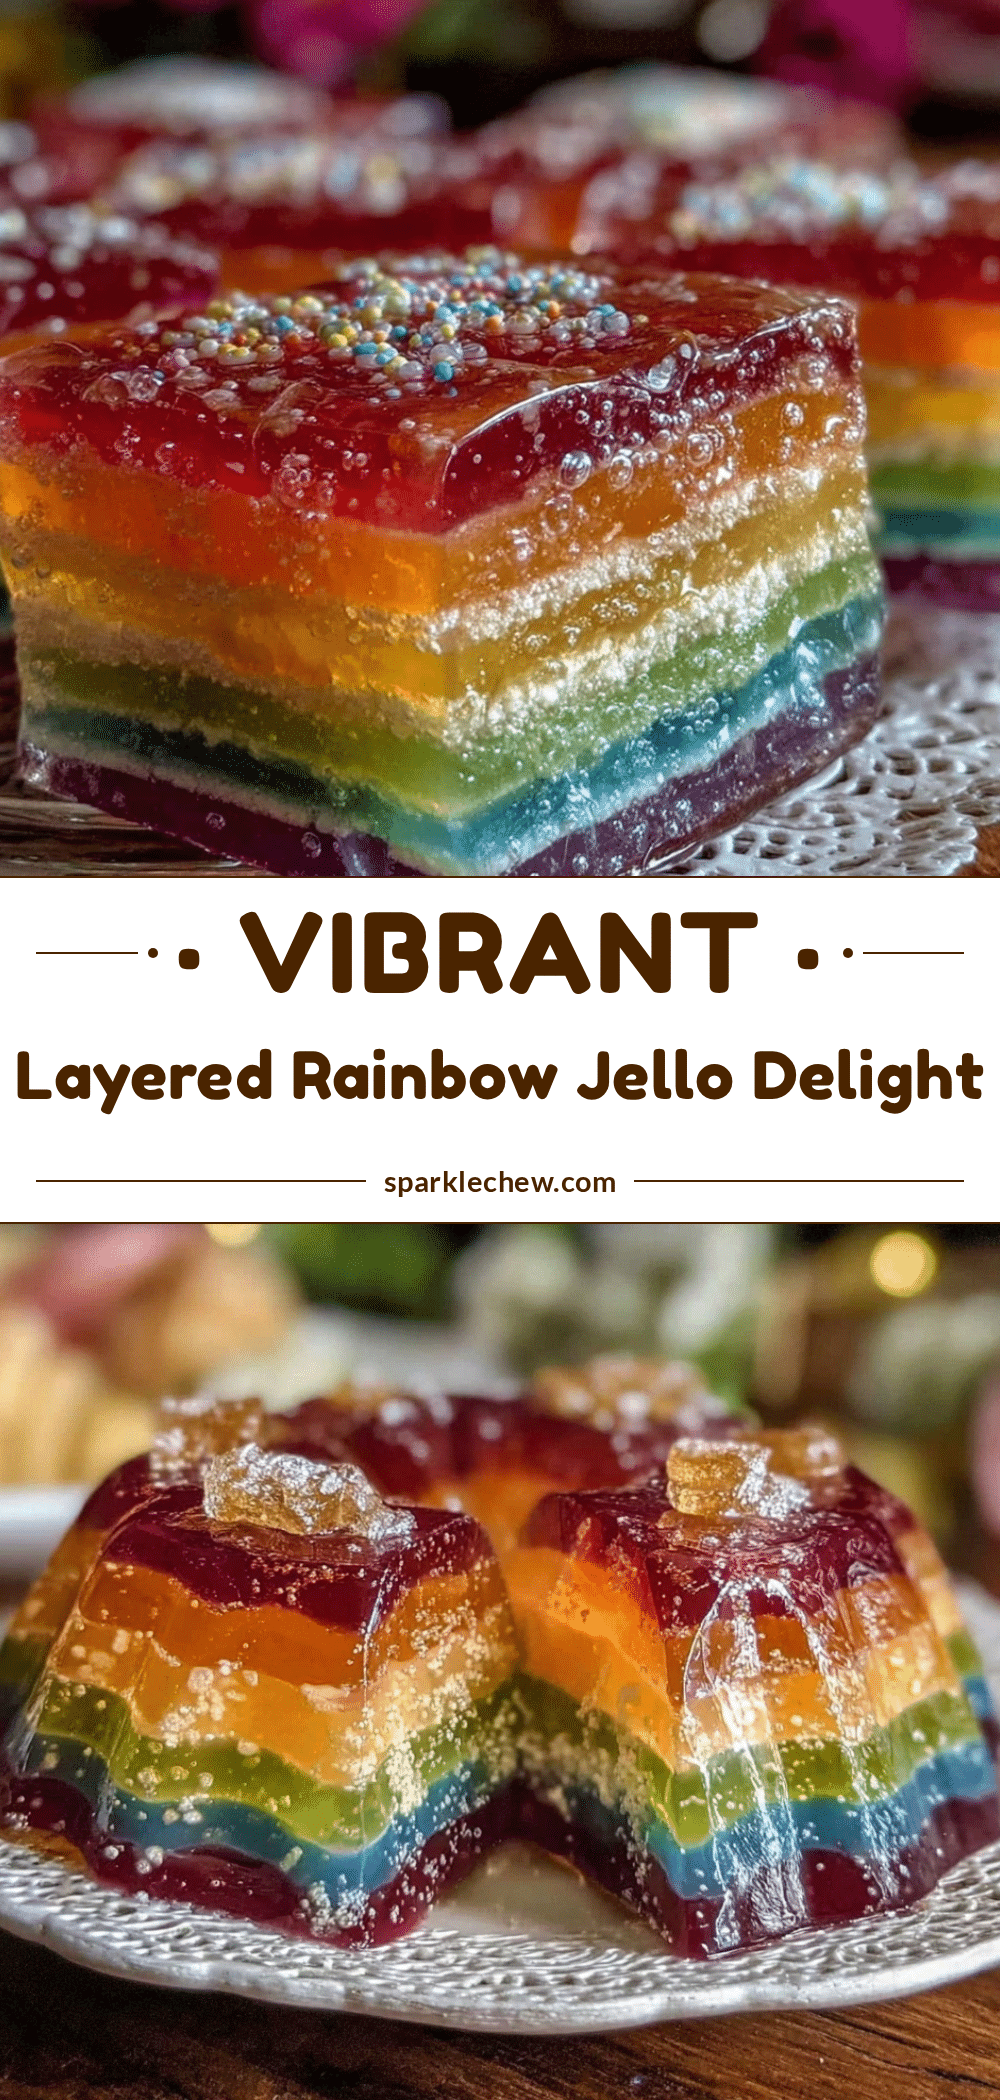
“You know that feeling when you walk into a party, and something just instantly catches your eye—like a colorful beacon calling you over? That was exactly how I first encountered the vintage perfect rainbow jello recipe for party delight. It wasn’t at some fancy gathering or a glitzy event, but rather at a humble community hall bake sale on a sticky Saturday afternoon. I was helping set up when this towering, shimmering five-layer jello masterpiece sat quietly on the dessert table, almost overshadowed by the fancy cupcakes and pies.
Honest to goodness, I was skeptical at first. Jello seemed like such a simple, maybe even outdated treat. But the way those vibrant layers caught the light, each one translucent yet bursting with color, pulled me closer. I remember the lady who made it—Martha, a retired schoolteacher with a mischievous smile. She told me it was a recipe she’d been perfecting since the ’70s, passed along from her mother’s old church cookbook. She swore it was foolproof, and that the secret was in the patience (and a little bit of love).
Well, let me tell you, I was hooked. I made a mess the first time I tried it at home—forgot to chill one layer properly, and it all blurred together. But after a couple of tries, I nailed it. That vintage perfect rainbow jello recipe for party delight isn’t just nostalgia—it’s a crowd-pleaser that brings smiles, conversation, and a bit of magic to any gathering. Maybe you’ve been there, staring at a dessert table and wondering what to bring that’s fun, colorful, and somehow timeless. This recipe might just be your new go-to.
Why You’ll Love This Recipe
Honestly, this vintage perfect rainbow jello recipe for party delight is one of those rare treats that’s as much fun to make as it is to eat. I’ve made it countless times for everything from casual potlucks to birthday celebrations, and it always steals the show. Here’s why it’s become such a favorite:
- Quick & Easy: You can have this five-layer beauty ready in about 3 hours, with most of the work being hands-off chilling time. Perfect for last-minute party plans or a weekend project.
- Simple Ingredients: No specialty stores needed. You probably have the basic jello flavors and some cream cheese or whipped topping in your fridge.
- Perfect for Parties: The colorful layers make it an eye-catching centerpiece, and it’s always a hit with kids and adults alike, sparking nostalgia and smiles.
- Crowd-Pleaser: The texture is delightfully wobbly yet firm, and the creamy layers balance the fruity jello perfectly, keeping everyone coming back for seconds.
- Unbelievably Delicious: This isn’t just sugary gelatin. The creamy layers give it a smooth, almost mousse-like finish that feels indulgent without being heavy.
What sets this recipe apart? It’s the layering technique and the subtle creaminess that makes each bite a little celebration. Instead of just stacking colors, this recipe includes a special creamy layer that helps bind everything while adding a luscious texture that’s not too sweet. It’s a little bit of vintage magic that feels fresh and fun today.
What Ingredients You Will Need
This recipe uses simple, wholesome ingredients to deliver bold flavor and satisfying texture without the fuss. Most of these are pantry staples, and you can easily find them at any grocery store. Here’s what you’ll need for the layers and the creamy binder:
- Jello Flavors (5 packets total): Choose classic colors—cherry (red), orange, lemon (yellow), lime (green), and blueberry or grape (purple). I recommend Kraft brand for the best color vibrancy and flavor.
- Boiling Water: To dissolve each jello packet fully.
- Cold Water: To help cool the jello before layering.
- Sweetened Condensed Milk (1 can, 14 oz / 397g): This adds the creamy layer’s sweetness and richness.
- Cold Milk (1 ½ cups / 360 ml): I usually go with whole milk, but 2% works fine too.
- Unflavored Gelatin (1 packet, about 2 ½ tsp / 7g): Helps set the creamy layers perfectly without being rubbery.
- Vanilla Extract (1 tsp): Adds a subtle warmth to the creamy layers.
If you want to make this recipe dairy-free, swap the sweetened condensed milk with coconut condensed milk (you might find it in specialty stores), and use almond or oat milk instead of cow’s milk. For a gluten-free option, rest assured all these ingredients are naturally gluten-free, just double-check your gelatin brand.
Equipment Needed
Here’s what you’ll want to have on hand to make this vintage perfect rainbow jello recipe for party delight without a hitch:
- 9×13-inch Glass Baking Dish: This is my favorite size for layering jello. Glass helps you see the beautiful colors as they set.
- Mixing Bowls: At least five bowls to prepare each jello flavor separately. I like using clear glass bowls to check the colors.
- Measuring Cups and Spoons: Accuracy helps layers set just right.
- Whisk: For blending gelatin and creamy layers smoothly.
- Spatula or Spoon: For gently spreading layers without mixing them.
- Refrigerator: Obviously essential for chilling each layer.
If you don’t have a 9×13 dish, a similar-sized ceramic or metal pan will work, but glass is best for visual appeal. For budget-friendly options, thrift stores often have perfect glass dishes at a fraction of the cost. And a quick tip: keep a damp cloth nearby to wipe off any spills on the dish edges after each layer—it keeps your rainbow layers nice and neat.
Preparation Method
- Prepare Each Jello Flavor: In five separate bowls, dissolve each jello packet in 1 cup (240 ml) of boiling water. Stir until completely dissolved. Add ½ cup (120 ml) cold water to each bowl to cool the mixture. Set aside to cool to room temperature but not set (about 10-15 minutes).
- Make the Creamy Layer Mixture: In a small bowl, sprinkle the unflavored gelatin over ¼ cup (60 ml) cold milk and let it bloom for 5 minutes. Meanwhile, combine sweetened condensed milk, remaining 1 ¼ cups (300 ml) cold milk, and vanilla extract in a saucepan over low heat, stirring gently.
- Heat Creamy Mixture: Warm the condensed milk mixture until steaming but not boiling. Remove from heat and stir in the bloomed gelatin until completely dissolved. Let it cool to room temperature (about 15 minutes), whisking occasionally to keep it smooth.
- Start Layering: Pour the first jello flavor (e.g., cherry) into the glass dish evenly. Refrigerate for about 30 minutes or until the layer is firm but still slightly tacky (this helps the next creamy layer stick).
- Add Creamy Layer: Gently pour or spoon a thin layer of the creamy mixture over the first jello layer. Return to the fridge for 25-30 minutes until it firms up but isn’t fully solid.
- Repeat Layers: Continue alternating jello flavors and creamy layers: orange jello, creamy layer, lemon jello, creamy layer, lime jello, creamy layer, and finally purple jello on top. Each jello layer should chill about 30 minutes, and creamy layers about 25-30 minutes.
- Final Chill: After the last purple jello layer, refrigerate the entire dish for at least 2 hours, preferably overnight, so all layers set beautifully and the flavors meld.
- Serve: To serve, run a warm knife around the edges and cut into squares. You’ll see those perfect, distinct rainbow layers wobbling with creamy goodness between.
Pro tip: Patience is key here. Rushing the chilling steps leads to colors bleeding into each other. Also, when pouring creamy layers, try pouring over the back of a spoon held just above the jello—it softens the fall and keeps layers neat.
Cooking Tips & Techniques
Making a vintage perfect rainbow jello recipe for party delight can feel like a mini science experiment, but a few tips make it smooth sailing:
- Timing Matters: Chill each layer until it’s firm but still a bit tacky on the surface. This helps the next layer stick without mixing colors.
- Cooling Jello: Don’t pour hot jello directly onto previous layers—it will melt them. Let the jello cool to room temperature but not set before layering.
- Gentle Pouring: Pour creamy layers slowly, ideally over a spoon, to avoid disturbing the jello underneath.
- Gelatin Blooming: Bloom unflavored gelatin in cold liquid before adding to warm mixtures. This ensures it dissolves properly and your creamy layers set perfectly.
- Keep It Clean: Wipe the sides of your dish between layers to keep the edges neat and your rainbow jello looking its best.
I once tried skipping the blooming step and ended up with a grainy creamy layer—lesson learned the hard way! Also, multitasking helps; prepare your jello flavors while the creamy mixture cools to save time. And if you get interrupted (like I did once by a ringing phone mid-pour), just take a deep breath and keep going—this recipe is forgiving as long as you’re patient.
Variations & Adaptations
This vintage perfect rainbow jello recipe for party delight is super flexible. Here are some ways to make it your own or suit different needs:
- Dairy-Free Version: Swap the sweetened condensed milk for coconut condensed milk and use almond or oat milk. The creamy layers have a delightful tropical twist this way.
- Seasonal Fruit Twist: Add small pieces of fresh fruit (like strawberries, mandarin oranges, or kiwi) between layers once the jello is partially set for extra texture.
- Alcohol-Infused: For adult parties, replace half the cold water with a flavored liqueur matching the jello flavor (think orange liqueur with orange jello). Chill a bit longer to firm up properly.
- Less Sweet: Use sugar-free jello packets and substitute sweetened condensed milk with a lighter version or cream cheese blended with a touch of honey for tang.
- Personal Favorite: I once tried layering with homemade lemonade jello in place of lemon flavor for a tart surprise that paired beautifully with the creamy layers. Everyone kept asking for the recipe!
Serving & Storage Suggestions
This rainbow jello is best served chilled straight from the fridge, especially on warm days when the jiggle is most appreciated. Cut into neat squares or use a cookie cutter for fun shapes if you’re serving kids. A sprinkle of edible glitter or a few fresh mint leaves on the side can make it party-ready with minimal fuss.
Pair it with light finger foods or a crisp white wine for adult gatherings. It also complements a summery menu featuring dishes like crispy garlic chicken or a fresh garden salad.
Store leftovers in an airtight container in the fridge for up to 4 days. The flavors meld with time, making it even tastier the next day. Avoid freezing, as the texture can get watery when thawed. When reheating for serving, it’s best to let it come to room temperature slightly but not melt—jello is happiest chilled!
Nutritional Information & Benefits
Each serving of this vintage perfect rainbow jello recipe for party delight is relatively low in calories, mainly coming from the sweetened condensed milk and sugar in the jello. A typical 1/12th slice contains approximately 150 calories, 3 grams of fat, and 30 grams of sugar.
Gelatin itself is a source of protein and has been linked to joint and skin benefits, though in small amounts here. Using real fruit pieces adds fiber and vitamins if you go that route. This treat is gluten-free and can be adapted for dairy-free diets as noted earlier.
From my own experience, it’s a fun way to satisfy a sweet craving without the heaviness of cakes or pies. It feels lighter but still special enough to make your party guests smile wide.
Conclusion
So, why try this vintage perfect rainbow jello recipe for party delight? Because it’s more than just a colorful dessert. It’s a charming nod to the past, a simple way to wow a crowd, and a fun project that rewards your patience with layers of fruity, creamy goodness. I love how it brings people together—whether kids marveling at the colors or adults reminiscing over the familiar jello jiggle.
Feel free to tweak the flavors, swap ingredients, or add your own twist. Honestly, this recipe is like a blank canvas with a splash of nostalgia and a dollop of fun. If you make it, please share your version in the comments—I’d love to hear how you put your spin on this classic party delight.
Now, grab those jello packets and get layering—you’re about to create something truly memorable!
Frequently Asked Questions (FAQs)
Can I use sugar-free jello packets for this recipe?
Yes, sugar-free jello works fine. Keep in mind the creamy layers might taste less sweet, so you might want to adjust by adding a touch of sweetener to the creamy mixture if needed.
How long does each layer need to chill before adding the next?
Generally, jello layers need about 30 minutes to firm up but remain slightly tacky. Creamy layers set a bit faster, around 25-30 minutes. This helps keep the layers distinct without mixing.
Can I prepare this recipe a day ahead?
Absolutely! In fact, chilling it overnight helps the layers set perfectly and lets the flavors meld. Just cover it tightly to prevent it from absorbing fridge odors.
What if my layers start to blend together?
This usually happens if the jello is too warm when poured or if you don’t chill each layer long enough. Let each layer cool completely and firm before adding the next, and pour creamy layers slowly over a spoon.
Is there a way to make this recipe vegan?
Traditional gelatin isn’t vegan, but you can try agar-agar as a substitute. The creamy layer will need a plant-based alternative like blended silken tofu or coconut cream, but texture might differ slightly.
Pin This Recipe!
Vintage Perfect Rainbow Jello Recipe Easy 5-Layer Party Delight
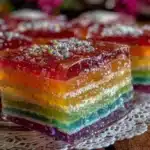
A nostalgic and colorful five-layer rainbow jello dessert with creamy layers, perfect for parties and gatherings. This vintage recipe combines vibrant jello flavors with a smooth, mousse-like creamy binder for a delightful treat.
- Prep Time: 30 minutes
- Cook Time: 3 hours (mostly chilling time)
- Total Time: 3 hours 30 minutes
- Yield: 12 servings 1x
- Category: Dessert
- Cuisine: American
Ingredients
- 5 packets of Jello flavors: cherry (red), orange, lemon (yellow), lime (green), blueberry or grape (purple)
- 5 cups boiling water (1 cup per jello packet)
- 2 1/2 cups cold water (1/2 cup per jello packet)
- 1 can (14 oz / 397g) sweetened condensed milk
- 1 1/2 cups (360 ml) cold milk (whole or 2%)
- 1 packet (about 2 1/2 tsp / 7g) unflavored gelatin
- 1 tsp vanilla extract
Instructions
- In five separate bowls, dissolve each jello packet in 1 cup (240 ml) boiling water. Stir until completely dissolved.
- Add 1/2 cup (120 ml) cold water to each bowl to cool the mixture. Set aside to cool to room temperature but not set (about 10-15 minutes).
- In a small bowl, sprinkle unflavored gelatin over 1/4 cup (60 ml) cold milk and let bloom for 5 minutes.
- Combine sweetened condensed milk, remaining 1 1/4 cups (300 ml) cold milk, and vanilla extract in a saucepan over low heat, stirring gently.
- Warm the condensed milk mixture until steaming but not boiling. Remove from heat and stir in bloomed gelatin until completely dissolved. Let cool to room temperature (about 15 minutes), whisking occasionally.
- Pour the first jello flavor evenly into a 9×13-inch glass baking dish. Refrigerate for about 30 minutes or until firm but slightly tacky.
- Gently pour or spoon a thin layer of the creamy mixture over the first jello layer. Return to fridge for 25-30 minutes until firm but not fully solid.
- Repeat alternating jello flavors and creamy layers: orange jello, creamy layer, lemon jello, creamy layer, lime jello, creamy layer, and finally purple jello on top. Chill each jello layer about 30 minutes and creamy layers about 25-30 minutes.
- After the last purple jello layer, refrigerate the entire dish for at least 2 hours, preferably overnight.
- To serve, run a warm knife around edges and cut into squares.
Notes
Patience is key to prevent layers from blending. Chill each layer until firm but slightly tacky before adding the next. Pour creamy layers slowly over the back of a spoon to keep layers neat. Wipe dish edges between layers to maintain clean layers. For dairy-free, substitute sweetened condensed milk with coconut condensed milk and use almond or oat milk. Avoid freezing as it affects texture.
Nutrition
- Serving Size: 1 slice (1/12th of t
- Calories: 150
- Sugar: 30
- Fat: 3
- Carbohydrates: 30
Keywords: rainbow jello, vintage jello recipe, layered jello, party dessert, colorful jello, creamy jello layers, easy jello recipe, 5-layer jello