Love this? Save it for later!
Share the inspiration with your friends
My brother-in-law Mark had refused to buy a garnish for his cocktails for years. “It’s a waste of money and time,” he’d say, waving off the fancy dried citrus wheels I’d bring to family gatherings. “The drink is the drink.” For three years, that was his position—solid, immovable, annoyingly smug. Then last December, I found him standing in my kitchen at 10 PM, elbow-deep in a bag of navel oranges, carefully slicing them into perfect quarter-inch rounds. He didn’t even look up when I walked in. “These are for my Old Fashioneds,” he mumbled, face red. “Don’t say a word.”
I didn’t say a word. I just handed him my mandoline and watched him spend the next hour learning what I’d figured out years ago—that these cozy oven-dried orange slices aren’t just pretty decorations. They’re little pockets of concentrated sunshine that transform a simple cup of tea or a basic cocktail into something that feels genuinely special. Honestly, I think the low heat does something magical to the fruit, caramelizing the natural sugars just enough to make them taste like candy without any added sugar.
The funny thing is, I stumbled onto this method by accident. I’d been trying to use up a bag of oranges that were about to turn, and my oven happened to be at its lowest setting from some earlier baking. I threw the slices in on a whim, forgot about them for two hours, and came back to the most incredible citrus aroma filling my whole apartment. Maybe you’ve been there—that moment when a kitchen accident turns into your new favorite thing. That’s exactly what happened here, and I keep making them because they make everything feel a little more intentional, a little more cozy.
Why You’ll Love This Recipe
Let me tell you why these cozy oven-dried orange slices have become my most-requested homemade gift and my secret weapon for lazy Sunday afternoons. I’ve tested this method more times than I can count, tweaking temperatures and timing until I got it just right.
- Simple Ingredients: You need exactly one ingredient—oranges. That’s it. No special syrups, no fancy equipment, no grocery store runs for obscure items.
- Quick & Easy: While the drying takes a few hours, the active prep time is under 10 minutes. Slice, arrange, and let your oven do the work while you go about your day.
- Perfect for Gifting: These make stunning homemade presents. Pop them in a mason jar with a ribbon, and you’ve got a gift that looks like you spent way more effort than you actually did.
- Crowd-Pleaser: I’ve brought these to holiday parties and watched people pick them off cocktail glasses to eat them plain. They’re that good.
- Unbelievably Versatile: Use them in cocktails, tea, baked goods, or just as a pretty kitchen decoration. They last for months when stored properly.
What makes this version different from other dried citrus tutorials you’ll find online? It’s the temperature. Most recipes tell you to dry at 200°F or higher, which can scorch the edges and leave the centers chewy instead of crisp. I’ve found that 170°F is the sweet spot—low enough to preserve that beautiful vibrant color, slow enough to dry them all the way through without any burnt bits. This isn’t just another dried orange slice recipe; it’s the one that actually works every single time, giving you those gorgeous, translucent wheels that look like stained glass when held up to the light.
This recipe is the kind that makes you feel like you’ve discovered a secret. It’s comfort in visual form—warm, golden, and just a little bit nostalgic. Perfect for those cold evenings when you want your tea to feel like a hug in a mug.
What Ingredients You Will Need
This recipe uses the simplest ingredient list imaginable, but the quality of that single ingredient matters more than you’d think. Here’s what you’ll need and why each choice makes a difference.
- Fresh oranges (3-4 medium): The star of the show. Look for firm, heavy oranges with smooth skin—those tend to be juicier and more flavorful. Navel oranges are my go-to for their sweetness and consistent shape, but blood oranges create stunning deep red slices, and cara cara oranges give a lovely pinkish hue. Avoid oranges with thin or blemished skin, as they can dry unevenly. I personally prefer organic oranges since you’re eating the peel, and the flavor really does come through brighter.
- Optional: Cinnamon sticks (2-3, broken into pieces): If you want to infuse your slices with a warm, cozy aroma, place a few cinnamon stick pieces on the baking sheet alongside the oranges. The gentle heat releases their oils, and the slices pick up the faintest hint of spice. This is completely optional but highly recommended if you’re planning to use these in tea.
- Optional: Whole cloves (1 tablespoon): Scatter these on the baking sheet for a subtle clove fragrance that pairs beautifully with winter cocktails and spiced teas. Again, totally optional, but it adds that “something special” factor.
- Optional: Star anise (2-3 pods): For an even more aromatic experience, add star anise to the baking sheet. The licorice-like scent mingles with the citrus in the most unexpected and delightful way.
That’s genuinely it. No sugar, no preservatives, no complicated syrups. The oranges do all the work themselves. If you’re feeling adventurous, you can experiment with other citrus fruits too—lemons, limes, and grapefruits all dry beautifully using this same method. Just note that thinner-skinned fruits like lemons will dry faster, so check them at the two-hour mark.
For the best results, choose oranges that are all roughly the same size. This ensures even drying since uniform slices will finish at the same time. I learned this the hard way after pulling out a tray of half-burnt, half-chewy slices my first time. Trust me on this one.
Equipment Needed
You don’t need much to make these cozy oven-dried orange slices, but having the right tools makes the process smoother and more enjoyable. Here’s what I use and what you can substitute if needed.
- Sharp knife or mandoline slicer: A sharp chef’s knife works perfectly, but a mandoline gives you those uniform slices that look so professional. I use my inexpensive plastic mandoline from the grocery store—it’s nothing fancy, but it gets the job done. Just watch your fingers; those blades are no joke.
- Cutting board: Any stable cutting board will do. I prefer a wooden one because it doesn’t dull my knife as quickly.
- Baking sheets (2-3): You’ll need enough surface area to arrange your slices in a single layer without overlapping. I use my standard half-sheet pans.
- Parchment paper or silicone baking mats: This is non-negotiable. The slices will stick to bare metal, and parchment paper makes cleanup so much easier. Silicone mats work beautifully too and are reusable.
- Paper towels: For patting the slices dry after slicing. This step removes excess moisture and speeds up the drying process.
- Airtight container or mason jar: For storing your finished slices. A glass jar with a tight-fitting lid keeps them crisp for months.
If you don’t have a mandoline, don’t worry. A steady hand and a sharp knife will give you perfectly good slices. The key is consistency, not perfection. And if you’re on a budget, skip the fancy equipment—your regular baking sheets and some parchment paper are all you truly need.
Preparation Method
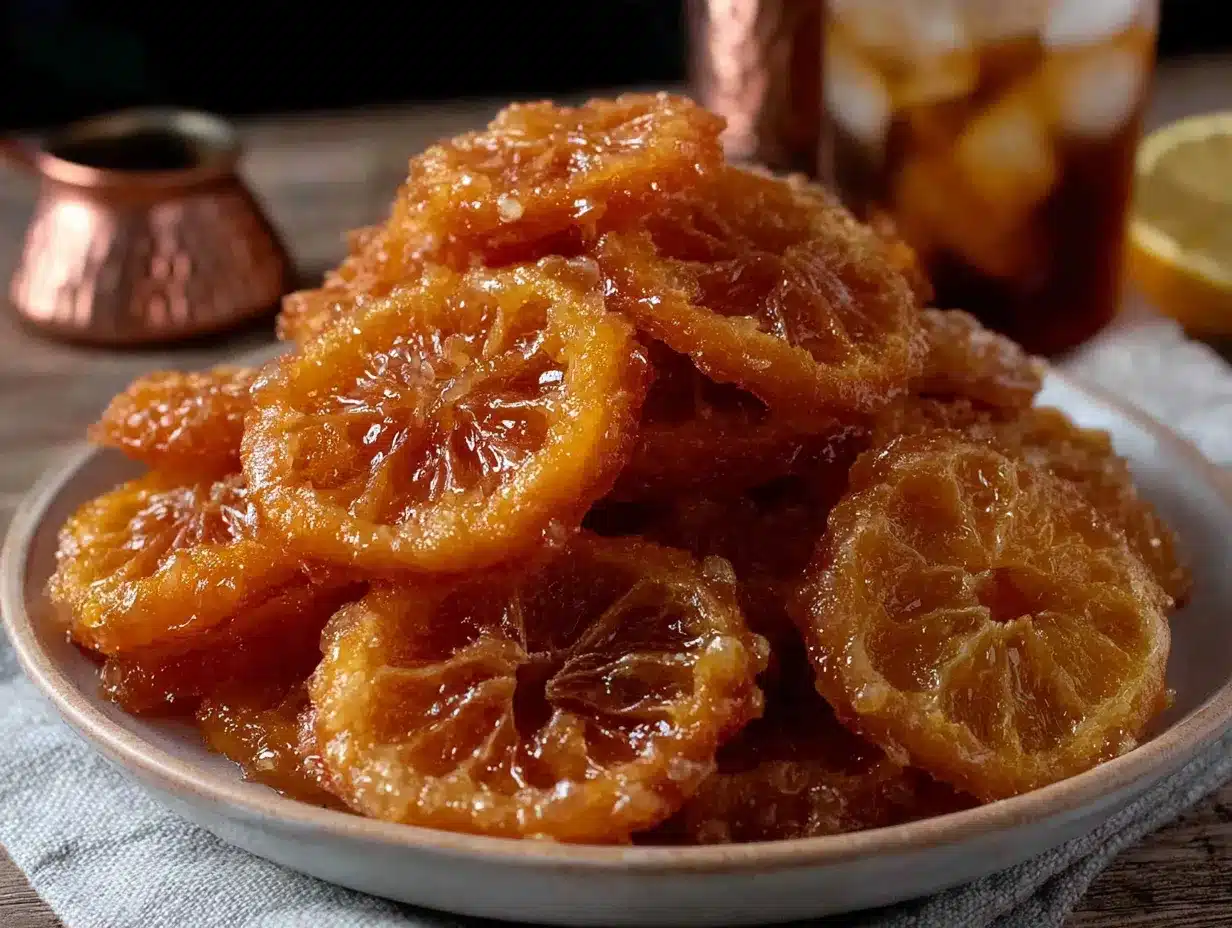
Let me walk you through the process step by step. I’ve made these slices dozens of times, and this method gives me consistent, gorgeous results every single time.
- Preheat your oven to 170°F (77°C). This is the lowest temperature most ovens can maintain. If your oven doesn’t go that low, set it to the lowest possible temperature (usually around 200°F) and prop the door open slightly with a wooden spoon handle to keep the temperature down. I’ve done this many times, and it works fine—just keep an eye on things.
- Wash and dry your oranges thoroughly. Even if they’re organic, give them a good scrub under warm water to remove any wax or residue. Pat them completely dry with a clean towel.
- Slice the oranges into even rounds, about 1/4 inch (6 mm) thick. Consistency is more important than perfection here. Slices that are too thin will burn; slices that are too thick won’t dry all the way through. I aim for slices that are just thick enough to hold their shape without flopping over. If you’re using a knife, try to keep a steady rhythm. If you’re using a mandoline, set it to the 1/4-inch setting and go slow.
- Blot the slices with paper towels. Place the slices in a single layer on a stack of paper towels, then gently press another paper towel on top to absorb surface moisture. This step cuts down drying time by at least 30 minutes and prevents that sticky, tacky texture that can happen when slices aren’t dried properly.
- Arrange the slices on parchment-lined baking sheets in a single layer. Make sure none of the slices are touching or overlapping—they need air circulation to dry evenly. If they’re crowded, they’ll steam instead of dry, and you’ll end up with limp, sad slices. Trust me, I’ve been there.
- Place the baking sheets in the oven and let them dry for 3 to 4 hours. The exact time depends on the thickness of your slices, the humidity in your kitchen, and your particular oven. Start checking at the 2.5-hour mark. The slices are done when they feel dry to the touch, slightly leathery but not brittle, and they’ve lost most of their moisture. They should bend slightly without cracking.
- Flip the slices halfway through. About 90 minutes in, use a spatula to flip each slice over. This ensures even drying on both sides. I’ve forgotten to do this before, and the bottom side ends up darker and slightly chewy while the top is perfect.
- Let the slices cool completely on the baking sheets. They’ll continue to crisp up as they cool, so don’t panic if they feel a little soft when you first pull them out. Once they’re at room temperature, they should be firm and snap slightly when bent.
- Store in an airtight container at room temperature. They’ll keep for up to 6 months if stored properly, though I’ve never had a batch last that long because we use them up too quickly.
A quick note on timing: I usually make these on a lazy Sunday afternoon when I’m home anyway. I pop them in the oven, set a timer, and go about my day—reading, cleaning, napping on the couch. The low temperature means there’s almost no risk of burning, so you don’t need to hover over the oven.
Cooking Tips & Techniques
After making these cozy oven-dried orange slices more times than I can count, I’ve collected a few tips that make the process smoother and the results better. Some of these I learned the hard way—like the time I forgot about a batch and ended up with orange-scented charcoal.
Don’t skip the blotting step. I know it seems fussy, but removing that surface moisture before drying cuts the total time by almost an hour. Plus, it prevents the slices from developing that tacky, sticky surface that can happen when the natural sugars concentrate too much. Just a gentle press with a paper towel is all it takes.
Rotate your baking sheets halfway through. Every oven has hot spots, and rotating the sheets front to back and top to bottom (if you’re using multiple racks) ensures even drying. I learned this after noticing that the slices on the back left corner of my oven always finished 20 minutes before the rest.
Test for doneness by feel, not time. Ovens vary wildly, and humidity levels change with the weather. Instead of relying on a timer, start checking your slices at the 2.5-hour mark. They should feel dry and leathery, with no visible moisture when you press them. If they still feel tacky or soft, give them another 30 minutes and check again.
Use a cooling rack if you have one. Placing a wire cooling rack on top of your baking sheet and arranging the slices on the rack allows hot air to circulate all around each slice. This speeds up drying time and gives you more even results. I do this when I’m in a hurry, and it shaves off about 45 minutes.
Don’t over-dry them. The goal is leathery, not crunchy. Over-dried slices become brittle and break easily, which is fine if you’re grinding them into powder but frustrating if you want pretty wheels for your cocktails. Pull them out when they still have a slight give.
One thing I messed up early on was trying to dry too many slices at once. I crammed four oranges’ worth onto a single sheet, and they all came out uneven—some were perfect, some were still wet, and a few were burnt on the edges. Give them space. It’s worth using multiple sheets or doing smaller batches.
Variations & Adaptations
One of the best things about this recipe is how easily it adapts to different tastes and occasions. Here are some variations I’ve tried and loved.
Spiced Orange Slices: Before placing the slices in the oven, lightly brush them with a mixture of honey and warm water (about 1 tablespoon honey to 2 tablespoons water), then sprinkle with cinnamon and a tiny pinch of cayenne. The honey helps them caramelize beautifully, and the cayenne adds a subtle warmth that’s incredible in mulled wine or hot cider. I made these for a holiday party last year, and they disappeared within an hour.
Blood Orange and Grapefruit Medley: Mix up your citrus! Blood oranges create stunning deep red slices that look almost jewel-like, and grapefruit slices add a lovely pink hue and slightly bitter edge that balances sweet cocktails perfectly. Just note that grapefruit slices are larger and may need an extra 30 minutes of drying time.
Herb-Infused Slices: Lay fresh rosemary sprigs or thyme branches on the baking sheet alongside your orange slices. The herbs release their oils as they warm, infusing the citrus with a subtle savory note that’s incredible in gin cocktails or herbal teas. I tried this on a whim one afternoon, and now it’s my go-to for summer entertaining.
Dairy-Free and Gluten-Free: This recipe is naturally free of both, so no adaptations needed. It’s also vegan, paleo-friendly, and Whole30-compliant. Basically, everyone can enjoy these.
Dehydrator Method: If you own a food dehydrator, you can use it instead of the oven. Set it to 135°F (57°C) and dry for 6 to 8 hours, flipping halfway through. The results are even more consistent than the oven method, and you can dry larger batches at once.
Sweetened Slices: For a treat that’s more like candy, dip the fresh slices in a simple syrup (equal parts sugar and water, heated until dissolved) before drying. Let the excess drip off, then proceed with the drying process. These are dangerously good and perfect for garnishing dessert cocktails or hot chocolate.
Serving & Storage Suggestions
These cozy oven-dried orange slices are incredibly versatile, and I love finding new ways to use them. Here are my favorite serving ideas and storage tips.
In Cocktails: Drop a slice into an Old Fashioned, a Negroni, or a Whiskey Sour. It adds a pop of color and a subtle citrus aroma that elevates the whole drinking experience. For a non-alcoholic option, float a slice in sparkling water with a sprig of mint—it’s my go-to afternoon refreshment.
In Tea: Place a slice in your mug before pouring hot tea over it. The heat rehydrates the orange slightly, releasing its essential oils into the tea. It’s especially lovely with black tea, chai, or herbal blends. I keep a jar of these on my counter specifically for this purpose.
As Edible Decor: String the slices on twine with cinnamon sticks and star anise to create a beautiful garland for your kitchen. Or tuck them into gift bags for a homemade touch that looks way more expensive than it is.
In Baked Goods: Chop the dried slices and fold them into scone or muffin batter for a burst of citrus flavor. You can also grind them into a powder using a spice grinder and use it to flavor frostings, shortbread cookies, or even rubs for meat.
Storage: Once completely cooled, store the slices in an airtight container at room temperature. A mason jar with a tight-fitting lid works perfectly. Keep them away from direct sunlight and moisture. Properly stored, they’ll last 4 to 6 months. I’ve kept batches for almost a year, though they do lose some vibrancy over time.
Rehydrating: If your slices have been stored for a while and seem a bit too brittle, you can revive them by placing them in a sealed container with a slightly damp paper towel overnight. They’ll soften just enough to be pliable again.
One thing I love about these slices is that their flavor actually deepens over the first week or two of storage. The essential oils continue to concentrate, and the slices develop a more intense, caramelized citrus flavor. So don’t be afraid to make them ahead of time.
Nutritional Information & Benefits
While these cozy oven-dried orange slices are more of a garnish than a main food source, they do offer some nutritional perks worth mentioning.
| Nutrient | Per Slice (approx.) |
|---|---|
| Calories | 12-15 |
| Carbohydrates | 3-4g |
| Sugar | 2-3g |
| Fiber | 0.5g |
| Vitamin C | 4-6% DV |
Oranges are naturally rich in vitamin C, which supports immune function and skin health. The drying process concentrates these nutrients, so even a small slice packs a decent antioxidant punch. The peel contains flavonoids and limonene, compounds that have been studied for their anti-inflammatory properties.
These slices are naturally free of gluten, dairy, nuts, soy, and added sugar, making them suitable for most dietary restrictions. The only potential allergen is citrus itself, which is rare but worth noting.
From a wellness perspective, I love that these slices make it easier to drink more water or tea throughout the day. Floating one in my water glass encourages me to stay hydrated, and the subtle flavor makes plain water feel like a treat. It’s a small habit that adds up over time.
Conclusion
These cozy oven-dried orange slices have become a staple in my kitchen, and I honestly can’t imagine going back to store-bought dried citrus. There’s something deeply satisfying about pulling a jar of these golden wheels off the shelf and dropping one into a hot cup of tea on a cold afternoon. They make ordinary moments feel a little more special, a little more intentional.
I hope you give this recipe a try, and I hope you make it your own. Experiment with different citrus fruits, play with the spices, find your favorite way to use them. That’s the beauty of a recipe this simple—it leaves plenty of room for your own creativity.
If you make these, I’d love to hear about it. Drop a comment below and tell me how you used them, what citrus you chose, or if you discovered a new favorite variation. And if you snap a photo, tag me—I always love seeing your creations. Until then, happy drying, and may your tea always be perfectly garnished.
Frequently Asked Questions
Can I use a microwave or air fryer to dry orange slices?
Yes, but the results are different. An air fryer works well at 150°F for 2-3 hours, though you’ll need to check frequently to prevent burning. A microwave isn’t ideal because it cooks rather than dries, leaving the slices chewy instead of crisp.
Why are my dried orange slices still sticky after drying?
This usually means they weren’t dried long enough, or the slices were too thick. The natural sugars in oranges can create a tacky surface if moisture remains. Pop them back in the oven for another 30 minutes and check again.
How do I prevent the edges from burning?
Keep your oven temperature low (170°F is ideal) and check the slices frequently. If you notice the edges darkening too quickly, cover them loosely with a piece of parchment paper or rotate the baking sheet.
Can I use these slices in baking?
Absolutely! Chop them finely and fold into muffin batter, scone dough, or shortbread cookies. You can also grind them into a powder using a spice grinder and use it to flavor frostings or rubs.
How long do these slices really last?
Stored properly in an airtight container away from light and moisture, they’ll last 4 to 6 months. I’ve kept batches for almost a year, though the color and flavor do fade slightly over time.
Pin This Recipe!

Cozy Oven-Dried Orange Slices for Perfect Cocktails

Transform simple oranges into beautiful, caramelized dried slices that elevate cocktails, teas, and baked goods. This low-temperature method preserves vibrant color and creates crisp, candy-like garnishes without added sugar.
- Prep Time: 10 minutes
- Cook Time: 3 hours 30 minutes
- Total Time: 3 hours 40 minutes
- Yield: 24 slices 1x
- Category: Garnish
- Cuisine: American
Ingredients
- 3–4 medium fresh oranges (preferably organic navel, blood, or cara cara)
- Optional: 2-3 cinnamon sticks, broken into pieces
- Optional: 1 tablespoon whole cloves
- Optional: 2-3 star anise pods
Instructions
- Preheat your oven to 170°F (77°C). If your oven doesn’t go that low, set it to the lowest possible temperature (around 200°F) and prop the door open slightly with a wooden spoon handle.
- Wash and dry your oranges thoroughly. Pat them completely dry with a clean towel.
- Slice the oranges into even rounds, about 1/4 inch (6 mm) thick.
- Blot the slices with paper towels to remove surface moisture.
- Arrange the slices on parchment-lined baking sheets in a single layer, ensuring none are touching or overlapping.
- Place the baking sheets in the oven and let them dry for 3 to 4 hours. Start checking at the 2.5-hour mark. The slices are done when they feel dry to the touch, slightly leathery but not brittle.
- Flip the slices halfway through (about 90 minutes in) using a spatula.
- Let the slices cool completely on the baking sheets. They will continue to crisp up as they cool.
- Store in an airtight container at room temperature for up to 6 months.
Notes
For even drying, choose oranges of similar size. If using a dehydrator, set to 135°F (57°C) and dry for 6-8 hours. To prevent burning, keep oven temperature low and check frequently. Over-dried slices become brittle; aim for leathery texture. Flavor deepens over the first week of storage.
Nutrition
- Serving Size: 1 slice
- Calories: 1215
- Sugar: 23
- Carbohydrates: 34
- Fiber: 0.5
Keywords: dried orange slices, oven-dried oranges, citrus garnish, cocktail garnish, homemade gift, edible decor, tea garnish